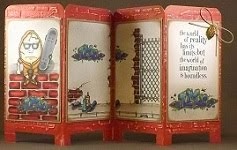
I've been having a blast decorating my Clearsnap Color Catcher. It's designed to be used with Smooch Spritz and other splatter spray products and I know it'll help me to be "greener" when using my Copic airbrush system too. I'll have less paper trash from protecting work areas and won't need paper towels for cleaning up. The Color Catcher is a cardboard spray booth that protects your project work area from over spray. There's no need for clean up. Yay!
I've decorated my urban graffiti color catcher as inspired by Diana Kovacs of HamptonArt (find a great you-tube "how to" here). I love that I could use acrylic paint, stamps, ink and cut-n-dry foam that I already had in my papercrafting stash too! Yay! The more spritz, spray and splotches, the more authentic it will look. When I'm not spritzing or spraying, then it can hold other stuff. It's all good.
I used Design Master Primer spray paint over the entire cardboard for my gray base coat.
I cut a 1" x 2 1/2" rectangle of Inkssentials cut-n-dry foam. (If I were going to make another, I'd cut a slightly smaller rectangle. Once the paint spread out, the brick was a little larger than the foam piece.) I cut another 1" x 1" foam piece to fill in the spots where a smaller brick was needed. I poured some Adirondack dabber paint (red pepper, cranberry, mushroom and espresso) onto a foam plate and began stamping my bricks on the outside walls first. After completing the outside, I moved to the inside walls of the booth. Every step of the way, my brick walls looked cooler. Adding each brick was fun!
Acrylic paint dries so quickly that I was ready to move on to the dripping splotches in no time. I diluted snow cap paint with water then just poured it directly onto the wall. I spread the paint around a bit with a sponge brush then just let it drip. While that was drying, I rinsed and reused the smaller square foam piece and added hopscotch squares to the floor. A few quick dabs of pebble paint with a sea sponge added some neat dirty-looking speckles to my floor and walls.
I pulled out some stamps from long, long ago and some newer ones too. (My oldest son once asked: "How many stamps does one person need? LOL!!! To that I must quote Buzz Lightyear: "To Infinity and Beyond!" LOL!!!) I tried Colorbox Chalk ink, as suggested in the video. I found the color to be too faint and I'd rather have a bolder, more vivid image, especially since I know that it'll eventually be covered by spritz. I turned to my archival black ink for clearer images. Overall, I think the variation in the softness and clarity of the images adds to the authentic urban graffiti look.
I stamped the clock face onto plain grungeboard then hand cut the circle. I stamped the other side of the grungeboard circle too, just in case part of it shows from the back. I inked both clock sides with Peeled Paint Distress Ink then pierced a hole in the center. I attached the time piece and game spinner with a brad, through the clock face and back wall of the color catcher.
I was having so much fun that I felt like painting and splattering some more . . . but, for now, enough is enough. I'm happy that my urban graffiti color catcher turned out to be such a neat looking and very cool tool that I can use with my Copic airbrush system too.
How will you decorate your Color Catcher?
Subscribe to:
Post Comments (Atom)


2 comments:
Not sure, but yours looks great Rose!! Can't wait for mine to come in now, Sue said Chris was ordering them.
I think I may do mine different, not sure what yet, have to think on it!!
Enjoyed class on Friday, thanks much!! Oh well have a good rest of the weekend.
Looking forward to your next post.
Donna
this is so brilliant, all of your stuff is, I can't get over what you can do with copic markers AMAZING x
Post a Comment