Why Rosie's Book?

While growing up, I had a dear friend, Renee, that lived next door and with whom I spent much of my childhood. We grew, in different directions, and went on our merry way. Many years later, I ran into her parents and they kindly reminded me of the laughs they still have over my book. “What book?” I wondered with a puzzled look. "I don't remember a book." Hardy laughter accompanied their response. At some time during our childhood, I tried to convince Renee about something that her parents didn’t agree with. I told her that proof of its truth could be found “in my book.” Naturally she went home and tried to convince her parents of the same thing but they weren’t falling for it. She needed an edge and told them emphatically, “It’s in Rosie’s book!” After they caught their breaths from reborn laughter, they let me know how “Rosie’s book” has been cited for many other things throughout the years. They’ve also mentioned that they’d like to see “Rosie’s book” one day. I can’t remember all of the things that I said were in “my book” but I’m sure my dear friend’s parents can recall much more than I ever knew about – LOL!!! So, here it is . . . my version of things you might find In Rosie’s Book . . .

Showing posts with label Tools. Show all posts

Sunday, October 20, 2013

MiC and LMM Freebie Challenge - Graffiti Party

Make It Crafty and Little Miss Muffet Stamps are hosting a Graffiti Party and provided this amazing free MiC and LMM artwork to those who want to participate.

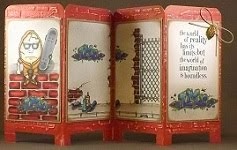
I was so inspired by Lynne K's screen card (here), that I decided to use these fun Little Miss Muffet and Make It Crafty Graffiti Party images on my own screen card:


This was my first attempt at making a screen card.  DCWV white core cardstock allowed for a bit of detail to show when sanded.  Zutter's 1/2" Round-it-All corner rounder softened my tops.  The base of the large tag from a Sizzix Traditional Combo Tags die cut through all four panels to square off the bottoms.  I lost a leg or two while running the panels through the die cut machine to emboss with Sizzix Tim Holtz Alterations Bricked Texture Fade then lightly sanded the raised bricks.  A golden leaf charm hangs from a jump ring on a hemp bow. A Sakura Gelly Roll medium white pen adds some sharp highlights to my eyeglasses and graffiti letters.  A Stampers Anonymous Tim Holtz Collection Stuff to Say sentiment fits nicely on the last panel.

Other than my loss of legs, I like the embossed look of the background.  I need to work on reinforcing and strengthening the legs to be able to hold the weight of my images and heavier embellishments on future screen cards.  They do make nice displays for scenery.


Individual panels . . .


Humpty Dumpty in Da Hood


Part1 of MiC's Urban Scene


Part2 of MiC's Urban Scene


LMM Graffiti word

You've got to pop over to the Make It Crafty and Little Miss Muffet Stamps Graffiti Party blog and see the amazing artwork using the MiC and LMM images entered there!


I'm adding this screen card to the following challenges:
Craft Your Passion "Embossing" (here)
Creative Craft "Anything Goes and Blogaversary" (here)

Copics used:
brick wall - E71, R46, R59, E79, R20
gate, eyeglass lenses - C1, C3, C5
egg - E41, E43, 0
tires, eyeglass frames - T0, T6, T9
hoodie outfit, sneakers - E57, E51
sidewalk, curb, between bricks - W3, W1
top of wall - C3, C1
graffiti and paint cans - FV2, FB2, FBG2, FYR1, FYG2, V22, B23, BG23, Y23, C6
airbrushed cement wall - W3
airbrushed speckles - N6


http://graffitiparty.blogspot.com.au/2013/11/graffiti-party-winners.html

Many thanks to Zoe and Barbara . . . I won the Graffiti Collection from LMMS & the Urban Characters from MiC!   These extremely talented artists liked my screen card for use of their images and THAT means alot to me!!!
 
 
As always, I'm so glad that you stopped by to visit!

~ Rose

Monday, January 21, 2013

Card Art with Copics: Rick St Dennis Corazon

I find Rick St Dennis' digital image named Corazon a bit intriguing and so I've used her again to display on a round side step card.

Here's a closer view of my Copic-filled image . . . It's unfortunate that the amazing sparkle of the Copic atyou Spica Pink over the hearts and trimming doesn't show in this photo.  In real life, it truly does make you say "Wow!"


I've die cut and matted my image using Lifestyle Crafts Large Ovals.

My EK Success Round Curvy Cutter provided the perfect size 6" card base of Bazzill Gray and a 5 1/2" pattern of Kaiser Craft's Love Notes Collection Love Song.  A Memory Box Heart Chain Border lies at the base of my card.  Part of a Cheery Lynn Designs Heartland America Large die and Sizzlits Funky Heart #1 and #2 set behind my Target Seasonal Printed Ribbon bow.  A Prima Gillian Raspberry Flower and Petaloo Dazzlers glitter flowers add a bit of bling to my hearts cluster.  Prima's Say It In Crystals and Zva Creative rhinestone swirls add a bit of movement throughout.


You can find my previous post showing Corazon on a more vintage-looking twisted easel card here.

 
I'm entering this round side step card into the following challenges:
Sparkle and Glitter with Rick St Dennis "Anything But A Square" (here)
Digital Tuesday "Flower Power" (here)
Sweet Stamps "Anything Goes" (here)
Creative Inspirations "One for the Girls" (here)
Divas by Designs "Make it Girlie" (here)
Cute Card Thursday "Diamonds are Forever" (here)
Craft Us Crazy "Celebrate Love or Color Red" (here)
Stampin' for the Weekend "Something Girly" (here)
All Sorts "Flower Power" (here)
Sweet Stampin' "Frillies" (here)


Copics used:
skin - E000, E01, E11, E93, BV00
hair - E31, C35, E47
gown, hat, feathers, shoe - C1, C3, C5, atyou Spica Pink
grounding shadow - W5, W3, W1, 0
airbrushed background - RV11, RV19


As always, I'm so glad that you stopped by to visit!

~ Rose

Wednesday, January 2, 2013

Crafts and Me Stamps Challenge: Winter Wonderland, Part 2

The Dynamite Digi design team is thrilled to continue the Rockin' Rubbah design team's Winter Wonderland Bumper Challenge over at the Crafts and Me Stamps' challenge blog.  There's a magnificent selection of prizes offered by several of the wonderful sponsors who support Crafts and Me Stamps. You can find out more about this challenge and their fantastic sponsors here.

When you want to convey the mood of a rich, bold and lavish eclectic style, Art Deco images are the perfect match. The images usually contain formal wear and show what appears to be the very best in taste and style no matter the variety of sources.

I've enjoyed using my Copic colors to softly fill one of the recently released Art Deco images for Crafts and Me Stamps named Beatrice.  I added Distress Stickles in Vintage Photo over her coat and in Picket Fence over the furry trim for some beautiful sparkling texture.  Here's a close up view of my image showing the perfectly matching sentiment from Crafts and Me Stamps' Art Deco wording.


I cut and embossed a Spellbinders Scalloped Oval to mat the cut and embossed small classic oval that frames Beatrice, then adhered her to the top of my die cut match box.  Sizzix makes several great project dies for use with their Big Shot Pro machine.  Their Match Box die cuts two parts:  the outside wrap and the inside slider.  I quickly ran a piece of Bazzill pink cardstock through the die cut system and within minutes my match box base was ready for embellishing.  A bit of Anna Griffin Animal Print in pink zebra stripes surrounds my match box wrap and lies at the bed of the inside slider.  Here's a view of how my match box slides open:


This finished Sizzix Big Shot Pro Match Box is 3 5/8" x 5 1/4" x 1 1/8". The insert slides out easily making it a nice container for including small gift items.

A bit of cotton lace and Tim Holtz idea-ology Lavish Trimmings rose ribbon borders the bottom of my match box.  A cut and embossed Spellbinders Medallion Four adds a delicate touch to the top left while Punch Bunch small and large Alta Flakes and small Carla Flakes accented with Bazzill Basics jewels fall gently around my image.

Here's a view of my completed gift project using the Sizzix Big Shot Pro Match Box die to showcase my Crafts and Me Stamps Art Deco Beatrice image and Art Deco wording:


You've just got to hop over to the Crafts and Me Stamps Challenge blog to see how the amazingly talented Dynamite Digi girls have shown their fabulous Winter Wonderland projects while using Crafts and Me Stamps digital images.


I'm entering this gift project into the following challenges:
Charisma Cardz "Anything Goes" (here)
Cute Card Thursday "Anything Goes" (here)
Paper Play "Out with the Old, In with the New" (here)
PaperCrafting Journey "Anything Goes" (here)
Sparkle & Glitter with Rick St Dennis "Last Minute Shopping" (here)
Papertake Weekly "Anything Goes" (here)
Divas by Design "Anything Goes" (here)
Creative Crafts "Non-Traditional Christmas" (here)
Simon Says Stamp! "New Something" (here)
ABC Challenge "E for Embossing" (here)


Copics used:
skin - E000, E01
gown - R81, R83, R85
outline shadow - W1, 0

As always, I'm so glad that you stopped by to visit!

~ Rose

Wednesday, October 24, 2012

Paper Mache Pumpkin Treat Holder

Paper Mache is a fun (and wonderfully messy!) way to transform newspaper strips into a dimensional object by pasting them to a mold to take its form.  I've used a large leftover party balloon to shape my newspaper strips into a dimensional oval to create my pumpkin.


The recipe for my paste is 1 cup flour, 1 cup water and 1 tablespoon of salt.  I wet both sides of each paper strip with my paste before adhering it to my balloon's surface then used a sponge brush to flatten the strip well.  After applying four layers of pasted newspaper, I began to clump layered strips on the top to form my pumpkin's short stem.

I've let the newspaper dry over the inflated balloon for four days before using a knife to cut off my lid.

I added folded newspaper strips around the opening of my pumpkin and the rim of the lid to smooth the edges then let it sit to dry another two days.  I planned to add paint and certainly don't want any mold to form in my project because of moisture left in my paper mache.

I began to paint layers of Lumiere metallic bronze and Ranger's flat orange acrylic paint to the outside and allowed more drying time.  The inside is also painted.

I used black Stickles to add hand-drawn eyes, a nose and mouth.  This pic seems to capture some of the amazing sparkle and texture that the Stickles glitter glue adds.


Now this fun, handmade jack-o-lantern holds some of the Halloween goodies that we'll hand out to our trick-or-treaters.

The swirly paper ivy adhered to the base and lid is a digital image cut from my QuicKutz Silhouette electronic cutter.  I love that I can resize the ivy image to meet my needs.  I've spritzed the paper vine with glimmer mist for shimmer.


* * * * *

I'm entering this project into the following challenges:
Cute Card Thursday "Got Glitter!" (here)
All Sorts "Autumn Colors" (here)
Dream Valley "Halloween" (here)
Crafty Sentiments "Recycle It" (here)
Simon Says Stamp! "Autumn Leaves" (here)
Creative Inspirations "Happy Halloween!" (here)
Divas by Design "Use Some Orange" (here)


I'm so glad that you stopped by to visit!

~ Rose

Thursday, October 18, 2012

Sizzix Big Shot Pro Carry All Box for Halloween Treats

This sweet little fairy is thrilled to show off her favorite pumpkin from the patch.  She is a digital image, named Pumpkin Fairy Ellora, designed by Elisabeth Bell.  You can get your own Pumpkin Fairy Ellora at Elisabeth Bell's Digital Gallery here.

This photo shows my Copic-filled image.


I used my Sizzix Big Shot Pro Carry All Box to die cut orange Bazzill paper to create my box.  A strip of deep brown cardstock layered beneath a strip of Moxxie Bump In The Night Dem Bones striped paper surrounds my box.  Black Fun Fir is tied around the handle for my only embellishment.

This photo shows a side view of my simple Halloween treat box, displaying Elisabeth Bell's Pumpkin Fairy Ellora digital image . . .


You can find Pumpkin Fairy Ellora and more of Elisabeth's amazing digital images by visiting the Elisabeth Bell Digital Collection at her gallery here.

Looking for fabulous inspiration using Elisabeth Bell images?  You'll find it at the Digi Bells Design Team Blog here.


I'm entering this treat box into the following challenges:
Charisma Cardz "Clean and Simple" (here)
Craft Us Crazy "Children and/or Fall" (here)
All Sorts "Too Cute to Spook!" (here)
Crazy 4 Challenges "Sweet Treat (Halloween)" (here)
Dream Valley "Halloween" (here)
Hooked on Crafts "Halloween" (here)
Creative Card Crew "Birds" (here)


Copics used:
skin - E000, E01, E11, E93, BV00
hair, shoes, dog, stem - E31, E35, E47
pumpkin, scarf, stars, bow - YR20, YR07, YR09
wings, petals, ribbon - BG90, BG93, BG99
wings, slip - B91, B95, B97
airbrushed background - W3, W00, Y21, B91, B95


I'm so glad that you stopped by to visit!

~ Rose

Monday, July 2, 2012

Card Art with Copics: Crafts and Me Stamps Sea Star by Jasmine Becket-Griffith

It seems to me that this lovely fairy is ready to reward a loving Christmas star as she shares warm words with someone special. Her name is Sea Star and she has been designed by Jasmine Becket-Griffith exclusively for Crafts and Me Stamps.  Sea Star is available as a rubberstamp (here).  Perhaps Sea Star wasn't intended to be used on a Christmas/Winter card but it's the first thing I thought of when seeing this sweet image.

I've used a Lifestyle Crafts/Quickutz circle die to shape my fairy.  Here's a closer view of my Copic-filled image . . . 


I've used daisy punches in various sizes in my attempts to create handmade paperwhites (Christmas flowers) to scatter around my image.  I've used yellow Stickles as the flower centers and lightly painted Diamond Stickles over the petals and leaves for pretty sparkle.


I've layered Bazzill cardstock with TPC Studio Winter Whites Let It Snow and Winter Wonderland patterned paper.   My Purple Cow Deckle Edge rotary trimmer blade makes it easy to add a torn paper look to my paper layers.  I'm thrilled with the addition of a Marianne Design Creatables Icicle die cut for a top a border.  Snowflake shaped brads accent each side of my image.  The loving sentiment is from a Close To My Heart Pair-a-Phrase set.  A May Arts 5/8" fuzzy ribbon bow provides a soft accent.

Here's a view of my completed card front showing Jasmine Becket-Griffith's Sea Star image used on a Christmas card for someone special . . .


I'm entering this card into the following challenges:
Dream Valley "Things With Wings" (here)
Ooh La La "Mystical Magic" (here)
Crafty Creations "Embellish It!" (here) - die cut, ribbon, brads, flowers
Creative Inspirations "Anything Goes" (here)
Charisma Cardz "Anything Goes" (here)
All Sorts "In Bloom" (here)
Sparkle Creations Christmas "Monochromatic" (here)
Hooked on Crafts "Christmas in July" (here)
Winter Wonderland "Monochromatic" (here)
Secret Crafter "Christmas" (here)


Copics used:
skin - E000, E01, E11, E93
hair - C1, C3, C5 then painted with Opaque White
dress, wings - B21, B23, B26
star - Y11, Y23, Y26
airbrushed background - C1, C5


"Top 3" July 8, 2012 Winter Wonderland


I'm so glad that you stopped by to visit!

~ Rose

Friday, June 22, 2012

Elisabeth Bell's Apple Bake Digi Bells' Blog Hop

To celebrate the newest addition to Elisabeth Bell's Digital Gallery (here), the Digi Bells Design Team is hosting a blog hop.

How can you win your own Apple Bake digi image?  You'll have to hop through and leave comments on EACH blog.  [You can find the full list of 11 other blogs at the Digi Bells Design Team blog (here).]  Lynda will pick 3 blogs at random and the winners will be picked from those comments. The hoppers will have until June 29, 2012 at 9 AM to leave comments. The winners will be posted at the Digi Bells' blog on Saturday, June 30, 2012.

Reminder:  Buying then sharing digital images is theft.  Sharing digital images takes income away from the artist.


* * * * *

I've used Apple Bake on the front of a side open card.  Cardstock and Bo Bunny Double Dots textured papers are layered with older Stampin' Up! Summer Picnic patterned paper to provide the perfect apple-themed background.  I've used the deckle edge rotary blade on my Purple Cow paper trimmer to give the appearance of torn paper throughout my card elements and image.    A basket spilling fresh apples is sprinkled with apple blossoms.  A Close To My Heart Fruitful Delight "apple" sentiment pairs up with a Crafty Secrets Tea with Alice large set "Yum" sentiment.  A Creative Imaginations "From My Kitchen with Love" grosgrain ribbon adds a nice bow to one corner.  Home Pro golden metal corners adorn a corner of a card layer and my image.

A QuicKutz basket die cut on its side is spilling Sizzix chipboard die cut apples to show the fresh apples leftover after making this scrumptious pie.  Some handmade punched apple blossoms are scattered throughout this apple cluster that includes a QuicKutz die cut pie.  The wonderful shine and dimension added to the basket, pie and paper covered chipboard apples is easily added with a layer of Glossy Accents.


Here's a view of my completed card front showcasing my use of Elisabeth Bell's Apple Bake digi image in my usual Classically Shabby style . . .


Remember to leave your comment below then move along to your next stop at the wonderfully-talented Wendy's blog (here).  For reference, you can find the full list of the blogs to hop at the Digi Bells Design Team blog (here).


I'm entering this card into the following challenges:
Elphine House Australia "Distressing or Paper Tearing" (here)
Papertake Weekly "BINGO" (here) Ribbon - Free - Blooms
Fab 'n Funky "Polka Dots" (here)
PaperPlay "Use a Die" (here)
Emerald Faeries aka A&T Digital Designs "Chipboard" (here)
Stampin' for the Weekend "Show Us Your Style" (here) - Classically Shabby


Copics used:
skin - E000, E01, E11, E93
hair - E31, E35, E47
golden pie crust, cat - E50, E53, Y26
pants - B91, B95, B97
shirt - R30, R43, R46
apron ties - YG91, YG95, YG97
apron - W5, W3, W1, W00, E41, 0
airbrushed background - W5, Y26, Y08, YG91


"Top 3" June 26, 2012 A&T Emerald Faeries


I'm so glad that you stopped by to visit!

~ Rose

Thursday, April 12, 2012

Card Art: Horizontal Criss Cross Card

I spent some time with the makings of a horizontal criss cross card.  I let the dimensions of this 4 1/4" tall x 5 1/2" wide card dictate the size and location of my image and embellishments.  Hmmm.  I've got some thinkin' to do in order for this to turn out close to how I'd like it to look.

As I hoped to allow part of the insert to show, my image had to be fairly small.  When using a digi image, I can easily resize the image to fit.  Instead, I put my Stamp-a-ma-jig to task and, with the help of a negative mask, I found a way to stamp a select part of an Elisabeth Bell Belles 'n Whistles Story Time image into a die cut oval.

Here's a closer view of my partially stamped, Copic-filled image where I've added a word stamped from a pre-inked stamp set:


Handmade flowers are formed from layers of an EK Success Paper Shapers small 6-petal daisy, a Punch Bunch mini sun and birch leaf.  As the flowers were punched from Bazzill Pink Bling, I only painted Diamond Stickles over the sun centers and the leaves for some special sparkle.


A sentiment from a Hero Arts' clear Elephants set was just the right size for this insert . . .


Triangles cut from Best Creations' A Walk in the Garden glitter paper pad add some sparkly patterns to my Bazzill cardstock.  Some QuicKutz Revolution Flourishes and Prima Say it in Pearls Swirls Cream add movement to the striped paper.  The belly-band of the card, covered with a Satin Sensations Island Blue 5/8" ribbon, wraps completely around the back and slides off easily. A Tim Holtz Charm Clip holds a warped clock charm. I've inserted a hot pink pearl heart Maya Road Trinket Pin into the bow.  Here's a pic of the front of my criss-cross card showing my use of part of Elisabeth Bell's Belles 'n Whistles Story Time image . . .


You can also find wonderful Elisabeth Bell digital images at her online gallery here.  Visit the Digi Bells Design Team blog here for digi design team inspiration.

I'm entering this card into the following challenges:
Belles 'n Whistles "Butterflies" (here)
Elphine House "Easter Colors/Pastels" (here)
Totally Paper Crafts "BINGO" (here) - covered everything but lace
One Stop Craft "Pastel and DieCuts" (here)
Crafty Emma's "Swirls and Pearls" (here)
Paper Sundaes "Sundae Bar - Use 2:  Kraft, lace, die cuts and/or charms" (here)
Cupcake Craft "Spring is in the Air" (here)
Crafty Sentiments "Spring/Pastel Colors" (here)
All Sorts "Color BINGO" (here) - covered everything but kraft and yellow
Tuesday Throwdown "Stick Pins" (here)

Copics used:
skin - E000, E01, E11, E93
hair, tree bark - E31, E35, E47
leaves - G82, G85, G99
top - RV91, RV95, RV99
coveralls - BG70, BG72, BG78
flowers, hairbow, butterfly - R81, R85, R89
book - G20, G24, G28
bird - R02, W1, W3
book pages - W3, W1, 0
straw hat - E40, E41, E42, E43, E44
airbrushed background - B21, G24, BG72, R85, E35


I'm so glad that you stopped by to visit!

~ Rose

Sunday, April 8, 2012

Sizzix Big Shot Pro Carry All Box

I'm looking forward to our family gathering for our Easter Breakfast meal and want to include a small candy filled favor at each place setting.  In comes the Sizzix Big Shot Pro Carry All Box.  In hardly any time at all, I had seven sweet Easter Blessings favors.

The latest Miss Caroline collection by My Mind's Eye provides beautiful Spring-, pastel-colored plaids and florals.  The Sizzix Big Shot Pro Carry All Box die made it so easy to die cut the shape of this perfectly sized favor bag.  The scored lines made it simple to adhere the single tab.


I used Spellbinders Circles dies to cut a window then adhered a piece of transparency to the inside of the box so treats can be easily viewed without opening the container.  I adhered sticky back flocked paper in Dark Chocolate to grungeboard then used the Sizzix Tim Holtz Movers and Shapers Mini Bunny for a sweet corner embellishment.  I added a bow of JoAnn's Mini Dot Bright Yellow or Lavender 1/8" ribbon to the bunny's neck.  A bottom border of Sizzix Grass adds to my scene.  A little EK Success Adornments fibers tied around the handle adds a bit of fun fluff.


My Sizzlits scalloped tags with a gold eyelet, stamped with a JustRite Spring Words set "Easter Blessings" sentiment, are tied on with twine.
In just minutes, I was able to add several varieties of individually wrapped chocolates for my guests.


May your Easter be overflowing with sweetness!  Enjoy!

I'm entering this project into the following challenges:
Hooked on Crafts "Easter" (here)
Crafty Sentiments "Bunnies" (here)
Creative Craft "Anything but a Card" (here)
Simon Says Stamp! "Use Your Favorite Tool" (here) - Sizzix Big Shot Pro
Creative Inspirations "Easter" (here)
Charisma Cardz "Chipboard or Stickers" (here)
Cute Card Thursday "I Want Candy!" (here)
Craft Us Crazy "Anything but a Card" (here)
One Stop Craft "Pastel and Die Cuts" (here)
Secret Crafter "Easter" (here)


I'm so glad that you stopped by to visit!

~ Rose

Saturday, February 25, 2012

Elisabeth Bell's World Challenge: Stitches 'n Swirls (with Curly Locks Kiki)

The Digi Bells design team over at the Elisabeth Bell's World Challenge Blog wants to see your Stitches 'n Swirls.  A randomly selected entry will win TWO Elisabeth Bell digi images of their choice AND a $10 gift card for use at Michelle's Scrapbooking and More online store!!!  You can find out more about this challenge and sponsor(s) here.  I'm happy to participate in this challenge as a Guest Designer.

I've created a bright and cheery card using this beautiful Curly Locks Kiki digital image designed by Elisabeth Bell.  You can find her at the Elisabeth Bell Digital Gallery here.  Here's a closer view of my Letterpress diecut and Copic filled image.  Once the image was dry, I added Copic Opaque White to brighten the flower bands, headband, sock top, and a few other spots in the white parts of the image.


In my attempts to embellish this image with something that Elisabeth used as an accent, I tried to pull the strawberries from the berry bowl onto my card front.  But how?  Hmmm.  After digging through my crafting supplies, I finally found a single strawberry stamp from an old See d's Inqueboutique recipes set.  I used my Copic colors directly on the stamp, stamped onto white cardstock dampened with Colorless Blender, outlined the image using my Copic multiliner then fussy cut each strawberry.  My Punch Bunch Garden Leaves multi punch, small blossom and mini sun gave me great strawberry blossoms and leaves to create my very own strawberry plant.  Thankfully I found some stray holiday season green ornament hooks to hold my strawberry plant pieces in place. Yay!  Each piece was painted with Diamond Stickles for magnificent shimmer.


A blossom and leaf adorn my Stampin' Up! Simply Summer set sentiment . . .


I've handstitched a border on the left using a curvy green leaf vine from a bazillbasics in the garden template with hillary green thread then covered most of it with my strawberry plant.


I've also handstitched a corner on the inside of my card using a bazillbasics flourishes template with jubilee and heidi purple threads.


I've layered Memory Box Pocket Posie patterned paper from their new Viola Collection with coordinating Bazzill textured cardstock. Home Pro silver metal corners adorn each corner of my card. Bits of Want2Scrap's amber bling swirls provide some sparkle. A Memory Box Savannah Border vine in purple swirls the length of the right side of my card. A simple bow in purple grosgrain ribbon wraps around the lower front.  I've added hand drawn faux stitching around the border of my patterned paper.

This photo shows my completed card front where I've used Elisabeth Bell's Curly Locks Kiki digital image . . .


For a chance to win a fabulous prize, get over to the Elisabeth Bell's World Challenge Blog and add your entry into this month's Stitches 'n Swirls challenge!


I'm entering this card into the following challenges:
Digital Tuesday "Make it Sparkle" (here)
Simon Says Stamp! "Use3 Different Papers" (here)
Divas by Design "Bling it Up" (here)
Paper Play "For a Mother" (here)
Moving Along with the Times "Lots of Layers" (here)
Crafty Catz "Begins with B" (here) bow, bling, berries, blossoms, brown
Stampin' for the Weekend "BINGO" (here) ribbon/bow glitter/sparkle flowers
All Sorts "Anything Goes" (here)
One Stitch at a Time "Digi or Don't" (here)
Totally Gorjuss "Yummy" (here)

Copics used:
skin - E000, E01, E11, E93
hair - E31, E35, E47
dress, socks - V20, NEW V22, V25, NEW V28, V99
berry bowl, scissors - C1, C3, C5
shoes - T0, T6, T9
strawberry leaves - YG11, YG13, YG17
strawberries - R32, R35, R37, R39
embroidery cloth, apron - E43, E42, E41, E40, 0
flower bands, headband, pillow - Y13, Y15, Y17, Y19
argyle pillow - B12, B16, B18, R83, R85, R89
airbrushed background - YG17, YG11, Y26, Y13
stamped strawberries - R35, R37, YG17
Copic Opaque White adds brightest white back to image accents


I'm so glad that you stopped by to visit!

~ Rose

Friday, February 17, 2012

Elisabeth Bell's On Cupid's Cloud Digi Bells' Blog Hop

To celebrate the newest addition to Elisabeth Bell's Digital Gallery (here), the Digi Bells Design Team is hosting a blog hop.  It's always been a joy to hop along and see how designers show the same image used in so many different ways.  Today, I'm overjoyed to participate in this hop as a guest designer for the Digi Bells.  Yay!!!

How can you win your own On Cupid's Cloud digi image?  You'll have to hop through and leave comments on EACH blog.  [You can find the full list of 13 blogs at the Digi Bells Design Team blog (here).]  Lynda will pick 2 blogs at random and the winners will be picked from those comments. The hoppers will have until March 2, 2012 at 9 AM to leave comments. The winners will be posted at the Digi Bells' blog on Saturday, March 3, 2012.

Another way to win will be to do the hop, leave comments and then to make a "Lots of Lace" card using ANY Elisabeth Bell image and post it on the Digi Bells' Blog (here).  This will also end on March 2, 2012 at 9 AM Arizona time and the winner will also be posted at the Digi Bells' blog on Saturday, March 3, 2012.

I've die cut my image using Spellbinders Heart Circles.  After I filled the image using Copic colors, I adhered it to a Want2Scrap Nestaboard of the same diecut design.  Here's a scanned pic of my colored, die cut image . . .


I printed a reduced version of my scanned image onto sticky back canvas to create custom canvas i-Top brads.  Here's a view of my medium-sized brad used as a flower center to decorate my flower cluster.  A locket is hidden among the paper roses . . .


This view shows my small custom canvas i-Top brad used as a 3-loop seam binding bow topper . . .


A few details from Elisabeth's image show up within another flower cluster.  This little Cupid gets some well-deserved rest as the Close To My Heart sentiment "still in love" QuicKutz mini tag is clearly displayed near a key charm.


I've used layers of heritage lace, musical notes and definitions patterned papers with Bazzill textured cardstock to create my card.  Here's a view of my card front showcasing my use of Elisabeth Bell's On Cupid's Cloud latest digital image . . .


Wouldn't this be a wonderful image for sharing happy wishes with a loving anniversary couple?  I think my dear husband will appreciate seeing Cupid getting a break for a day of fishing - LOL!!!


Remember to leave your comment below then move along to your next stop at the wonderfully-talented Alethea's blog (here).  For reference, you can find the full list of the blogs to hop at the Digi Bells Design Team blog (here).


I'm entering this card into the following challenges:
One Stitch At A Time "Anything Goes" (here)
All Sorts "Free and Easy" (here)
Crafty Emma's "Lots of Layers - 3 or more" (here)
One Stop Craft "Hearts and Flowers with Ribbon" (here)
Totally Gorjuss "Lurve!" (here)
Paper Sundaes "Sundae Bar - cream, blue, distress" (here) Sponsor is Elisabeth Bell!
Elphine House "Hearts" (here)
Belles 'n Whistles "Love and Hearts" (here)
Dream Valley "Valentine" (here)
Creative Craft "Valentine's Day" (here)


Copics used:
skin - E000, E01, E11, E93
hair, rod - E31, E35, E47
roses - R22, R29, R59
leaves - G40, NEW G43, NEW G46, G99
hearts - RV23, RV14, RV19
wings, keys - Y13, Y26, Y28
toga - E70, E74, E77
clouds - B000, 0, C1, C3
airbrushed torn paper clouds - B21


"Top 3" Feb. 28, 2012 Creative Craft Challenges


"Top 3" Feb. 23, 2012 Paper Sundaes


I'm so glad that you stopped by to visit!

~ Rose

Thursday, December 8, 2011

Zentangle-Diecut Fusion

I've had a sudden need for small gift packages to hold smallish items that are easy for gift giving.  I wanted these packages to be attractive too.  I think that a handmade item is always wonderful to share, especially when I know that the recipient will appreciate the love and care put into creating it.

I have spent a great deal of time creating tangles that resulted in a piece of Zentangle-inspired wall art.  This framed artwork has become invaluable to me in so many ways.  I immediately felt the wonder of relaxation while tangling.  Seeing the progression of my artwork, by my own hands, was amazing to me.  Having completed a framable piece of artwork was incredibly satisfying.  This particular work continues to make me feel such accomplishment.

Again my wall art has come to the rescue.  I've scanned my Zentangle-inspired art work then printed it to both sides of a sheet of Bazzill Smooth cardstock.  Yes, this is my own pen and pencil to paper handwork and with the help of technology, as well as the Sizzix Big Shot Pro die cutting system, I've been able to create these small gift packages to meet my needs.

This photo shows my Zentangle-inspired matchbox.  I've added a strip of Bazzill Black bling to the match striking area.  A Tim Holtz alterations sizzlits rosette and Spellbinders flourish adorn the top.


Here's a view of my Zentangle-inspired carry all box.  The only embellishment needed was a bit of fun fur for the handle.


This photo shows my Zentangle-inspired candy-shaped box looking lovely with simple bows tied to each side . . .


Now I'm ready to add my little gifties!  Sweet and simple is good.

I encourage you to find a Certified Zentangle Teacher in your area and experience the wonder of Zentangle for yourself.

I'm entering one of these projects into the following challenges:
Cupcake Craft's "DIY Background Paper" (here)
Papertake Weekly "Anything Goes" (here)
Charisma Cardz "No Cards" (here)
Cute Card Thursday "Anything Goes" (here)
Moving Along With The Times "Last Minute Christmas" (here)
Creative Card Crew "Tis the Season" (here)

Monday, November 21, 2011

Sizzix Big Shot Pro Candy-Shaped Box and Sara Burrier's Poinsettia

I'm thrilled to share a Crafts and Me Stamps soon-to-be-released beautiful fairy digital image by Sara Burrier named Poinsettia.

This photo shows a closer view of my Copic-filled image.  I set this lovely fairy toward the side of my cut rectangle so I'd have plenty of room to add a sentiment and some embellishments.  This magnificent stamped sentiment is an oldie from Art Gone Wild!  A QuicKutz manger and north star die cuts provide divine accents.  A bit of Diamond Stickles covers her wings and the poinsettia she's holding.  You can find out the basics of how I make my punched poinsettias here.


I've used my Sizzix Big Shot Pro and the Candy-Shaped Box Pro die to die cut Little Yellow Bicycle's Christmas Magic paper.  Holiday ribbons, tied in bows, hold my candy box tight but will make it easy to open and tie again.  A Spellbinders' Fleur De Lis Rectangle frames my image.

It all came together pretty easily.  Memory Box holly vines add a very nice over the edge flourish.  Here's a view of my completed Sizzix Big Shot Pro Candy-Shaped Box showcasing Sara Burrier's Poinsettia . . .


I'm entering this project into the following challenges:
Ladybug Crafts Ink "Fairies" (here)
Digital Tuesday "Christmas Time" (here)
Flutterby Wednesdays "Open" (here)
Wags 'n Whiskers "Christmas-themed" (here)
One Stitch At A Time "Anything Goes" (here)
Paper Sundaes "Beautiful Bows" (here)
ABC Challenge "D=Dazzle" (here)
Daisy Doodles "Christmas" (here)

Copics used:
skin - E000, E01, E11, E93
hair - E31, E35, E47
holly leaves - G82, G85, G99
poinsettia and dress - R22, R29, R59
wings - Y18, Y26, Y28
airbrushed outline shadow - Y11, Y28


"Top 3" Dec. 1, 2011 The ABC Challenge