Why Rosie's Book?

While growing up, I had a dear friend, Renee, that lived next door and with whom I spent much of my childhood. We grew, in different directions, and went on our merry way. Many years later, I ran into her parents and they kindly reminded me of the laughs they still have over my book. “What book?” I wondered with a puzzled look. "I don't remember a book." Hardy laughter accompanied their response. At some time during our childhood, I tried to convince Renee about something that her parents didn’t agree with. I told her that proof of its truth could be found “in my book.” Naturally she went home and tried to convince her parents of the same thing but they weren’t falling for it. She needed an edge and told them emphatically, “It’s in Rosie’s book!” After they caught their breaths from reborn laughter, they let me know how “Rosie’s book” has been cited for many other things throughout the years. They’ve also mentioned that they’d like to see “Rosie’s book” one day. I can’t remember all of the things that I said were in “my book” but I’m sure my dear friend’s parents can recall much more than I ever knew about – LOL!!! So, here it is . . . my version of things you might find In Rosie’s Book . . .

Showing posts with label Pattern. Show all posts

Wednesday, April 18, 2012

Crafts and Me Stamps Challenge: Vintage

The digi design team over at the Crafts and Me Stamps challenge blog wants to see your Vintage projects.  Crafts and Me Stamps is sponsoring this challenge and offering THREE digi images of the winner's choice to a randomly selected entry.  You can find out more about this challenge and the sponsor here.

I've used a recently released digi image named Fairy Tales, designed by Sara Burrier, exclusively for Crafts and Me Stamps.

I've added Copic color to Kraft cardstock and used the Beyond the Edge technique when diecutting this image with a Spellbinders Oval then layered it onto a Spellbinders Labels Five die cut.  Here's a closer view of my Copic-filled image . . .


I've used Punch Bunch medium and small cosmos with a mini sun and McGill pine branch to create my Bachelor's Button handmade flowers.  A Paper Shaper daisy, mini sun and Punch Bunch small birch leaf form my small daisies.  A light layer of Diamond Stickles adds some sparkle to my blooms and attracts a butterfly that lands nearby.  Here's a closer view of one of my flower clusters . . .


A Martha Stewart Garden Trellis Deep Edge Punch provides a border while Sizzlits photo corners adorn my faux stitched layer of KaiserCraft These Days Collection Reunion patterned paper.  My easel card is formed with Bazzill cardstock in Rain, Olive and Cool Cantaloupe.  A Satin Sensations 5/8" Forest Green ribbon bow adds a formal touch.  My handcut flag shows an It's your birthday... sentiment from a Close To My Heart Card Chatter - Birthday set.  Here's a closer view of my card front . . .


A loving Birthday Love Peace rubberstamp sentiment from Endless Creations seems appropriate for the inside of my card.  Here's a closer view of the inside of my card . . .


Here's a view of my completed easel card showing how I've used the Fairy Tales digital image, by Sara Burrier, for my vintage card . . .


I'm entering this card into the following challenges:
Charisma Cardz "Fancy Folds" (here)
Cute Card Thursday "Spring Flowers" (here)
Paper Play "Things with Wings" (here)
Moving Along with the Times "Shabby Chic and/or Vintage" (here)
Totally Paper Crafts "Things with Wings" (here)
Paper Sundaes "Anything Goes" (here)
Craft Your Passion "Die Cuts and Punches" (here)
Bunny Zoe's Crafts "Ribbon or Twine" (here)
Southern Girls Challenge "Fancy Folds" (here)
Creative Card Crew "Use Kraft" (here)


Copics used:
skin - E000, E01, E11, E93
hair - E31, E35, E47
pants, fairy dress - BG70, BG72, BG75, BG78
top, fairy wings - YR0000, YR00, YR02
leaves, grass - G82, G85, G99
book - YR12, YR15, YR18
rock - E40, E42, E44
airbrushed background - G82, BG72


"Top 3" April 24, 2012 Creative Card Crew


I'm so glad that you stopped by to visit!

~ Rose

Monday, April 16, 2012

Card Art with Copics: Elisabeth Bell's Li'l Lynda's Piano Forte

I'm so glad that I made some time to play with this sweet digital image designed by Elisabeth Bell called Li'l Lynda's Piano Forte.  This sweet little lady is dressed in her best as she sings her little heart out while playing the piano for her doll, puppy and everybody else who cares to listen.  You can find her at the Elisabeth Bell Digital Gallery (here).

Here's a closer view of my Copic-filled image, sized smaller (just 2 1/2" tall) to fit inside of a die cut oval . . .


My sentiment, stamped onto a QuicKutz mini tag, is from a Close To My Heart Annotations set.  A Zip Sweetheart alphabet die forms the letter "B" that I added to my sentiment.  A jump ring holds a brass "wish" charm.


The coordinating handmade flowers are made from my card scraps with punches.  The Bachelor's Button is formed from a Punch Bunch medium and small cosmos, mini sun, and McGill pine branch.  My small daisies are formed from a Paper Shaper 6-petal daisy and Punch Bunch mini sun and birch leaf.  I painted a light layer of Diamond Stickles over each for added glimmer.  Here's a closer view of my flower cluster . . .


I've layered TPC Studio Party Hearty Birthday Wishes and Birthday Candles double-sided patterned paper with Bazzill cardstock to form my square criss-cross card. A Magnolia Doohickeys Tilda Lace Die cut edge provides a sweet lacey border for each side of my criss-cross. I die cut my image and matting using Spellbinders Classic Ovals and Scalloped Ovals.  This photo shows my completed criss-cross birthday card where I've used the Li'l Lynda's Piano Forte digital image designed by Elisabeth Bell . . .


The stamped sentiment on the insert of my card is from a Stampin' Up! Elegant Greetings set.

Here's a view of the insert of my card . . .


You can find more inspiration using Elisabeth Bell's digital images at the Digi Bells Design Team blog here.

Set aside some time to join the Digi Bells this Friday, April 20th, for their monthly blog hop and a chance to win one of Elisabeth's newest digi images.  You still have time to submit your entry at the Elisabeth Bell's World Challenge Blog - Shabby Chic/Distressing challenge  for a chance to win TWO digi images of your choice!


I'm entering this card into the following challenges:
Digital Tuesday "Birthdays" (here)
Divas by Design "Charmed, I'm Sure" (here)
Charisma Cardz "Fancy Folds" (here)
Paper Crafting Journey "3 or more patterned papers" (here)
Wags 'n Whiskers "Anything Goes" (here)
Sir Stampalot "Happy Birthday" (here)

Copics used:
skin - E000, E01, E11, E93
blonde hair - Y13, Y26, Y28
dress, bow, dolls skirt and shoes - B32, B34, B37
pillow roses - G12, G14, G16
pillow - YR0000, YR00, YR02
piano - T9, T6, T0
puppy - E50, E53, E55
shoe, slip - E41, 0
airbrushed background - BG72, B32


I'm so glad that you stopped by to visit!

~ Rose

Thursday, April 12, 2012

Card Art: Horizontal Criss Cross Card

I spent some time with the makings of a horizontal criss cross card.  I let the dimensions of this 4 1/4" tall x 5 1/2" wide card dictate the size and location of my image and embellishments.  Hmmm.  I've got some thinkin' to do in order for this to turn out close to how I'd like it to look.

As I hoped to allow part of the insert to show, my image had to be fairly small.  When using a digi image, I can easily resize the image to fit.  Instead, I put my Stamp-a-ma-jig to task and, with the help of a negative mask, I found a way to stamp a select part of an Elisabeth Bell Belles 'n Whistles Story Time image into a die cut oval.

Here's a closer view of my partially stamped, Copic-filled image where I've added a word stamped from a pre-inked stamp set:


Handmade flowers are formed from layers of an EK Success Paper Shapers small 6-petal daisy, a Punch Bunch mini sun and birch leaf.  As the flowers were punched from Bazzill Pink Bling, I only painted Diamond Stickles over the sun centers and the leaves for some special sparkle.


A sentiment from a Hero Arts' clear Elephants set was just the right size for this insert . . .


Triangles cut from Best Creations' A Walk in the Garden glitter paper pad add some sparkly patterns to my Bazzill cardstock.  Some QuicKutz Revolution Flourishes and Prima Say it in Pearls Swirls Cream add movement to the striped paper.  The belly-band of the card, covered with a Satin Sensations Island Blue 5/8" ribbon, wraps completely around the back and slides off easily. A Tim Holtz Charm Clip holds a warped clock charm. I've inserted a hot pink pearl heart Maya Road Trinket Pin into the bow.  Here's a pic of the front of my criss-cross card showing my use of part of Elisabeth Bell's Belles 'n Whistles Story Time image . . .


You can also find wonderful Elisabeth Bell digital images at her online gallery here.  Visit the Digi Bells Design Team blog here for digi design team inspiration.

I'm entering this card into the following challenges:
Belles 'n Whistles "Butterflies" (here)
Elphine House "Easter Colors/Pastels" (here)
Totally Paper Crafts "BINGO" (here) - covered everything but lace
One Stop Craft "Pastel and DieCuts" (here)
Crafty Emma's "Swirls and Pearls" (here)
Paper Sundaes "Sundae Bar - Use 2:  Kraft, lace, die cuts and/or charms" (here)
Cupcake Craft "Spring is in the Air" (here)
Crafty Sentiments "Spring/Pastel Colors" (here)
All Sorts "Color BINGO" (here) - covered everything but kraft and yellow
Tuesday Throwdown "Stick Pins" (here)

Copics used:
skin - E000, E01, E11, E93
hair, tree bark - E31, E35, E47
leaves - G82, G85, G99
top - RV91, RV95, RV99
coveralls - BG70, BG72, BG78
flowers, hairbow, butterfly - R81, R85, R89
book - G20, G24, G28
bird - R02, W1, W3
book pages - W3, W1, 0
straw hat - E40, E41, E42, E43, E44
airbrushed background - B21, G24, BG72, R85, E35


I'm so glad that you stopped by to visit!

~ Rose

Thursday, December 8, 2011

Zentangle-Diecut Fusion

I've had a sudden need for small gift packages to hold smallish items that are easy for gift giving.  I wanted these packages to be attractive too.  I think that a handmade item is always wonderful to share, especially when I know that the recipient will appreciate the love and care put into creating it.

I have spent a great deal of time creating tangles that resulted in a piece of Zentangle-inspired wall art.  This framed artwork has become invaluable to me in so many ways.  I immediately felt the wonder of relaxation while tangling.  Seeing the progression of my artwork, by my own hands, was amazing to me.  Having completed a framable piece of artwork was incredibly satisfying.  This particular work continues to make me feel such accomplishment.

Again my wall art has come to the rescue.  I've scanned my Zentangle-inspired art work then printed it to both sides of a sheet of Bazzill Smooth cardstock.  Yes, this is my own pen and pencil to paper handwork and with the help of technology, as well as the Sizzix Big Shot Pro die cutting system, I've been able to create these small gift packages to meet my needs.

This photo shows my Zentangle-inspired matchbox.  I've added a strip of Bazzill Black bling to the match striking area.  A Tim Holtz alterations sizzlits rosette and Spellbinders flourish adorn the top.


Here's a view of my Zentangle-inspired carry all box.  The only embellishment needed was a bit of fun fur for the handle.


This photo shows my Zentangle-inspired candy-shaped box looking lovely with simple bows tied to each side . . .


Now I'm ready to add my little gifties!  Sweet and simple is good.

I encourage you to find a Certified Zentangle Teacher in your area and experience the wonder of Zentangle for yourself.

I'm entering one of these projects into the following challenges:
Cupcake Craft's "DIY Background Paper" (here)
Papertake Weekly "Anything Goes" (here)
Charisma Cardz "No Cards" (here)
Cute Card Thursday "Anything Goes" (here)
Moving Along With The Times "Last Minute Christmas" (here)
Creative Card Crew "Tis the Season" (here)

Wednesday, July 13, 2011

Enchanting Card Set: Card - Crafts and Me Child of Healing

The Dynamite Digi team at Crafts and Me Challenges wants to see your Summertime projects. The lovely Teresa of Crafts and Me Stamps is offering SIX digi images to the winner of a randomly selected entry. Find out more about this challenge here.

I've added another all occasion card to my coordinated Enchanting Card Set.  This time I've used Crafts and Me Stamps' Child of Healing by artist Sara Burrier.


As this is one of a few cards that will be enclosed in my card set's folder found here, I've kept my embellishments very light.  Another all occasion card can be found here.

When completing a card set, consistency with the pieces of the set is very important. I've used a similar layout as well as the same colors, papers and embellishments to match my card set's folder and other card. Antique Gold Satin Ribbon knotted on the border, Bazzill Basics Walnut jewels at two corners and a negative mask formed from a Spellbinders scalloped oval for an airbrushed backround provide the simple consistency that makes this piece easily recognized as belonging to this card set.

This photo shows the completed card front for another card that is now part of my Enchanting Card Set using Crafts and Me digital images.


I'm entering this card at the following listed challenges:
Simon Says Stamp!'s Anything Goes Challenge here
Flutter By Wednesday's Photo Inspiration Challenge here


Featured "Top 5" July 24, 2011 Flutter By Wednesday


Copics used:
skin - E000, E01, E11, E93, BV00
hair - E31, E35, E47
leaves - G82, G85, G99
gown - Y13, Y26, Y28

flowers in hair - N1, FYR1
wings - BG53, B45, V95, Y00

doves - E41, 0
airbrushed background - Y00, BG000, B00, V000

Thursday, March 24, 2011

Sizzix Big Shot Pro Pillow Purse and Magnolia Stamps

Sometimes improvising is the key to unlock doors that seem to block creativity.  I wanted to use Magnolia stamps for an Easter scene but I didn't have any Magnolia Easter stamps.  Hmmm.  Improvise.

I filled my Magnolia Tilda Hanging Ornaments image from the 2010 Merry Little Christmas collection with the intention of cutting off the ornaments.


I wanted a fence to hide some eggs but didn't want a full background so I filled the fence from the Magnolia Fence and Summer Background image from the 2008 Summer and Sea Collection and cut it out too.


I die cut a couple of baskets and several eggs using the QuicKutz Easter Basket die . . .


. . . added some shading using Copic markers and adhered them to my stamped Magnolia images.


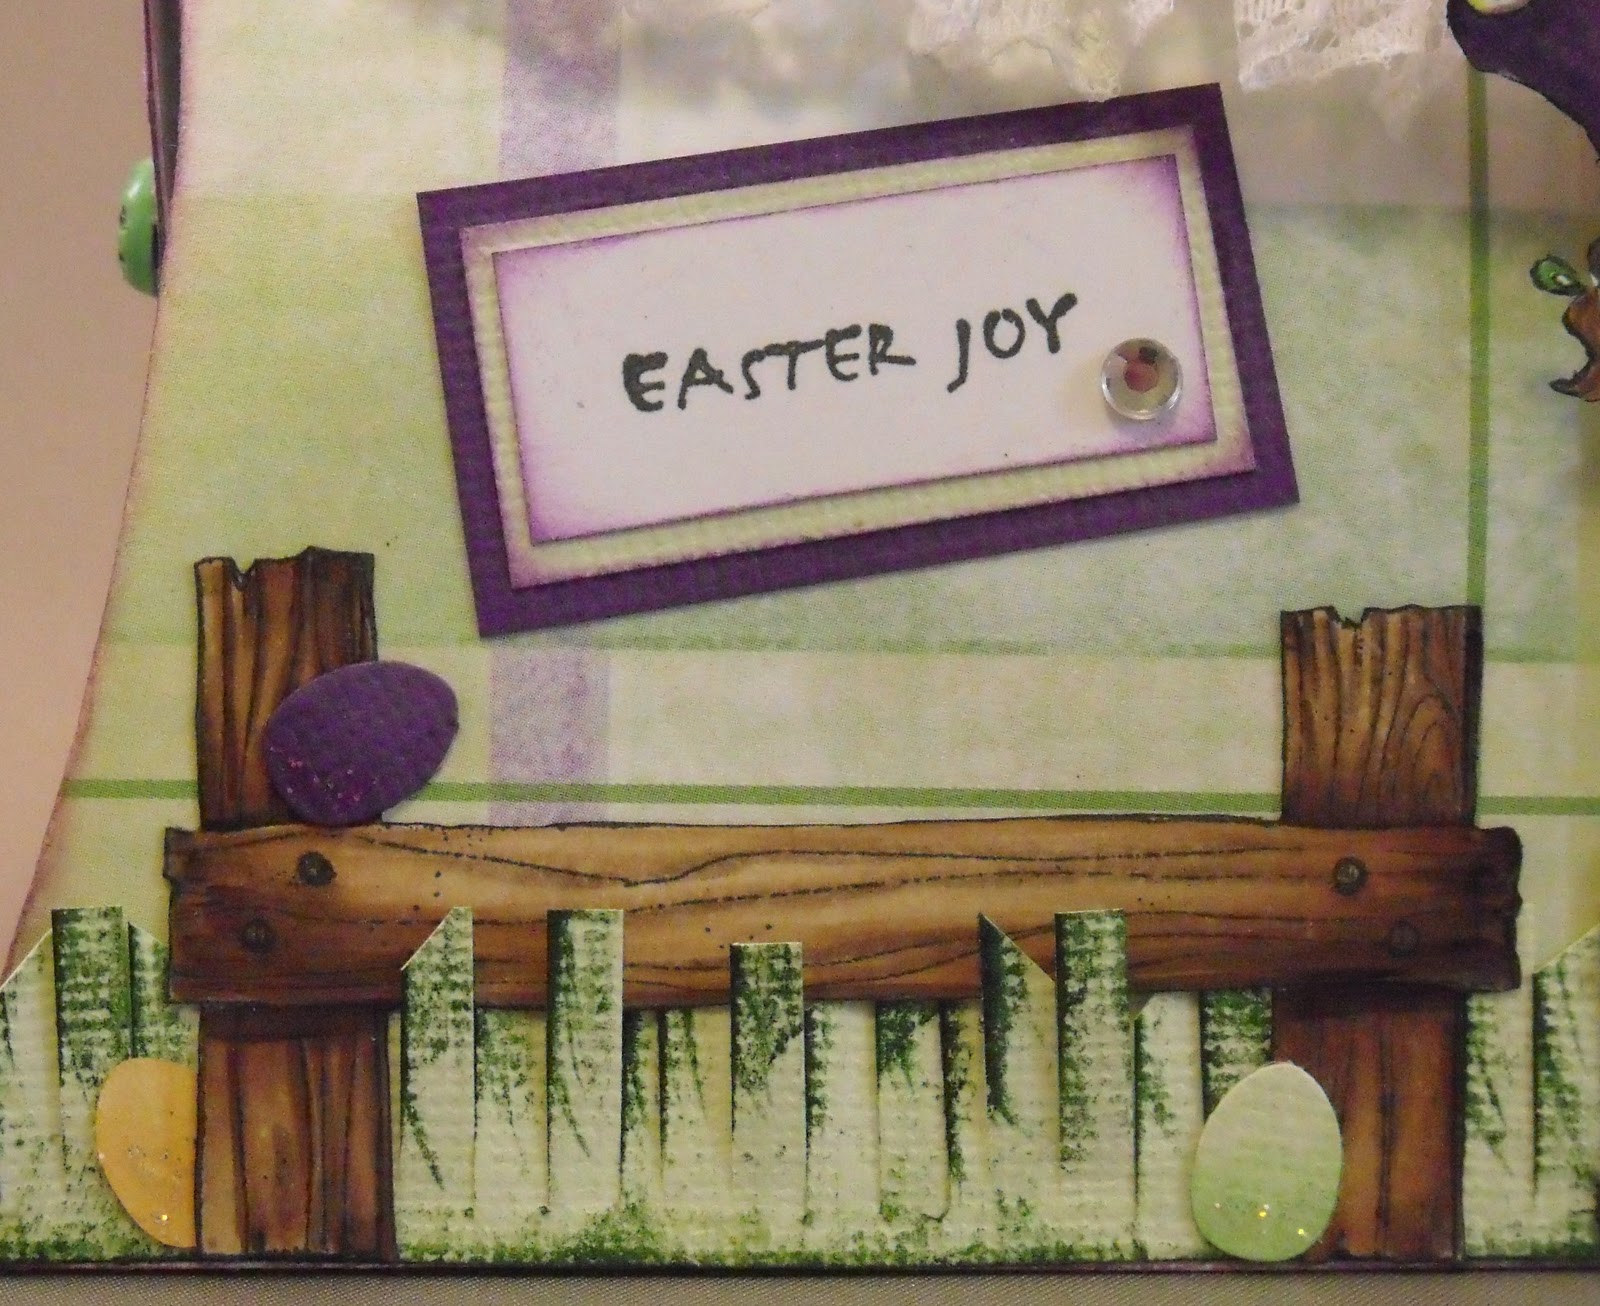
I used some older Top Line Creations Easter/Spring Varsity Plaid single-sided patterned paper to die cut my Sizzix Big Shot Pro Pillow Purse.  A little lace pleated under the front flap, a Bazzill Basics Button Vintage Elizabeth for a flap closure, some Diamond Stickles for added sparkle, Martha Stewart fringe scissors for long Spring grass and an Easter Joy sentiment from Outlines Rubber Stamp Co. supplements my Easter scene.


Here's my completed Easter scene decorated Sizzix pillow purse . . .


Since only the bottom half of Tilda is adhered to the base of the pillow purse, the purse flap can still open and close behind her.

My Magnolia stamps Easter Scene is complete without using any Magnolia Easter images.  How's that for improvising?

I've entered this Sizzix Big Shot Pro Pillow Purse using Magnolia Stamps in the current Magnolia-Licious Inspiration Challenge (find more about the challenge here).

I've also entered this project for a #3 Anything but a Card at the Magnolia-licious Easter-Spring Extravaganza Contest (here).  Click here to enter the Magnolia-licious store.

* * * * *
Edited 5/14/11 to add:

I've just reviewed the March 2011 issue of Magnolia Ink Magazine and found my Magnolia Easter Purse published on page 59 of the Spring issue.  Woo-Hoo!!! ~ Rose


Published in March 2011 Magnolia INK Magazine


Copics Used:
Skin - E0000, E00, E02, R20
Hair/Fence - E47, E35, E31
Shirt/Socks - V12, V15, V17
Pants - YG11, YG13, YG17
Eyelet Lace - YG21, 0
Basket - E31, E0000, E47
Bow - BV11, BV0000, BV17
Eggs - YG11, BV11, YR20

Monday, January 31, 2011

Zentangle-inspired Sizzix Big Shot Pro Pillow Purse

There is no right side up to a Zentangle pattern which makes it perfect to use as a background for Zentangle-inspired paper crafting projects.


I spent some time last autumn filling an 8x10" piece of Zentangle-inspired art for framing.  I scanned my completed piece with the intention of reproducing it on an iron-on transfer for fabric.

After playing with the Sizzix Big Shot Pro Pillow Purse (here), I wanted to see how my Zentangle-inspired art would look on a die cut project.  First things first, I printed my black and white image onto smooth, white cardstock.

Yikes!!!  My printer, acting wholly on its own, added red and black stripes throughout my Zentangle-inspired work.  If my printer were anything but mechanical, I'm certain the words spewing out of my mouth then would have at least hurt its feelings.  I could have thrown that paper away and tried again but this is, afterall, a Zentangle-inspired project.  So, in the true spirit of all things Zentangle, I simply moved forward from that moment and continued on with what I had.  Can I turn this blunder into something nice?

I placed my newly printed, now striped, sheet of cardstock over the Sizzix Big Shot Pro Pillow Purse die and ran it through the die cutting machine.  Hmmm.  This just might work.  I attached the handle using black mini brads to allow the handle to be movable and adhered the sides.


I folded a strip of 5/16" Offray sheer black ribbon to the front flap and added a set of magnets for closure.  Using the scraps remaining from the die cut purse, I used a 1/2" circle punch and added these pieces over the magnets.  Cool.


I still had enough remaining scraps to die cut one large and three small Sizzix 3D flowers and curled them to decorate the front of my Zentangle-inspired pillow purse.  A few McGill punched branches, some with a thin layer of Diamond Stickles, and a touch of ribbon made a nice flower cluster.


This little purse is large enough to hold some Zentangle tiles, a couple of markers, a short pencil and more.  I think it will make a nice gift package that can also be displayed.


As the Zentangle patterns wrap around to the back and bottom, all sides are decorated nicely.  Here's a view of the back . . .


and bottom . . .


I guess I need to go now and find out why my printer added red and black stripes to my print job . . .

Wednesday, December 22, 2010

Canvas Tag Art - Tim Holtz' 12 Tags of Christmas

Each December, for the past few years, I've eagerly awaited Tim Holtz' daily blog posts for his 12 Tags of Christmas.  I have alot of completed, full-sized tags, sitting in a drawer, ready to reference for technique reminders and artsy inspiration.

This year I felt a little more free-spirited and decided to create my tags using another art form that I learned from Tim last March:  Canvas Tag Art.

I prepped a 12x12 canvas with spritzes of water then added Smooch from my stash.  A light coating of Glimmer Mist helped add some sparkle to the canvas.  When dried, I adhered some of Tim's metal corners.
Canvas spritzed with Smooch and Glimmer Mist
Using a single sheet of Bazzill Extra Thick cardstock, I cut 12 tags in a variety of sizes to fit onto this canvas.

Only after Tim posted his final tag, I began planning how to best showcase them on my canvas.  Since my tags were cut in a variety of sizes with different orientations, I did my best to choose the correct tag to meet the highlighted technique of each of Tim's versions.  There was a lot of thinking to do about how I could make it work but I sure didn't hurt myself trying - LOL!!!  I don't even have any tags in my dud pile caused by re-dos.  I'm happy about that!

Here's my version of 2010's Tim Holtz' 12 Tags of Christmas, all combined on a Canvas Tag Art layout that's ready to be displayed on the wall.  Yay!!!  This is my submission for the Scrappers Cove Tim's 12 Tags of Christmas contest.  Find the Scrappers Cove newsletter here.

Canvas Tag Art - 2010's Tim Holtz' 12 Tags of Christmas
I think each tag showcases Tim's highlighted technique of the day.  I did have to tweak, make adjustments and substitute in some areas with products that I already had in my supply stash.  Although the baubles and adornments that usually hang from the ribbon secured through the tag holes are missing, I don't think that takes anything away from the basic content of the techniques displayed.

Die cuts are still my favorite form of paper crafting.  Something about the ease of diecutting cool shapes makes me happy.  Cutting cool shapes out of many different materials makes me feel like jumping up and down!
Tag 1 - Rickety House
I love to add metal to my projects.  Most of my projects just don't feel "done" unless there's some metal somewhere, even if it's just a brad.
Tag 9 - Paper Rosette
I tend to avoid using packaged flowers but I do love to make my own.

Tag 7 - Poinsettia
Stamping techniques are totally awesome to me:  inking, masking, and embossing make me step back and admire the simple coolness.
Tag 2 - Custom Ink Pad
Thank you Tim for your thoughtfulness and generosity in sharing yet another December with me, teaching and inspiring creativity, in so many ways.

Saturday, December 18, 2010

Layout Challenge: Sassafras Mix and Mend

Here's a photo of the products from the latest Scrappers Cove layout challenge kit:  Sassafras Mix and Mend free composition and fancy free double-sided patterned papers, coordinating Bazzill cardstock, a Cats Eye butterscotch chalk ink pad, and a Sassafras Entwined Bloom.


It didn't take me long to figure out where to start with these products . . . I began cutting, distressing and inking all of the papers' edges . . . Yay!  I'm lovin' the look of an old lacy tablecloth on the Fancy Free sheet and thought of the perfect heritage photo to use on this layout.  Placing Tim Holtz' idea-ology flourish mask in a few places, I swept some Ranger's juniper paint dabber over it.


The lacy feel of the paper made me want to make it more interesting by adding the contrast of metal, yet keep the overall layout feeling somewhat delicate-looking.  I used the Tim Holtz Alterations elegant flourishes die to shape some chipboard then painted over it with Ranger's gold paint dabber.  Ahhh . . .


I feel the need for more metal.  How about a few of the Tim Holtz Alterations gadget gears? . . . Oh yeah!  Gave them a metal look using Rangers gold, silver and copper paint dabbers.  That Entwined Bloom softens those gears just a little, don't ya' think?


A few copper pieces of We R Memory Keepers metal, adhered around the layout, helped to pull it all together.

I needed to pull a little more softness back into this layout by using some thickers felt letter stickers.


Now to glam it up a bit.  Whew!  A few spritzes of Ranger Perfect Pearls Mists in perfect pearl really makes this layout sparkle.  It's always difficult to show the sparkle by photo on monitor but this side view gives a pretty good idea of how the perfect pearl covers everything so nicely with a sparkly sheen.  (If you click on the photo to enlarge it, you can see the sheen covering even the felt letters - cool, huh?)


Pop a photo in place, personalize it with a little handwriting and this layout is done.


While working on family history, sometimes there is just one picture to accompany important genealogical facts.  I found that the vintage look of this Sassafras Mix and Mend line allowed me to record this important photo yet play with techniques, products and design elements.  I just had too much fun mixing this layout up!