Why Rosie's Book?

While growing up, I had a dear friend, Renee, that lived next door and with whom I spent much of my childhood. We grew, in different directions, and went on our merry way. Many years later, I ran into her parents and they kindly reminded me of the laughs they still have over my book. “What book?” I wondered with a puzzled look. "I don't remember a book." Hardy laughter accompanied their response. At some time during our childhood, I tried to convince Renee about something that her parents didn’t agree with. I told her that proof of its truth could be found “in my book.” Naturally she went home and tried to convince her parents of the same thing but they weren’t falling for it. She needed an edge and told them emphatically, “It’s in Rosie’s book!” After they caught their breaths from reborn laughter, they let me know how “Rosie’s book” has been cited for many other things throughout the years. They’ve also mentioned that they’d like to see “Rosie’s book” one day. I can’t remember all of the things that I said were in “my book” but I’m sure my dear friend’s parents can recall much more than I ever knew about – LOL!!! So, here it is . . . my version of things you might find In Rosie’s Book . . .

Showing posts with label Punch Bunch. Show all posts

Sunday, January 19, 2014

Card Art with Copics: Crafty Sentiments Opening Presents

I've had this lovely Crafty Sentiments Opening Presents rubberstamp for quite some time and this is the first time I've inked her up.  I love how she's brought her teddy to the unwrapping of the gift as dear teddy is obviously very important to her.

Here's a closer view of my Copic-filled image.  I've used a negative mask for the Nasty Rag technique to add some natural-looking fuzz to my teddy bear.


There's alot going on throughout the layers of this particular card and for the most part it turned out as I imagined it would.

I laid the folded half of my white paper just along the inside cut line of the Sizzix Tim Holtz Alterations Tag and Bookplates die so I could form my tag-shaped card.  I embossed the Spellbinders Heart Circles die to form a frame on the front of my card.  Once the embossing was done, I used the Spellbinders Large Standard Circle set to cut a circle for my window.

A piece of transparency adhered to the back becomes my window.  My handmade floral additions are made using Cheery Lynn Designs' Baby's Breath Flower Kit and Tiny Flower Kit, layered with some Punch Bunch small and mini birch leaves.  All flowers are lightly painted with a thin coat of Star Dust Stickles.

Three strips of 1/8" Wondertape are covered with Sparkle N Sprinkle's Aquamarine and Sunset glitter along with Stickles Dry Glitter in Lagoon to form my sparkling stripes at the base.

A Marvy small balloon punch acts as a tag topper with a gold eyelet and a bit of yellow ribbon tied through it.  A Close To My Heart Just a Number set sentiment is popped up above my window.


The left side of the interior shows TPC Studio Party Hearty Birthday Candles paper with a machine sewed zig zag stitch of metallic thread.  This is my first time using a sewing machine for the zig zag stitch and I have no idea how the corners are supposed to look.  I did try my best as I think the zig zag adds some pizzazz to a zesty party feeling.

My Crafty Sentiments "Opening Presents" image is stamped on the right side with a Morning Star sprinkled day sentiment just above my Copic-filled image.  A multi-striped ribbon is tied through that balloon punch tag topper.

I ran my die cut Memory Box Butterfly Chain upside down through my xyron "X" to make the front of the butterflies sticky.  I used the same glitter as I used for the stripes on the front of the card to color my sparkling butterfly border.


Because Copic inks are known to seep through the paper and will show on the back of your project, once my coloring was done, I adhered an extra clean piece of white tag to cover that bleed-through . . .


This view shows how the card front looks when the card is closed.  You get a glimpse of the lovely little lady through the window.


I'm entering this card into the following challenges:
Papertake Weekly "New Stash, New Year" (here) - Cheery Lynn's tiniest flowers EVER!
Crafty Sentiments "Anything Goes" (here) Add #6 after name
Tuesday Throwdown "Stripes" (here)
Simon Says Stamp! "Emboss It!" (here) - embossed heart circle around window
Divas by Design "Use Ribbons" (here)
Cute Card Thursday "Warm It Up!" (here)
Stampin' for the Weekend "Happy Birthday" (here)
Sweet Stampin' "Favorite Style" (here) - Shaped Cards
Bunny Zoe's Crafts "Stitching" (here)
Through the Purple Haze "Anything Goes" (here)


Copics used:
skin - E000, E01, E11, E93, BV00
hair - E31, E35, E47
bows, spots - YR12, YR15, YR18
shirt, shorts - BG11, BG15, BG18
gift bow - Y11, Y15, Y18, Y28
gift paper - BG72, BG75, BG78
teddy bear - R22, R59 (Nasty Rag Technique)
nose - W3, W0, W5
airbrushed background - W3, BG13, Y13, Y00


As always, I'm so glad that you stopped by to visit!

~ Rose

Tuesday, December 31, 2013

My 2013 Blog Year In Review

I spent some time reviewing my 2013 blog posts and sadly my blogging shows that my health has been poorly this year.  Unfortunately I was not able to meet many of my design team commitments.  I'm grateful to the design teams of Crafts and Me Stamps, the Digi Bells of Elisabeth Bell's Designs and the lovely ladybugs of Ladybug Crafts Ink who have been patient with me while I recover as they have allowed me to continue to participate on their teams whenever I can.  I am on the mend and expect to show more projects in 2014 as I enjoy being part of introducing more of their amazing images.

I began the year as a more-experienced blogger. I continue to be inspired by you uber-talented artists who show work that I've come to know and love.  Some of my favorite 2013 occasions and projects are included below.  Basic card art rocks and fancy folds and other projects are especially fun and exciting to see!  I still enjoy my classically-shabby style - LOL!!!

There are five individual cards shown below so I enter this post in Debby's My Favourite Five of 2013 for a chance to win her fabulous favorite things candy.  (You can click on each pic to link to the posts for more details.)

Enter until Jan. 11, 2014

In January, I enjoyed rockin' in the New Year with KennyK's ElenaK . . .

http://inrosiesbook.blogspot.com/2013/01/card-art-with-copics-kenny-ks-elenak.html


February shows my use of the lovely Martini Nikki and several of my coordinating handmade flowers that I really love to make . . .

http://inrosiesbook.blogspot.com/2013/02/card-art-with-copics-ladybug-crafts-ink.html


In March I was officially crowned as a Ladybug with a beautiful tiara - LOL!!!  This tag using Queen of Hearts seemed appropriate to celebrate.

http://inrosiesbook.blogspot.com/2013/03/tag-art-with-crafts-and-me-stamps-queen.html


I had way too much fun adding stamped seasonal scenery through the window of Window Seat Billie and paper-piecing drapes to coordinate . . . (winter, spring, summer, fall)


In May, I played around with Photoshop until I learned how to merge digital images.  This example shows Geraldine in Paris . . .

http://inrosiesbook.blogspot.com/2013/05/card-art-with-copics-crafts-and-me.html


I struggled through the Summer but was able to begin Christmas-time cards using this 'Twas the Night Before Christmas image . . .

http://inrosiesbook.blogspot.com/2013/07/elisabeth-bells-world-challenge.html


I was honored to accept a guest design team spot at Sweet Stampin' for the month of September then sadly I was unable to meet their needs for my final week.  I did however add my first "no lines technique" on a scenic side-step card . . .

http://inrosiesbook.blogspot.com/2013/09/elisabeth-bells-apple-berry-digi-bells.html


When MiC and LMM hosted their first Graffiti Party, I couldn't wait to challenge myself by using their urban images and created my first screen card . . .

http://inrosiesbook.blogspot.com/2013/10/mic-and-lmm-freebie-challenge-graffiti.html


Finally in December, I got inky and messy and had a ton of fun working on this alcohol-inked, stamped, ornament-window tag . . .

http://inrosiesbook.blogspot.com/2013/12/tag-art-with-alcohol-inks-and-die-cuts.html


While I've been unwell, unmotivated and less than creative, it's been another wonderful year in papercrafting and blogging.

I am ever grateful for your kind words, encouragement and inspiration throughout 2013.

Here's wishing you a happy and healthy New Year that's overflowing with all good things!


As always, I'm so glad that you stopped by to visit!

~ Rose

Sunday, October 27, 2013

Elisabeth Bell's World Challenge: Witches

The Digi Bells design team over at the Elisabeth Bell's World Challenge Blog wants to see your Witches.  A very lucky randomly selected entry will win TWO Elisabeth Bell digi images of their choice AND an exclusive stamp from Whiff of Joy!  You can find out more about this challenge and sponsors here.

Here's a closer view of my Copic-filled image with a few highlights added with a Sakura Gelly Roll medium White marker . . .


Layers of Bazzill Raven black and Green Bling with patterned sheets from Little Yellow Bicycle's (LYB) Frightful 8x8 tablet form my side-open card.  A Spellbinders Scalloped Circle die cut of black netting lies behind the Lifestyle Crafts Large Circle shaped image.  An EK Success Whale of a Punch Photo Corner Scallop of Doodlebug Design's black sugar paper is popped up in an upper corner.

A journaling frame from the LYB Frightful tablet, matted with black glossy paper, holds a black paper covered chipboard bat from a Sizzix Tim Holtz Alterations "Bewitching Hour" die.  A few handmade flowers made from a Punch Bunch small blossom and birch leaf with a pearl center are lightly painted with Star Dust Stickles to add sparkle to the other upper corner.


A "bewitching" bracket from the LYB Frightful tablet lies beneath a bow made from Michaels' 3/8" Celebrate It black metallic ribbon and another handmade flower from a Cheery Lynn Build-a-Flower #1 die set with Punch Bunch extra large birch and medium oak leaves painted with Star Dust Stickles for wonderful glimmer.  A couple of QuicKutz digital image pumpkin vines, cut by my Silhouette electronic cutter are spritzed with Tattered Angels Creme de Chocolat Glimmer Mist to add a swirling border.


Here's a view of my completed card front showing my use of Elisabeth Bell's Little Witch with a Broom clear stamp image . . . There's amazing sparkle, shimmer and glimmer all over this card - it's a shame that I couldn't capture it in the photos.


Here's a view of the inside of my card . . .


You can find more inspiration using Elisabeth Bell's digital images at the Digi Bells Design Team blog here and many rubberstamp and clear stamp images at the Elisabeth Bell's World challenge blog here.


I'm entering this card into the following challenges:
Bunny Zoe's Crafts "Ribbon" (here)
Simon Says Stamp and Show "Spooky" (here)
Simon Says Stamp "Halloween or Halloween Colors" (here)
Crafty Creations "Halloween Characters" (here)
Divas by Design "Spooked" (here)
Cute Card Thursday "Spooktacular" (here)
Paper Crafting Journey "Anything Goes" (here)
Southern Girls "Shine On" (here)
Stampin' For the Weekend "Something Spooky" (here)
Fashionable Stamping "Make a Card" (here)

Copics used:
skin - E000, E01, E11, E93, BV00
hair - E31, E35, E47
broom handle, pumpkin stems - E31, E35, E37
broom bristles - Y21, Y26, Y28 + atyou Spica Gold
pumpkins, clothing trim - E02, E04, E09
hat, cloak - V20, V22, V25, V28
clothing trim - G40, G43, G46
spider, web - atyou Spica Silver
airbrushed background - Y21


As always, I'm so glad that you stopped by to visit!

~ Rose

Saturday, September 14, 2013

Card Art with Copics: Ryder Cole by KennyK

I'm thrilled to participate in this week's Sweet Stampin' "Fancy Folds" challenge as a guest designer.  I'm so lucky to be invited to submit another project to be displayed along with the Sweet Stampin' team projects.  Thanks to Tracey and the rest of the Sweet Stampin' design team for including me!  (You can find out more about this Iva Nova Chest AND The Ribbon Girl sponsored challenge and the wonderfully talented Sweet Stampin' design team here.)

Meet Ryder Cole.  He's one of the few really cool KennyK images that you can get as a digi from KennyK's online shop here or as a rubberstamp from Whimsy Stamps here.  Ryder Cole is a great image to have on hand to meet those awkward teenage boy events like birthdays, thinking of you or congrats for a great job done.


This photo shows my completed card front where I've used this great teenage boy image.  Spellbinders Labels Four (with Grands Labels Four) die cuts shape my image.  Bazzill cardstock is layered with Rusty Pickle's Lizzie's Cats spotted paper.  A border is made using McGill's single star punch and a bit of Michael's 1/8" Textured Trios striped ribbon.  A Jillibean Soup Beanstalks twine is tied in an upper corner.  A few QuicKutz Revolution Flourishes are scattered about while a single handmade flower, lightly painted with Diamond Stickles, (Punch Bunch 5-petal flower, small cosmos and birch leaf) sits in the lower right corner. 


I prepared a "Happy Fall" tag to adhere to the front (Get it?  Wishing a skateboarder a Happy Fall!?!? LOL!!!) .  I decided to hang on to the piece to use if I give the card to a young man who won't be hurt by it.  LOL!!!  Teenagers can be sooo temperamental . . . 
 
And here's the inside of my card showing Karen Foster Design's Fall Foliage patterned paper.  I left the sentiment area blank because I'm really not sure how I'll use this card at this time.


This view shows my Flip Z card, open and ready for display . . . This pic doesn't show the remaining empty space left as the image flips to the front.  This post of my Flip Z card shows the space much better (here).


Pop over to the Sweet Stampin' challenge blog for wonderful design team inspiration and enter your "Fancy Folds" project to win some fabulous prizes.


I'm entering this card into the following challenges:
One Stitch at a Time "Use a Digi" (here)
Kenny K's Krafty Krew "Colors of Fall" (here)
Whimsy Stamps Monthly "Masculine Cards" (here)
Oldie but Goodie "Spots and Stripes" (here)
Crafty Sentiments "Anything Goes" (here)
Tuesday Throwdown "Anything Goes" (here)
Crafty Catz "Men/Boys" (here)
Sketch Saturday "Sketch by Jen" (here)


Copics used:
skin - E000, E01, E11, E93, BV00
hair, collar, pants - E31, E35, E47
jacket - E13, E17, E19
hat, shirt, rag, sneakers - YG91, YG95, YG99
chain, axles - C1, C3, C5
wheels - T0, T6, T9
airbrushed background - E17, E35, YR24, YG95


As always, I'm so glad that you stopped by to visit!

~ Rose

Thursday, July 25, 2013

Elisabeth Bell's World Challenge: Christmas in July

The Digi Bells design team over at the Elisabeth Bell's World Challenge Blog wants to see your Christmas-themed projects.  A very lucky randomly selected entry will win TWO Elisabeth Bell digi images of their choice AND two stamps courtesy of our very own Digi Bell Lynda!  You can find out more about this challenge and sponsors here.

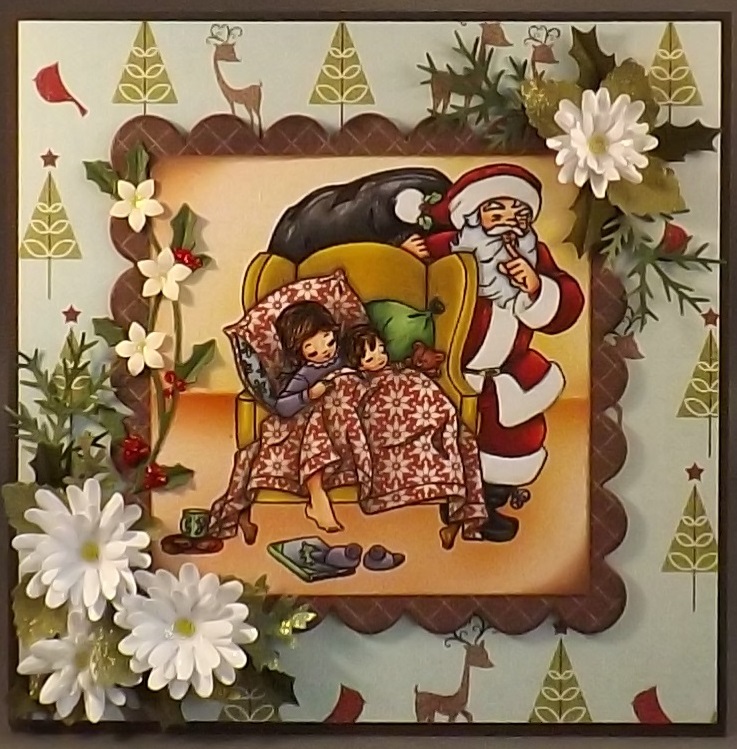
I've used this sweet clear stamp image called Twas the Night Before Christmas designed by Elisabeth Bell for Belles 'n Whistles.  These sleepy children dream happily while waiting for Santa's visit.

This pic shows a closer view of my Copic-filled image.  I also stamped my image onto Basic Grey's Eskimo Kisses Glazed Apple patterned paper then fussy cut the pillow and blanket.  I used my Copic colors to add shadows after adhering the pieces to my image.  Hampton Art's Sprinkle Flocking Set provides white dimensional and velvety texture over Santa's hat, jacket and pant cuffs.


Layers of Bazzill brown cardstock with My Mind's Eye I Believe "Reindeer" double-sided patterned paper form my easel card.  I covered a piece of Grafix medium weight chipboard with the opposite side of the paper then die cut it using a Sizzix Clear Scallop Square die to frame my image.  The edges are inked with Prima's Dark Bark chalk ink.
 
A Memory Box Holly Vine, cut into two pieces back up other Christmas greenery made from a McGill pine branch and Punch Bunch birch, oak and holly leaves.  Layers of Punch Bunch daisies with Yellow Stickles at the center form my handmade Christmas paper white flowers.  A few Punch Bunch mini kikyou flowers and Xmas Red Stickles accent my holly vine.


Here's a view of the front of my completed card showing my use of Belles 'n Whistles Twas the Night Before Christmas, as designed by Elisabeth Bell, surrounded by Christmas greenery and flowers . . .


The inside of my card is decorated to coordinate with the front and contains a stamped sentiment from a Kraftin' Kimmie's Christmas Clara set.  My Mind's Eye Stella and Rose Hattie "Buddies" Buttons are tied with My Mind's Eye Miss Caroline Fiddlesticks "Lucky" twine.


Here's a view of my easel card, open and ready for display . . .


For a chance to win a fabulous prize, get over to the Elisabeth Bell's World Challenge Blog and add your entry into this month's Christmas in July challenge!


I'm entering this card into the following challenges:
Christmas All Year Long "It's All About Santa" (here)
PaperCrafting Journey "Punches/Die Cuts" (here)
Sweet Stampin' "Christmas in July" (here)
Dream Valley "Fancy Folds" (here)
Cards for Men "Christmas in July" (here)
Sweet Stamps "Christmas Greenery" (here)
Elphine House Australia "Christmas in July" (here)
Divas by Design "Anything Goes" (here)
Creative Inspirations "BINGO" (here) - top row, first column


Copics used:
skin - E000, E01, E11, E93, BV00
hair, chair legs, cookies - E31, E35, E47
Santa's beard, bells, book cover - C1, C3, C5
Santa's suit, plate - R22, R29, R59
Santa's boots, sack - T0, T6, T9
bear - E13, E17, E19, R22
holly, tree, pillow, cup - G40, G43, G46
chair - Y13, Y26, Y28
girl pj's, slippers - V12, V25, V28
shadows to paper pieced blanket and pillow - W1, W3, W5
airbrushed ground - E11, Y26, E15


As always, I'm so glad that you stopped by to visit!

~ Rose

Monday, July 15, 2013

Card Art with Copics: Elisabeth Bell's Christmas Hearth

These very excited yet curious children consider the magic of Santa's arrival while they investigate the fireplace where they've been told that Santa will appear.  You can find this wonderful clear stamp image designed by Elisabeth Bell for Belles 'n Whistles here.  Teresa at Crafts and Me Stamps is having a mahoosive sale of rubber and clear stamps so pop over there now to order yours!

Here's a closer view of my Copic-filled image.  The edge is framed using Marvy Uchida's Calligraphy Opaque Paint Gold Marker.


Four designs from Bo Bunny's Liberty Collection patterned paper are layered with Bazzill red, white and blue cardstock to form my easel card.  Three decorative metal brads accent the upper right corner as though Santa's sleigh, pulled by his magical reindeer will arrive soon.  Two handmade poinsettia flowers, made from Punch Bunch Kikyou and holly leaf punches, tie the sentiment to the image in the lower left corner.  An EK Success Paper Shaper Photo Corner Scallop punch, embossed with a QuicKutz' 2x2 Goosebumps HoHoHo metal embossing folder, accents one corner of my image and base sentiment.  A vertical sentiment from a Stamping Sensations Perfectly Said - Lori's Words stamp set lies alongside of my image.   

Here's a view of my completed card front showing my use of Elisabeth Bell's Christmas Hearth clear stamp image . . .


The base of the card includes a lovely stamped sentiment from Artful Legacy . . .


Here's a view of my easel card, open and ready for display . . .


You can find more inspiration using Elisabeth Bell's digital images at the Digi Bells Design Team blog here and many rubberstamp and clear stamp images at the Elisabeth Bell's World challenge blog here.


I'm entering this card into the following challenges:
Cards for Men "BINGO" (here) - Die/Punch Sentiment Multifold
Crafty Sentiments "Christmas In July" (here)
Fab 'n Funky "Christmas In July" (here)
Paper Crafting Journey "Christmas In July" (here)
Southern Girls "No Spoolin'" (here)
Delicious Doodles "All About the Scenery" (here)
Elphine House Australia "Add Some Metal" (here) - Decorative Metal Brads
Sassy Studio Designs "Christmas In July" (here)
Christmas Cards All Year 'Round "It's All About Santa" (here)
Dream Valley "Fancy Folds" (here)


Copics used:
skin - E000, E01, E11, E93, BV00
hair, logs, bear - E31, E35, E47
bricks, berries, apple - R22, R29, R59, W5
hearth, candlesticks, ornaments - C1, C3, C5
ornaments, flame glow - Y13, Y26, Y28
tree, pine - G82, G85, G99
boy sleeper, stocking - B21, B37, B39
girl sleeper , stocking - R11, R14, R27
mantel - E13, E17, E19
airbrushed background - E11, Y26

As always, I'm so glad that you stopped by to visit!

~ Rose

Thursday, April 25, 2013

Elisabeth Bell's World Challenge: April Showers Bring May Flowers

The Digi Bells design team over at the Elisabeth Bell's World Challenge Blog wants to see your projects showing loads of flowers.  A very lucky randomly selected entry will win TWO Elisabeth Bell digi images of their choice AND a fabulous prize from Quixotic Paperie!  You can find out more about this challenge and sponsors here.

I've used this sweet clear stamp image called Story Time designed by Elisabeth Bell for Belles 'n Whistles.  This lovely little lady happily reads her favorite book while resting under a blooming tree.

This pic shows a closer view of my Copic-filled image.


Layers of Bazzill cardstock with flowered paper from a 6x6 Making Memories Flower Patch paper pad form my side open card.  Faux stitching provides a contrasting border.  A Wyla white ruffled lace strip lies below a Martha Stewart Punch Around the Page Daisy Edge punched border.  A few black mini brads accent one corner.  A sentiment from a Crissy Armstrong Whimsy On Thoughts Sentiments set is topped with a sheer yellow swirl ribbon.  KaiserCraft pearl strips are scattered throughout.
 
Several handmade flowers are made from layered Punch Bunch punches.  You'll find Asters, Round Petal Blossoms with a rhinestone center and blue Paper Whites with pearl centers.  Punched Birch leaves accent my flowers.  All are lightly painted with a layer of Diamond Stickles for super sparkle.


Here's a view of the front of my completed card showing my use of Belles 'n Whistles Story Time, as designed by Elisabeth Bell, surrounded by loads of flowers as she rests peacefully . . .


The inside of my card is decorated to coordinate with the front and contains space for a handwritten note or stamped sentiment . . .


For a chance to win a fabulous prize, get over to the Elisabeth Bell's World Challenge Blog and add your entry into this month's April Showers Bring May Flowers challenge!


I'm entering this card into the following challenges:
Elphine House Australia "Pearls and Lace" (here)
ABC "L is for Lovely Lace" (here)
Simon Says Stamp! "Anything Goes" (here)
Creative Inspirations "Ribbons and Pearls" (here)
Wags 'n Whiskers "May Flowers" (here)
All Sorts "A Passion for Flowers" (here)
Creative Card Crew "Handmade Flowers" (here)


Copics used:
skin - E000, E01, E11, E93, BV00
hair - T0, T6, T9
tree - E31, E35, E47
pants, bird, flowers, butterfly - B21, B23, B26
grass, leaves - YG11, YG13, YG17
book cover, flowers - R11, R12, R14
shirt, patches - Y21, Y23, Y26, Y28
hat, book pages - E40, E41, E42, E43
airbrushed ground - YG11, YG13; sky B12


As always, I'm so glad that you stopped by to visit!

~ Rose

Friday, April 12, 2013

Card Art with Copics: Kenny K's Download Diva

Kenny K has a wide range of fun images that make me happy.  I'm hoping to share the gift of music with someone special and find this image to be perfect for the music lovers in my life.  I can include the gift of a CD, iTunes gift card, concert tickets or any other music-related items.

I've used Download Diva on a flip-easel card to share my gift with a music lover.  Here's a closer view of my Copic-filled image.


Layers of Bazzill cardstock with Melissa Frances Stella patterned paper form my flip-easel card and faux stitching adds a contrasting border. I've used a set of bonus cutting dies from a Lifestyle Crafts 2012 Genius Magnetic Ultimate Platform system to shape my image. A Technique Tuesday Pieces of the Puzzle Autism set provided my stamped "listen" sentiment.  An EK Success Whale of a Punch Photo Corner Scallop punch provided my corners.

When the layers of my handmade flowers are dried, I like to paint a light layer of Star Dust or Diamond Stickles glitter glue over the leaves and petals for added glimmer.  These coordinating flowers are made from layers of a variety of Punch Bunch punched shapes from the scraps leftover after I made my card.


Here's a view of the front of my card showing how I've used Download Diva.  A 7Gypsies Diva dangle/charm hangs from a Recollections 3/8" colorful musical note ribbon bow.  Left to right you see my handmade versions of mini aster, bachelor's button, plum blossom, coreopsis, chrysanthemum, cherry blossom and another mini aster.


The base of my card includes a stamped quote from a Gel-a-tins Musical set that lies over a QuicKutz Revolution Library Pocket.  I carried some of the scallops from the front to the base by using a Fiskars Treading Water border punch to the top of the tag I placed inside of the pocket.


Here's a view of my flip-easel card, open and ready for display . . .


I'm entering this card into the following challenges:
Kenny K "Easel Card" (here)
One Stitch at a Time "Anything Goes" (here)
Papertake Weekly "BINGO" (here) - punches, free, ribbons
Tuesday Throwdown "Fancy Folds" (here)
Simon Says Stamp "April Showers and/or Spring Flowers" (here)
Fab-n-Funky "Spring Colours" (here)
Divas by Design "Flowers" (here)
A&T Challenges "Flowers" (here)


Copics used:
skin - E000, E01, E11, E93, BV00
hair, shoes - E31, E35, E47
pants, eyes - YG61, YG63, YG67, YG99
sleeves, socks, cell phone - V20, V22, V25, V28
top, accents on sneakers - RV91, RV93, RV95
sneakers - T0, T6, T9
shoe laces - E42, E40, 0
airbrushed background - RV93, V22, speckles YG67


As always, I'm so glad that you stopped by to visit!

~ Rose

Tuesday, April 9, 2013

Ladybug Crafts Ink Challenge: Toddlers, Teens and In Betweens

The current challenge by the Lovely Ladybugs over at the Ladybug Crafts Ink TLT Challenge is to create a project for Toddlers, Teens and In Betweens. Hop over to enter your project for a chance to win TWO cling stamps (or FOUR if you use a Ladybug Crafts image!). You can find out more about this challenge and the wonderfully talented Ladybugs here.

* * * * *

Ladybug Crafts Ink carries a fabulous line of The Teenagers digital images featuring Jess and Josh that I've found to be unique and perfect for using on current day projects to share loving thoughts and wishes with teens.  I've used The Teenagers Texting Josh to create a birthday flip-easel card.  My biggest challenge was figuring out where I wanted him to be.  Is he at the mall? on a ship? at a boardwalk? a ballgame? a bridge?  Finally I used my Copic Multiliner to scribble some squiggly lines behind him with the hopes of it looking like water.

This view shows my Copic-filled image.


Layers of Bazzill Candy Apple cardstock with TCP Studio Party Hearty Birthday Wishes double-sided patterned paper form my flip-easel card and faux stitching adds a contrasting border.  I've used the die-cutting "beyond the edge" technique with a Spellbinders Labels Five to shape my image.  A Close To My Heart Card Chatter - Birthday set provides my It's Your Birthday sentiment.  A handmade accent daisy made from Punch Bunch small daisies, mini sun and small birch leaf sets near my sentiment with a Stampin' Up! ladybug from an All Wrapped Up Accessories set.

Here's a view of my completed card front showcasing Ladybug Crafts Ink The Teenagers Texting Josh . . .


The base includes a popped up "It's Your Special Day" rubberstamped sentiment by Endless Creations with a couple of phrases cut out from the patterned paper . . .


Here's a view of my flip-easel card, open and ready for display . . .


Looking for fabulous inspiration using Ladybug Crafts Ink images? You'll find more designs by the Lovely Ladybugs at the Ladybug Crafts Ink challenge blog (here).


I'm entering this card into the following challenges . . .
Tuesday Throwdown "Fancy Folds" (here)
Simon Says Stamp! "Happy Birthday" (here)
Crafty Creations "Flowers" (here)
Crafty Catz "Anything Goes" (here)
Delicious Doodles "Folds, More than One" (here)
One Stop Craft "Birthdays" (here)
One Stitch at a Time "Anything Goes" (here)
Dream Valley "Happy Birthday" (here)
Craft Your Passion "Water, Water Everywhere" (here)
Stamp with Fun "Birthday" (here)


Copics used:
skin - E000, E01, E11, E93, BV00
hair - E31, E35, E47
pants - BG70, BG72, BG75, BG78
hoodie - YR61, YR65, YR68
sneakers - T0, T6, T9
railing - C1, C3, C5
ground - E40, E41, E42, E43
water - BG000, BG0000, Copic Multiliner 0.03
sky - B0000

* * * * *

As always, I'm so glad that you stopped by to visit!

~ Rose

Thursday, April 4, 2013

Card Art with Copics: Elisabeth Bell's Love You Miss You

This lovely little lady waits patiently for the arrival of someone special with birthday gifts.

I've used Elisabeth Bell's digital image, Love You Miss You, on a side-open card to share birthday wishes.  I printed her onto Bazzill Smooth Kraft cardstock.  A Creative Memories Corner Rounder softens the edges while a Martha Stewart Lace Heart border adds a delicate and loving touch.  Here's a closer view of my Copic-filled image.


Layers of Bazzill cardstock with Basic Grey Little Black Dress Classy Chic stripe patterned paper form the base for my card and is surrounded by faux stitching.  Punch Bunch large, medium and small Kikyou star-shaped flower punches peek out from behind two corners.  Close To My Heart Bitty Sparkles add a little bling to the center of three of the smallest layered accents.

Here's a view of my completed card front showcasing my use of Elisabeth Bell's Miss You Love You digi image.  I added a small birthday sentiment from Outlines Rubberstamps.


You can find Love You Miss You and more of Elisabeth's amazing digital images by visiting the Elisabeth Bell Digital Collection at her gallery here.

Looking for fabulous inspiration using Elisabeth Bell images?  You'll find it at the Digi Bells Design Team Blog here.


I'm entering this card into the following challenges:
Sketch Saturday "Sketch by Jen" (here)
Cupcake Craft "Color on Kraft" (here)
Papertake Weekly "Anything Goes" (here)
Simon Says Stamp! "Happy Birthday" (here)
Creative Impressions "Let's Get Krafty" (here)
Moving Along with the Times "Let's Get Krafty" (here)
Southern Girls "Make Like a Zebra - Use Stripes" (here)
All Sorts "Vintage" (here)
ABC Challenge "K is for Kraft" (here)
Elphine House Australia "Punch It!" (here)


* * * * *

Copics used:
skin - E000, E01, E11, E93, BV00
hair, basket, puppy - E31, E35, E37
trunk - E31, E33, E35
hardware, hat trim, dress patch - Y13, Y26, Y28
bouquet wrap - YG0000, YG00, YG01
pants, purse, top - B91, B95, B97
leaves, flip flops - YG11, YG13, YG25
roses - R20, R22, R35
petunias - V20, V25, V28
daisies - YR000, YR02, YR14
apron, bonnet - E40, E42, E44
grounding shadow - W1, W3, W5

As always, I'm so glad that you stopped by to visit!

~ Rose

Wednesday, April 3, 2013

Crafts and Me Stamps Challenge: Spring Flowers

The Dynamite Digi design team over at the Crafts and Me Stamps' challenge blog wants to see spring flowers on your projects.  Crafts and Me Stamps is sponsoring this challenge and offering a wonderful prize of a set of newly released vintage/shabby chic digital paper pads to a randomly selected entry. You can find out more about this challenge here.

I've used Easter Lily Fairy digital stamp by Hannah Lynn on a side open card to share spring wishes.  Here's a closer view of my Copic-filled image.  Super sparkly Yellow and Star Dust Stickles are lightly painted over stamen, petals and butterfly.


I've created handmade gerber daisies and accent daisies using Punch Bunch large oak leaves, large, medium and small daisies, small and mini suns, medium dusty miller leaves and small birch leaves punches.  Star Dust Stickles is lightly painted over flowers for beautiful sparkle.


Bazzill cardstock is layered with K&Company Smitten Butterflies flat single sided paper to create my card.  A Satin Sensations 5/8" Saffron satin ribbon provides a border and bow.  A self-curling ribbon wraps around my image base.  A stamped  sentiment set from a Kraftin' Kimmie Yvette set is placed at the top and bottom of my card front.
 
Here's a view of the front of my card showing how I've used Easter Lily Fairy.


The inside of the card is left blank for a handwritten note.


You've got to hop over to the Crafts and Me Stamps Challenge blog to see how the amazingly talented Dynamite Digi girls have shown their use spring flowers while using Crafts and Me Stamps digital images.


I'm entering this card into the following challenges:
Crafty Creations "Flowers and/or Fairies" (here)
Divas by Design "Spring Colours" (here)
Sweet & Sassy Digi "Think Spring" (here)
Sweet Stampin' "Oh So Girly" (here)
One Stitch at a Time "Spring" (here)
Papertake Weekly "Anything Goes" (here)
Simon Says Stamp and Show "Absolutely Anything Goes" (here)
Flutterby Wednesdays "Flowers" (here)


Copics used:
skin - E000, E01, E11, E93, BV00
hair - E31, E35, E47
leaves - YG11, YG13, YG25
lilies - Y21, Y23, Y26
wings - BV000, BV01, BV04
airbrushed background - Y21, YG11, YG13, BV01, BV04


As always, I'm so glad that you stopped by to visit!

~ Rose