Why Rosie's Book?

While growing up, I had a dear friend, Renee, that lived next door and with whom I spent much of my childhood. We grew, in different directions, and went on our merry way. Many years later, I ran into her parents and they kindly reminded me of the laughs they still have over my book. “What book?” I wondered with a puzzled look. "I don't remember a book." Hardy laughter accompanied their response. At some time during our childhood, I tried to convince Renee about something that her parents didn’t agree with. I told her that proof of its truth could be found “in my book.” Naturally she went home and tried to convince her parents of the same thing but they weren’t falling for it. She needed an edge and told them emphatically, “It’s in Rosie’s book!” After they caught their breaths from reborn laughter, they let me know how “Rosie’s book” has been cited for many other things throughout the years. They’ve also mentioned that they’d like to see “Rosie’s book” one day. I can’t remember all of the things that I said were in “my book” but I’m sure my dear friend’s parents can recall much more than I ever knew about – LOL!!! So, here it is . . . my version of things you might find In Rosie’s Book . . .

Showing posts with label Memory Box. Show all posts

Sunday, January 19, 2014

Card Art with Copics: Crafty Sentiments Opening Presents

I've had this lovely Crafty Sentiments Opening Presents rubberstamp for quite some time and this is the first time I've inked her up.  I love how she's brought her teddy to the unwrapping of the gift as dear teddy is obviously very important to her.

Here's a closer view of my Copic-filled image.  I've used a negative mask for the Nasty Rag technique to add some natural-looking fuzz to my teddy bear.


There's alot going on throughout the layers of this particular card and for the most part it turned out as I imagined it would.

I laid the folded half of my white paper just along the inside cut line of the Sizzix Tim Holtz Alterations Tag and Bookplates die so I could form my tag-shaped card.  I embossed the Spellbinders Heart Circles die to form a frame on the front of my card.  Once the embossing was done, I used the Spellbinders Large Standard Circle set to cut a circle for my window.

A piece of transparency adhered to the back becomes my window.  My handmade floral additions are made using Cheery Lynn Designs' Baby's Breath Flower Kit and Tiny Flower Kit, layered with some Punch Bunch small and mini birch leaves.  All flowers are lightly painted with a thin coat of Star Dust Stickles.

Three strips of 1/8" Wondertape are covered with Sparkle N Sprinkle's Aquamarine and Sunset glitter along with Stickles Dry Glitter in Lagoon to form my sparkling stripes at the base.

A Marvy small balloon punch acts as a tag topper with a gold eyelet and a bit of yellow ribbon tied through it.  A Close To My Heart Just a Number set sentiment is popped up above my window.


The left side of the interior shows TPC Studio Party Hearty Birthday Candles paper with a machine sewed zig zag stitch of metallic thread.  This is my first time using a sewing machine for the zig zag stitch and I have no idea how the corners are supposed to look.  I did try my best as I think the zig zag adds some pizzazz to a zesty party feeling.

My Crafty Sentiments "Opening Presents" image is stamped on the right side with a Morning Star sprinkled day sentiment just above my Copic-filled image.  A multi-striped ribbon is tied through that balloon punch tag topper.

I ran my die cut Memory Box Butterfly Chain upside down through my xyron "X" to make the front of the butterflies sticky.  I used the same glitter as I used for the stripes on the front of the card to color my sparkling butterfly border.


Because Copic inks are known to seep through the paper and will show on the back of your project, once my coloring was done, I adhered an extra clean piece of white tag to cover that bleed-through . . .


This view shows how the card front looks when the card is closed.  You get a glimpse of the lovely little lady through the window.


I'm entering this card into the following challenges:
Papertake Weekly "New Stash, New Year" (here) - Cheery Lynn's tiniest flowers EVER!
Crafty Sentiments "Anything Goes" (here) Add #6 after name
Tuesday Throwdown "Stripes" (here)
Simon Says Stamp! "Emboss It!" (here) - embossed heart circle around window
Divas by Design "Use Ribbons" (here)
Cute Card Thursday "Warm It Up!" (here)
Stampin' for the Weekend "Happy Birthday" (here)
Sweet Stampin' "Favorite Style" (here) - Shaped Cards
Bunny Zoe's Crafts "Stitching" (here)
Through the Purple Haze "Anything Goes" (here)


Copics used:
skin - E000, E01, E11, E93, BV00
hair - E31, E35, E47
bows, spots - YR12, YR15, YR18
shirt, shorts - BG11, BG15, BG18
gift bow - Y11, Y15, Y18, Y28
gift paper - BG72, BG75, BG78
teddy bear - R22, R59 (Nasty Rag Technique)
nose - W3, W0, W5
airbrushed background - W3, BG13, Y13, Y00


As always, I'm so glad that you stopped by to visit!

~ Rose

Tuesday, December 31, 2013

My 2013 Blog Year In Review

I spent some time reviewing my 2013 blog posts and sadly my blogging shows that my health has been poorly this year.  Unfortunately I was not able to meet many of my design team commitments.  I'm grateful to the design teams of Crafts and Me Stamps, the Digi Bells of Elisabeth Bell's Designs and the lovely ladybugs of Ladybug Crafts Ink who have been patient with me while I recover as they have allowed me to continue to participate on their teams whenever I can.  I am on the mend and expect to show more projects in 2014 as I enjoy being part of introducing more of their amazing images.

I began the year as a more-experienced blogger. I continue to be inspired by you uber-talented artists who show work that I've come to know and love.  Some of my favorite 2013 occasions and projects are included below.  Basic card art rocks and fancy folds and other projects are especially fun and exciting to see!  I still enjoy my classically-shabby style - LOL!!!

There are five individual cards shown below so I enter this post in Debby's My Favourite Five of 2013 for a chance to win her fabulous favorite things candy.  (You can click on each pic to link to the posts for more details.)

Enter until Jan. 11, 2014

In January, I enjoyed rockin' in the New Year with KennyK's ElenaK . . .

http://inrosiesbook.blogspot.com/2013/01/card-art-with-copics-kenny-ks-elenak.html


February shows my use of the lovely Martini Nikki and several of my coordinating handmade flowers that I really love to make . . .

http://inrosiesbook.blogspot.com/2013/02/card-art-with-copics-ladybug-crafts-ink.html


In March I was officially crowned as a Ladybug with a beautiful tiara - LOL!!!  This tag using Queen of Hearts seemed appropriate to celebrate.

http://inrosiesbook.blogspot.com/2013/03/tag-art-with-crafts-and-me-stamps-queen.html


I had way too much fun adding stamped seasonal scenery through the window of Window Seat Billie and paper-piecing drapes to coordinate . . . (winter, spring, summer, fall)


In May, I played around with Photoshop until I learned how to merge digital images.  This example shows Geraldine in Paris . . .

http://inrosiesbook.blogspot.com/2013/05/card-art-with-copics-crafts-and-me.html


I struggled through the Summer but was able to begin Christmas-time cards using this 'Twas the Night Before Christmas image . . .

http://inrosiesbook.blogspot.com/2013/07/elisabeth-bells-world-challenge.html


I was honored to accept a guest design team spot at Sweet Stampin' for the month of September then sadly I was unable to meet their needs for my final week.  I did however add my first "no lines technique" on a scenic side-step card . . .

http://inrosiesbook.blogspot.com/2013/09/elisabeth-bells-apple-berry-digi-bells.html


When MiC and LMM hosted their first Graffiti Party, I couldn't wait to challenge myself by using their urban images and created my first screen card . . .

http://inrosiesbook.blogspot.com/2013/10/mic-and-lmm-freebie-challenge-graffiti.html


Finally in December, I got inky and messy and had a ton of fun working on this alcohol-inked, stamped, ornament-window tag . . .

http://inrosiesbook.blogspot.com/2013/12/tag-art-with-alcohol-inks-and-die-cuts.html


While I've been unwell, unmotivated and less than creative, it's been another wonderful year in papercrafting and blogging.

I am ever grateful for your kind words, encouragement and inspiration throughout 2013.

Here's wishing you a happy and healthy New Year that's overflowing with all good things!


As always, I'm so glad that you stopped by to visit!

~ Rose

Saturday, December 14, 2013

Card Art with Copics: KennyK's Jet Setter

With the holidays on their way, many travelers are making arrangements so they can share special times with their families and friends.  With that in mind, I've opted to use KennyK's Jet Setter, complete with luggage, to share loving thoughts with my dear daughter who sadly won't be able to join us this year for our holiday celebrations.

Here's a closer view of my Copic-filled image.  I've painted a light coating of Walnut Stain Distress Stickles over her coat to add some sparkling texture.


I layered Bo Bunny's A Gift of Love "Believe Peace" over black cardstock then used Memory Box' Grand Heart to create my double gatefold card with a heart window.

This view shows my card when fully opened so the heart windows show on each side . . . I've added an Inkadinkado Warm Holiday Wishes clear stamp then tried to fill the stars with the brush tip of a Wink of Stella clear pen.  I'm unhappy with the uncontrollable blobs of sparkle that fell over my stars.


Prima's Tea Roses Sweet Teal and Heirloom Paper Leaves Willow are clustered with a Basic Grey's Fabric Yo Yos button flower and cotton flower with Michael's Celebrate It Sparkling 3/8" ribbon, Morex Corp's white 1/4" Organdy ribbon and Petite Stitch 1/8" ribbon to embellish the lower right of the front of my card.


This scanned view shows how the card front looks when the sides are closed and overlap . . .


I'm entering this card into the following challenges:
KennyK's Krafty Krew "Button, Boots and Bling" (here)
Divas by Design "Anything Goes" (here)
Cute Card Thursday "Christmas Catch Up" (here)
Paper Crafting Journey "It's Christmas Time" (here)
Crafty Catz "Anything Goes" (here)
Sweet Stampin' "Last Minute Christmas" (here)
Crafty Ribbons "Anything Goes with Ribbon" (here)
Totally Gorjuss "Special Christmas" (here)
Southern Girls "Christmas-themed Projects" (here)


Copics used:
skin - E000, E01, E11, E93, BV00
hair, suitcase - E31, E35, E47
sweater, stickers - RV63, RV66, RV69
pants, stickers - BG70, BG72, BG75, BG78
suitcase - YG21, YG23, YG25
boots, wheel - T0, T6, T9
suitcase hardware - C1, C3, C5
grounding shadow - W5, W3, W1
airbrushed background - B72, speckles BG78, R89


As always, I'm so glad that you stopped by to visit!

~ Rose

Friday, September 27, 2013

Elisabeth Bell's Apple Berry Digi Bells' Blog Hop

To celebrate the newest addition to the Elisabeth Bell Design's Digital Gallery (here), the Digi Bells Design Team is hosting a blog hop.

How can you win your own Apple Berry digi image? You'll have to hop through and leave comments on EACH blog. [You can find the full list of 10 other blogs at the Digi Bells Design Team blog (here).] Lynda will pick 2 blogs at random and the winners will be picked from those comments. The hoppers will have until Friday, October 4, 2013 at 9 AM to leave comments. The winners will be posted at the Digi Bells' blog on Saturday, October 5, 2013.

Reminder: Buying then sharing digital images is theft. Sharing digital images takes income away from the artist.


* * * * *
 
I've used the "no lines" technique (see my How To Print notes at the end of this post) on this newly released Apple Berry digital stamp by Elisabeth Bell to make a scene on a side-step card.  This view shows a closer view of my Copic-filled image after I added Glossy Accents over her pie and the apples in her basket.  I've used the Lifestyle Crafts Large Ovals set to shape my image.


Bazzill's green cardstock is layered with an old Stampin' Up! green apple patterned paper to form my card.  A bit of Creative Imaginations Thin Cherry Real Wood lies beneath my QuicKutz Santa's Workshop window frame and hand pleated apple curtains.  Through the window, you see a few QuicKutz Mini Apples, covered with Glossy Accents, hanging from the branches of a couple of QuicKutz trees from a Santa's Workshop Heritage Accessories set.  I included a layer of a white Memory Box Estate Fence die cut to make the apple trees appear further away.  A few more Glossy Accents-covered mini apples lie at the base of my image while a knotted lace ribbon adds another delicate layer in the top corner.


This view shows the layers of the scenery elements of my side-step card.


Remember to leave your comment below then move along to your next stop at the wonderfully-talented Lynne's blog (here).  For reference, you can find the full list of the blogs to hop at the Digi Bells Design Team blog (here).


I'm entering this card into the following challenges:
Simon Says Stamp! "Anything Goes" (here)
Divas by Design "Monochrome" (here)
Cute Card Thursday "Pretty Ribbons" (here)
Southern Girls "The World in Monochrome" (here)
Creative Craft "Use Ribbon" (here)
Oldie but Goodie "Dies and Punches" (here) - everything is OLD except for the digi image
Crafty Ribbons "Monochrome" (here)
Elphine House Australia "Simply Cute" (here)
Creative Inspirations "Favorite Stamp Brand" (here) - Elisabeth Bell Designs


Copics used:
skin - E000, E01, E11, E93, BV00
hair, pie, basket - E31, E35, E47
apples - YG91, YG95, YG97
leaves - YG11, YG13, YG17
hat, top, knickers, apron, mitts, floor background - E40, E41, E43, 0
ribbons atyou Spica Olive
faux suede scribbled wall background - YG91


On 9/27/13, Elisabeth Bell wrote:  "Rooossee, your card is absolutely EXQUISITE!!"

* * * * *

How to Print Prepare Digital Image for "No Lines" Technique using Photoshop Elements 8
FIRST STEP
Select File tab; Select Open then select .jpg or .png image
Select Image tab
Slide to Convert Color Profile
Select Convert to (*) Profile

SECOND STEP
Select Layer tab
Slide to New Adjustment Layer
Select Hue/Saturation
Mode:  Normal Opacity: 50
Adjustments show at right; slide Lightness to far right

Select File tab then Save As:  .jpg copy file then print image
Do NOT save changes to your original .png image or you will LOSE your digi investment!!!

Note:  You may NOT alter the line work of artist-created digital images.  These steps are simply the digital equivalent of stamping a rubberstamp image in gray ink rather than black ink.

* * * * *

As always, I'm so glad that you stopped by to visit!

~ Rose

Thursday, July 25, 2013

Elisabeth Bell's World Challenge: Christmas in July

The Digi Bells design team over at the Elisabeth Bell's World Challenge Blog wants to see your Christmas-themed projects.  A very lucky randomly selected entry will win TWO Elisabeth Bell digi images of their choice AND two stamps courtesy of our very own Digi Bell Lynda!  You can find out more about this challenge and sponsors here.

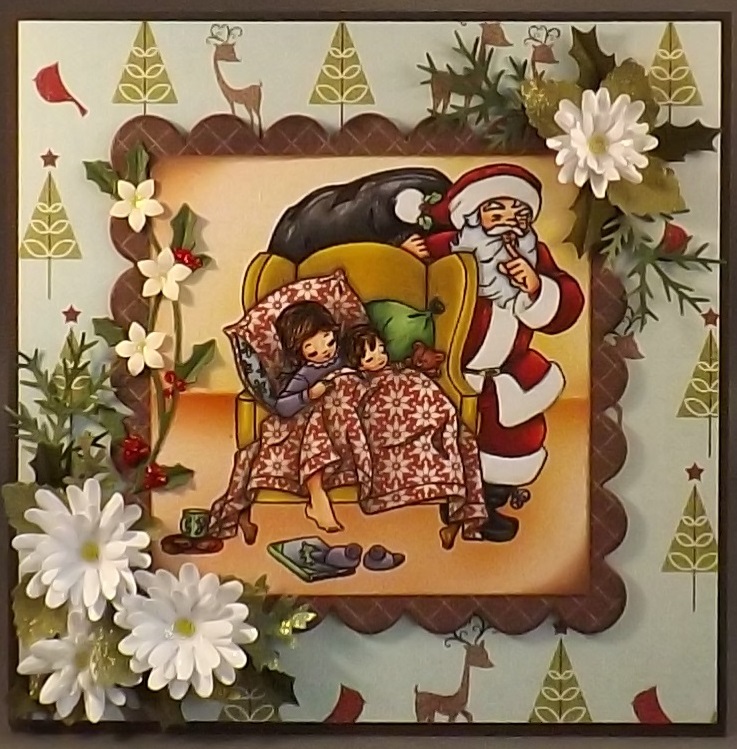
I've used this sweet clear stamp image called Twas the Night Before Christmas designed by Elisabeth Bell for Belles 'n Whistles.  These sleepy children dream happily while waiting for Santa's visit.

This pic shows a closer view of my Copic-filled image.  I also stamped my image onto Basic Grey's Eskimo Kisses Glazed Apple patterned paper then fussy cut the pillow and blanket.  I used my Copic colors to add shadows after adhering the pieces to my image.  Hampton Art's Sprinkle Flocking Set provides white dimensional and velvety texture over Santa's hat, jacket and pant cuffs.


Layers of Bazzill brown cardstock with My Mind's Eye I Believe "Reindeer" double-sided patterned paper form my easel card.  I covered a piece of Grafix medium weight chipboard with the opposite side of the paper then die cut it using a Sizzix Clear Scallop Square die to frame my image.  The edges are inked with Prima's Dark Bark chalk ink.
 
A Memory Box Holly Vine, cut into two pieces back up other Christmas greenery made from a McGill pine branch and Punch Bunch birch, oak and holly leaves.  Layers of Punch Bunch daisies with Yellow Stickles at the center form my handmade Christmas paper white flowers.  A few Punch Bunch mini kikyou flowers and Xmas Red Stickles accent my holly vine.


Here's a view of the front of my completed card showing my use of Belles 'n Whistles Twas the Night Before Christmas, as designed by Elisabeth Bell, surrounded by Christmas greenery and flowers . . .


The inside of my card is decorated to coordinate with the front and contains a stamped sentiment from a Kraftin' Kimmie's Christmas Clara set.  My Mind's Eye Stella and Rose Hattie "Buddies" Buttons are tied with My Mind's Eye Miss Caroline Fiddlesticks "Lucky" twine.


Here's a view of my easel card, open and ready for display . . .


For a chance to win a fabulous prize, get over to the Elisabeth Bell's World Challenge Blog and add your entry into this month's Christmas in July challenge!


I'm entering this card into the following challenges:
Christmas All Year Long "It's All About Santa" (here)
PaperCrafting Journey "Punches/Die Cuts" (here)
Sweet Stampin' "Christmas in July" (here)
Dream Valley "Fancy Folds" (here)
Cards for Men "Christmas in July" (here)
Sweet Stamps "Christmas Greenery" (here)
Elphine House Australia "Christmas in July" (here)
Divas by Design "Anything Goes" (here)
Creative Inspirations "BINGO" (here) - top row, first column


Copics used:
skin - E000, E01, E11, E93, BV00
hair, chair legs, cookies - E31, E35, E47
Santa's beard, bells, book cover - C1, C3, C5
Santa's suit, plate - R22, R29, R59
Santa's boots, sack - T0, T6, T9
bear - E13, E17, E19, R22
holly, tree, pillow, cup - G40, G43, G46
chair - Y13, Y26, Y28
girl pj's, slippers - V12, V25, V28
shadows to paper pieced blanket and pillow - W1, W3, W5
airbrushed ground - E11, Y26, E15


As always, I'm so glad that you stopped by to visit!

~ Rose

Wednesday, March 20, 2013

Crafts and Me Stamps Challenge: Buttons and Bows (Use Both)

The Dynamite Digi design team over at the Crafts and Me Stamps' challenge blog wants to see you use BOTH buttons and bows on your projects.  Marianne Designs is sponsoring this challenge and offering a wonderful prize of a die and clear stamp to a randomly selected entry. You can find out more about this challenge here.

I've used Little Miss Deelish digital stamp by Hannah Lynn on an easel card to share birthday wishes.  Here's a closer view of my Copic-filled image.  It wasn't until I was adding color to this sweet unicorn that I discovered all of the candy treats tied to his backside, head and legs.  He's covered in gummy bears, lollipops, ice cream cones, candy canes, and wrapped mints.  Who'dathunkit?!?!?!  Now I understand where the Deelish comes from.  LOL!!!  I tried to draw attention to the candy pieces by adding Lavender, Yellow, and Xmas Red Stickles to the candies.  The unicorn's horn, mane and tail are covered with Stardust Stickles.  Magenta, Firefly and Yellow Stickles covers the butterfly and fairy wing.


I've stamped gummy bear and wrapped mint images from a Stampin' Up! All Wrapped Up Accessories set, a lollipop from a SU! Very Punny set and an ice cream cone from a See D's Recipes set.  I added a bit of Copic color to my stamped candies then ran them through my Xyron "X."  I turned the strip over and ran them through my Xyron "X" again to have the stickiness on the top of my candy then covered them with Transparent Crystal Glitter Ritz for fun glimmer and shine.


Bazzill cardstock is layered with Doodlebug Designs Baby Girl Baby's Breath and Basic Grey Romani Archangel patterns to create my easel card.  A Lifestyle Crafts Large Circles die provides my circular element.  Faux stitching with a Zig pure brown marker borders my layers.  A Satin Sensations 5/8" Citrus satin ribbon provides a border and bow.  A stamped birthday sentiment from a Close To My Heart Just a Number set is lined at the top of my card front.  A few Memory Box pistachio green jewel stickers are lined around my image and sentiment.  Recollections mini roses with a medium bright green paper rose are clustered at a bottom corner.  A few white flower buttons are tied with My Mind's Eye Miss Caroline Dolled Up "Cute" Twine.
 
Here's a view of the front of my card showing how I've used Little Miss Deelish.


The inside of the card is designed similar to the front and includes a May You Touch stamped sentiment from Rubber Cottage.


Here's a view of my easel card, open and ready for display . . .


You've got to hop over to the Crafts and Me Stamps Challenge blog to see how the amazingly talented Dynamite Digi girls have shown their use of BOTH buttons and bows while using Crafts and Me Stamps digital images.


I'm entering this card into the following challenges:
Simon Says Stamp "Sketch by Dawny P 1 of 2" (here)
Cute Card Thursday "Anything Goes" (here)
Totally Paper Crafts "Easel Cards" (here)
One Stop Craft "Anything Goes" (here)
All Sorts "As Easy As 1, 2, 3" (here) - 1 image, 2 papers, 3 flowers
Cupcake Crafts "Mythical Creatures" (here)
Craft Your Passion "Ribbons or Lace" (here)
Creative Craft "For the Kids" (here)


Copics used:
skin - E000, E01, E11, E93, BV00
hair, shoes - E31, E35, E47
unicorn mane and tail, clothing - YG11, YG13, YG25
bows, clothing - R81, R83, R85, R89
hooves - W1, W3, W5
dress - Y21, Y23, Y26
unicorn body - E50, E53, E55
airbrushed background - Y21, R81, R85


As always, I'm so glad that you stopped by to visit!

~ Rose

Saturday, March 9, 2013

Card Art with Copics: Elisabeth Bell's Little Miss Mouse

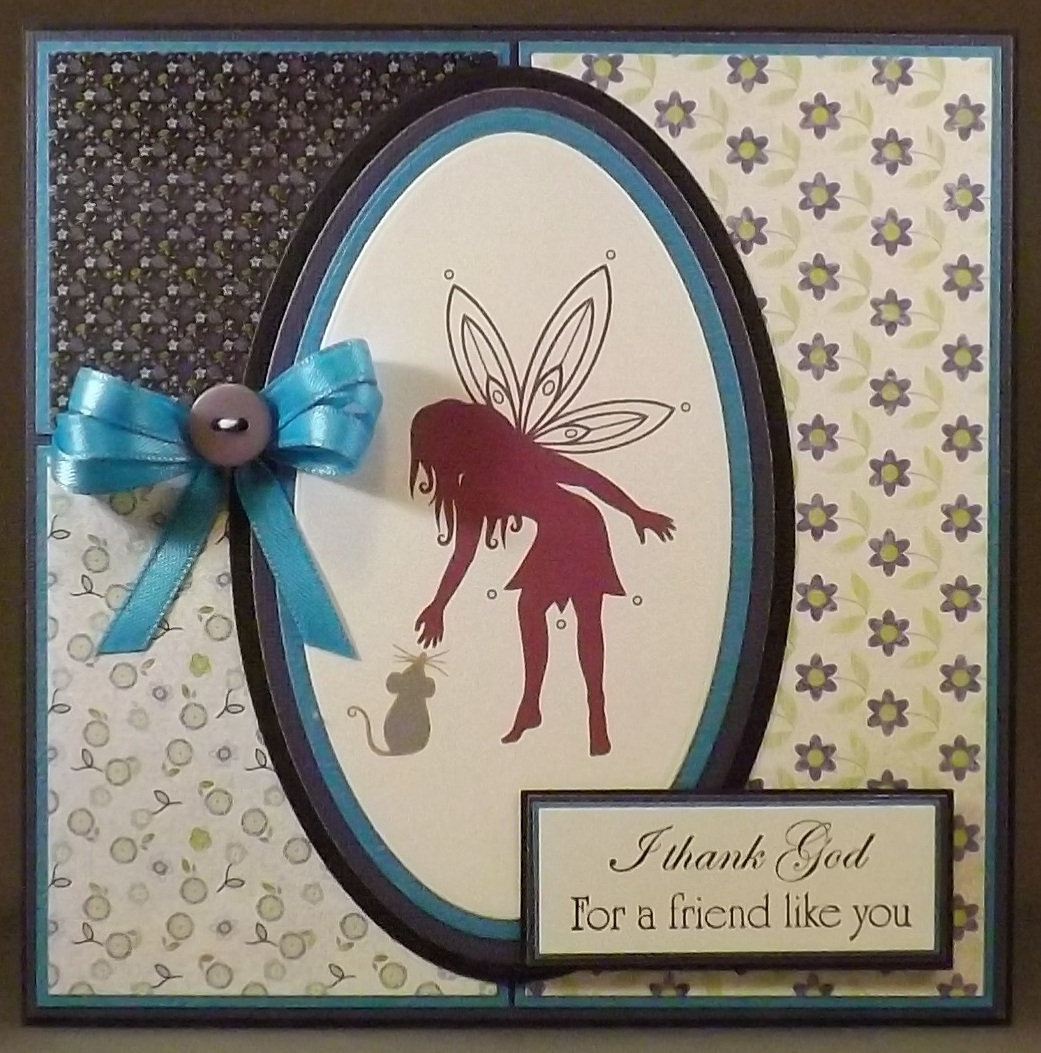
This lovely little fairy is happy to find her sweet little mouse friend passing by as they share a daily greeting.

I've used Elisabeth Bell's digital image, Little Miss Mouse, on a side-open card to share some magical and encouraging words.  Here's a closer view of my Copic-filled image with a light coating of Star Dust Stickles painted over the fairy's wings and the rose on the hat of the little mouse.


I've temporarily adhered die cuts from a My Favorite Things Die-namics Cloud Trio set, airbrushed around them, then removed the die cuts to add dimension with Copic colors W1, W0, W00 and 0.

My handmade flower cluster includes Punch Bunch large, medium and small daisy punches.  Creative Impressions Bits of Bling white pearls sit in the flower centers.  Star Dust Stickles, lightly painted over my punched daisies, adds wonderful sparkle.  A few McGill pine branch punches add nice filler for my white netted and jeweled wire butterfly to flutter from.  An iridescent ribbon bow, made from a ribbon that I saved from a holiday candy box, helps to tie my flower cluster to the Spellbinders Floral Doily Motifs die cut.


Layers of Bazzill Olive, Rain and Cool Cantaloupe cardstock with patterned papers from Kaiser Craft's These Days Collection "Reunion" and "Generation" provide the base for my card.  A Memory Box Charlotte Border adds a delicate touch to the top and bottom of a center block surrounded by faux stitching.

Here's a view of my completed card front showcasing my use of Elisabeth Bell's Little Miss Mouse digi image.  I added a small dream sentiment from an Inkadinkado Sentiments set.


This view of the inside of my card shows a sweet sentiment from a Just Rite Cling Elizabeth O. Dulemba Bee Ride set.


You can find Little Miss Mouse and more of Elisabeth's amazing digital images by visiting the Elisabeth Bell Digital Collection at her gallery here.

Looking for fabulous inspiration using Elisabeth Bell images?  You'll find it at the Digi Bells Design Team Blog here.


I'm entering this card into the following challenges:
Crafty Catz "All Stitched Up!" (here)
Totally Paper Crafts "Punch It" (here)
Delicious Doodles "Use Die Cuts" (here)
Rick St. Dennis "Spring Is In the Air" (here)
Papertake Weekly "Anything Goes" (here)
Simon Says Stamp! "A Bit O' Green" (here)
Cute Card Thursday "Spring Fever" (here)
Craft Us Crazy "Anything Goes" (here)
Creative Card Crew "Ribbon" (here)
Elphine House Australia "Glitter It Up" (here)

* * * * *

Copics used:
skin - E000, E01, E11, E93, BV00
hair, mushroom bottom and stem - E31, E35, E47
mouse, mushroom top, wings - W1, W3, W5
flowers, dress, mushroom spots, wings - YR61, YR65, YR68
mouse dress, hat, wings - BG70, BG72, BG75
grass, foliage, wings - YG91, YG95, YG99
mouse apron - E40, E41, E42, E43
airbrushed ground - YG93, YG91
airbrushed sky - BG72
clouds - W1, W0, W00, 0


"Top 3" Mar. 16, 2013 Crafty Catz

As always, I'm so glad that you stopped by to visit!

~ Rose

Monday, February 25, 2013

Elisabeth Bell's World Challenge: Sketch

The Digi Bells design team over at the Elisabeth Bell's World Challenge Blog wants to see your projects using a wonderful sketch shared by Janneke.  A very lucky randomly selected entry will win TWO Elisabeth Bell digi images of their choice AND a fabulous prize from Whiff of Joy!  You can find out more about this challenge and sponsors here.

I've used this sweet rubberstamp image called Sharing in Your Sorrow designed by Elisabeth Bell for the Whiff of Joy's Sympathy Collection.  You can find this lovely but sad young lady and her frowning little puppy companion at the Whiff of Joy online store here.

This pic shows a closer view of my Copic-filled image.


I've layered Bazzill cardstock with We R Memory Keepers Anthologie patterns to form my easel card. A Spellbinders Ironwork Accents die cut provides my rounded corner element. Faux stitching borders my layers.  A brown wrinkled seam binding bow lies below a Close To My Heart Say It In Style set sentiment.  Memory Box white pearl sticker strips are lined at each end of my striped border.  A Junkitz Mom Buttonz white fabric button tied with silver cord accents one corner.  Zva Creative rhinestone swirls add bits of bling around my image.  Handmade flowers, lightly painted with Star Dust Stickles, are made using Punch Bunch daisy and birch leaf punches and hold Creative Impressions white pearls in their centers.  McGill pine branch punches add nice filler to my flower clusters.
 
Here's a view of the front of my completed card showing my use of Whiff of Joy's Sharing in Your Sorrow, as designed by Elisabeth Bell, using the sketch by Janneke . . .


The base of my card shows a silver metal praying angel, QuicKutz arrows die cuts, and a feel better sentiment from a Hero Arts Huge Hugs set.  Another white fabric button tied with silver cord adorns a corner with a small cluster of handmade flowers.  A bit of Zva Creative rhinestone swirls adorns the opposite corner.


This pic shows how my easel card looks when completely open and ready for display . . .


For a chance to win a fabulous prize, get over to the Elisabeth Bell's World Challenge Blog and add your entry into this month's Sketch challenge!


I'm entering this card into the following challenges:
Papertake Weekly "Buttons and Bling" (here)
Simon Says Stamp! "Use and Arrow" (here)
Crafty Creations "Tic Tac Tac" (here) - buttons, pearls, gems
Creative Inspirations "Anything Goes + an option of angels" (here)
Divas by Designs "Fancy Fold" (here)
PaperCrafting Journey "BINGO" (here) - sentiment, buttons, flowers
Crafty Catz "Dies and Punches" (here)
Bunny Zoe's Crafts "Flowers and Pearls" (here)
Whiff of Joy "Anything Goes" (here)
Sassy Studio Designs "Stitch it Up" (here)


Copics used:
skin - E000, E01, E11, E93, BV00
hair - E31, E35, E47
puppy - YR21, YR24, YR27, R95 cheeks
dress, headband, dog collar, shoes - BG11, BG13, BG15, BG18
steps - E40, E41, E42, E43
airbrushed background - B00, C2


As always, I'm so glad that you stopped by to visit!

~ Rose

Sunday, February 24, 2013

Card Art with Crafts and Me Stamps Silhouette Fairy Friends

Crafts and Me Stamps carries a fabulous selection of amazing digital silhouette fairy stamps.  When you're in a hurry and don't have time to add your own coloring, silhouette images can be the perfect addition to your projects.

I've used Fairy Friends to whip up a simple note card that will be handy for sharing a bit of news or sending caring thoughts to a good friend.  You can get your own digital Fairy Friends here.

You'll note that all of the digital silhouette images are made to print in black ink.  In eight simple steps, I changed my digital image to print in purple and gray in my attempts to better match my card.  You can find the steps I used at the end of this previous post.

This photo shows my purple and gray-filled silhouette image printed on white cardstock.


I've layered Bazzill cardstock with patterned papers from a Memory Box Viola 6x6 paper stack.  My image is shaped and matted with Lifestyle Crafts Large Ovals die cuts.  The front and inside of my card show sentiments from a Heartfelt Creations' Inspire Me Sentiments set.  A Hero Arts Card Buttons Summer purple button, tied with a small bit of My Mind's Eye Miss Caroline Dilly Dally "Celebrate" twine is in the center of an Offray 1/4" triple ribbon bow.
 
This photo shows the front of my side open card, displaying Crafts and Me Stamps Silhouette Fairy Friends digital image . . .


The inside is decorated similar to the front.


I'm entering this card into the following challenges:
Tuesday Alchemy "My Hearts All a Flutter (hearts and/or wings)" (here)
Creative Inspirations "Anything Goes + an option of angels" (here)
Fab 'n Funky "Flower Power" (here) - papers
PaperCrafting Journey "BINGO" (here) - sentiment button flowers (on papers)
All Sorts "Animals" (here)
One Stitch at a Time "Use a Digi" (here)
Cute Card Thursday "Simplify" (here)


As always, I'm so glad that you stopped by to visit!

~ Rose

Wednesday, January 23, 2013

Crafts and Me Stamps Challenge: Vintage

The Dynamite Digi design team over at the Crafts and Me Stamps' challenge blog wants to see your Vintage-themed projects.  Crafts and Me Stamps is sponsoring this challenge and offering THREE digital images to a randomly selected entry. You can find out more about this challenge here.

I've used newly released steampunk Mimi by Hannah Lynn on a twisted easel card.  You can find this lovely digital image here.  Here's a closer view of my Copic-filled image.

 
Layers of Bo Bunny's Timepiece collection patterned paper, matted with Bazzill rust and brown, support my steampunk theme.  After adhering Bazzill cardstock to chipboard, I used a Sizzix Tim Holtz Alterations On The Edge Steampunk die to create a gear border.  Wyla polyester pleated off-white lace lies behind my border.  I've also framed my image with the same lace.

A Close To My Heart Say It In Style "thinking of you" stamp lies on a Lifestyle Crafts cutting die from their Genius magnetic ultimate platform system set.  Home Pro copper metal corners adorn the top left and bottom right of my card.  Assorted Jolee's Boutique metallic steampunk stickers are scattered throughout.

Here's a view of the front of my card showing how I've used Mimi to convey a vintage theme . . .
 
 
I do enjoy making handmade flowers using punches.  If I have flowers remaining after my projects are complete, I store them for use at another time.  Here you'll see a few chrysanthemums made from Punch Bunch daisies and oak leaves, a five-petal plum flower with a small cosmos as its stamen, a larger marigold and several pine branch leaf fillers.  Most are lightly painted with Diamond Stickles for beautiful shimmer.
 
The base of the card includes a layered Memory Box and Martha Stewart butterfly.
 
 
 Here's a view of my twisted easel card ready for display . . .


You've got to hop over to the Crafts and Me Stamps Challenge blog to see how the amazingly talented Dynamite Digi girls have shown their fabulous Vintage-themed projects while using Crafts and Me Stamps digital images.


I'm entering this card into the following challenges:
Creative Inspirations "Anything Goes + Optional Flowers" (here)
Charisma Cardz "Use at Least Two Punches" (here)
Winter Wonderland "Vintage" (here)
All Sorts "Flower Power" (here)
Dream Valley "Girls, Girls, Girls" (here)
Fab-n-Funky "Favorite Color Combo" (here) - rich, jewel tones
Digital Tuesday "Favorite Color Combo" (here) - rich, jewel tones
Bunny Zoe's "Anything Goes" (here)
Creative Card Crew "Girly" (here)
Oldie but Goodie "Glitz and Glam" (here) - Jolee's Boutique Steampunk stickers, HomePro corners +


Copics used:
skin - E000, E01, E11, E93, BV00
hair, eyes - E31, E35, E47
eyeballs - C3, C1,0
top, collar, fan tips - E13, E15, E19
wing, bolts, fan - C1, C3, C5
arrows, hair ribbon - Y13, Y26, Y28
shoulder and hair ornaments, gear - E33, E37, E39, E02
fan map - E41, E43
airbrushed background - E41, E43


As always, I'm so glad that you stopped by to visit!

~ Rose

Monday, January 21, 2013

Card Art with Copics: Rick St Dennis Corazon

I find Rick St Dennis' digital image named Corazon a bit intriguing and so I've used her again to display on a round side step card.

Here's a closer view of my Copic-filled image . . . It's unfortunate that the amazing sparkle of the Copic atyou Spica Pink over the hearts and trimming doesn't show in this photo.  In real life, it truly does make you say "Wow!"


I've die cut and matted my image using Lifestyle Crafts Large Ovals.

My EK Success Round Curvy Cutter provided the perfect size 6" card base of Bazzill Gray and a 5 1/2" pattern of Kaiser Craft's Love Notes Collection Love Song.  A Memory Box Heart Chain Border lies at the base of my card.  Part of a Cheery Lynn Designs Heartland America Large die and Sizzlits Funky Heart #1 and #2 set behind my Target Seasonal Printed Ribbon bow.  A Prima Gillian Raspberry Flower and Petaloo Dazzlers glitter flowers add a bit of bling to my hearts cluster.  Prima's Say It In Crystals and Zva Creative rhinestone swirls add a bit of movement throughout.


You can find my previous post showing Corazon on a more vintage-looking twisted easel card here.

 
I'm entering this round side step card into the following challenges:
Sparkle and Glitter with Rick St Dennis "Anything But A Square" (here)
Digital Tuesday "Flower Power" (here)
Sweet Stamps "Anything Goes" (here)
Creative Inspirations "One for the Girls" (here)
Divas by Designs "Make it Girlie" (here)
Cute Card Thursday "Diamonds are Forever" (here)
Craft Us Crazy "Celebrate Love or Color Red" (here)
Stampin' for the Weekend "Something Girly" (here)
All Sorts "Flower Power" (here)
Sweet Stampin' "Frillies" (here)


Copics used:
skin - E000, E01, E11, E93, BV00
hair - E31, C35, E47
gown, hat, feathers, shoe - C1, C3, C5, atyou Spica Pink
grounding shadow - W5, W3, W1, 0
airbrushed background - RV11, RV19


As always, I'm so glad that you stopped by to visit!

~ Rose