Why Rosie's Book?

While growing up, I had a dear friend, Renee, that lived next door and with whom I spent much of my childhood. We grew, in different directions, and went on our merry way. Many years later, I ran into her parents and they kindly reminded me of the laughs they still have over my book. “What book?” I wondered with a puzzled look. "I don't remember a book." Hardy laughter accompanied their response. At some time during our childhood, I tried to convince Renee about something that her parents didn’t agree with. I told her that proof of its truth could be found “in my book.” Naturally she went home and tried to convince her parents of the same thing but they weren’t falling for it. She needed an edge and told them emphatically, “It’s in Rosie’s book!” After they caught their breaths from reborn laughter, they let me know how “Rosie’s book” has been cited for many other things throughout the years. They’ve also mentioned that they’d like to see “Rosie’s book” one day. I can’t remember all of the things that I said were in “my book” but I’m sure my dear friend’s parents can recall much more than I ever knew about – LOL!!! So, here it is . . . my version of things you might find In Rosie’s Book . . .

Showing posts with label Monochrome. Show all posts

Friday, September 27, 2013

Elisabeth Bell's Apple Berry Digi Bells' Blog Hop

To celebrate the newest addition to the Elisabeth Bell Design's Digital Gallery (here), the Digi Bells Design Team is hosting a blog hop.

How can you win your own Apple Berry digi image? You'll have to hop through and leave comments on EACH blog. [You can find the full list of 10 other blogs at the Digi Bells Design Team blog (here).] Lynda will pick 2 blogs at random and the winners will be picked from those comments. The hoppers will have until Friday, October 4, 2013 at 9 AM to leave comments. The winners will be posted at the Digi Bells' blog on Saturday, October 5, 2013.

Reminder: Buying then sharing digital images is theft. Sharing digital images takes income away from the artist.


* * * * *
 
I've used the "no lines" technique (see my How To Print notes at the end of this post) on this newly released Apple Berry digital stamp by Elisabeth Bell to make a scene on a side-step card.  This view shows a closer view of my Copic-filled image after I added Glossy Accents over her pie and the apples in her basket.  I've used the Lifestyle Crafts Large Ovals set to shape my image.


Bazzill's green cardstock is layered with an old Stampin' Up! green apple patterned paper to form my card.  A bit of Creative Imaginations Thin Cherry Real Wood lies beneath my QuicKutz Santa's Workshop window frame and hand pleated apple curtains.  Through the window, you see a few QuicKutz Mini Apples, covered with Glossy Accents, hanging from the branches of a couple of QuicKutz trees from a Santa's Workshop Heritage Accessories set.  I included a layer of a white Memory Box Estate Fence die cut to make the apple trees appear further away.  A few more Glossy Accents-covered mini apples lie at the base of my image while a knotted lace ribbon adds another delicate layer in the top corner.


This view shows the layers of the scenery elements of my side-step card.


Remember to leave your comment below then move along to your next stop at the wonderfully-talented Lynne's blog (here).  For reference, you can find the full list of the blogs to hop at the Digi Bells Design Team blog (here).


I'm entering this card into the following challenges:
Simon Says Stamp! "Anything Goes" (here)
Divas by Design "Monochrome" (here)
Cute Card Thursday "Pretty Ribbons" (here)
Southern Girls "The World in Monochrome" (here)
Creative Craft "Use Ribbon" (here)
Oldie but Goodie "Dies and Punches" (here) - everything is OLD except for the digi image
Crafty Ribbons "Monochrome" (here)
Elphine House Australia "Simply Cute" (here)
Creative Inspirations "Favorite Stamp Brand" (here) - Elisabeth Bell Designs


Copics used:
skin - E000, E01, E11, E93, BV00
hair, pie, basket - E31, E35, E47
apples - YG91, YG95, YG97
leaves - YG11, YG13, YG17
hat, top, knickers, apron, mitts, floor background - E40, E41, E43, 0
ribbons atyou Spica Olive
faux suede scribbled wall background - YG91


On 9/27/13, Elisabeth Bell wrote:  "Rooossee, your card is absolutely EXQUISITE!!"

* * * * *

How to Print Prepare Digital Image for "No Lines" Technique using Photoshop Elements 8
FIRST STEP
Select File tab; Select Open then select .jpg or .png image
Select Image tab
Slide to Convert Color Profile
Select Convert to (*) Profile

SECOND STEP
Select Layer tab
Slide to New Adjustment Layer
Select Hue/Saturation
Mode:  Normal Opacity: 50
Adjustments show at right; slide Lightness to far right

Select File tab then Save As:  .jpg copy file then print image
Do NOT save changes to your original .png image or you will LOSE your digi investment!!!

Note:  You may NOT alter the line work of artist-created digital images.  These steps are simply the digital equivalent of stamping a rubberstamp image in gray ink rather than black ink.

* * * * *

As always, I'm so glad that you stopped by to visit!

~ Rose

Monday, April 29, 2013

Card Art with Copics: Kenny K's Jasmine

This sweet Kenny K image named Jasmine can be useful for nearly all occasions.  You can find Jasmine as a rubberstamp at the Whimsy Stamps online store here.

I've used Jasmine on an easel card to share happy wishes.  Here's a closer view of my Copic-filled image.  A layer of Diamond Stickles adds shimmer to her shirt.


Layers of Bazzill cardstock with SEI Diane Fresh Linen double-sided patterned paper form my easel card and faux stitching adds a contrasting border.  A few Recollections black mini brads are lined in two corners.  A Morex Corp 1 3/8" white lace ribbon provides a grounding border.  A happiness sentiment from a Stampin' Up! Summer by the Sea set is stamped near my image.  Cheery Lynn Designs Fanciful Flourish and Mini Fancy Flourish are layered with My Mind's Eye Lost and Found Blush "Sweet" Pearl Swirls.  Flower clusters are formed with Prima's Gillian Raspberry and Fairytale Roses Baby Pink with Petaloo Dazzlers Florettes in fuschia.

Here's a view of the front of my card showing how I've used Jasmine.


The base of my card includes a stamped sentiment from a Stampin' Up! For Father set, a strip of KaiserCraft Pink Champagne pearls and a Creative Charms pink netted butterfly.


Here's a view of my easel card, open and ready for display . . .


I'm entering this card into the following challenges:
Kenny K "Tic Tac Toe" (here) - Row 2 Lots of Layers, Pearls, Stamped Image, Lace
Whimsy Stamps "Pretty in Pink" (here)
Simon Says Stamp! "Anything Goes" (here)
Crafty Creations "Pink + One Other Color" (here) - brown
PaperCrafting Journey "Use a Sentiment" (here)
Totally Paper Crafts "Flowers and Lace" (here)
Wags 'n Whiskers "May Flowers" (here)
Stampin' for the Weekend "Die Cuts and/or Punches" (here)
Sweet Stampin' "Anything but Birthday" (here)
Fashionable Stamping "Sentimental" (here)


Copics used:
skin - E000, E01, E11, E93, BV00
hair - E31, E35, E47
shoes, eyes - E93, E95, E97, E99
clothing, glasses - R81, R83, R85, R89
airbrushed background - E35, E33, R81, E95


As always, I'm so glad that you stopped by to visit!

~ Rose

Tuesday, April 23, 2013

Ladybug Crafts Ink Challenge: Colour Combo Red AND White

The current challenge by the Lovely Ladybugs over at the Ladybug Crafts Ink TLT Challenge is to create a red and white project in honor of St. George's Day, the Patron Saint of England.  Hop over to enter your project for a chance to win TWO cling stamps (or FOUR if you use a Ladybug Crafts image!). You can find out more about this challenge and the wonderfully talented Ladybugs here.

Note:  All Ladybug Crafts Ink cling stamps are currently 70% off!!!  It's definitely time to head over and see what's left!!!

* * * * *

Ladybug Crafts Ink carries a fabulous line of The Teenagers digital images featuring Jess and Josh that I've found to be unique and perfect for using on current day projects to share loving thoughts and wishes with teens.  I've used The Teenagers Texting Jess to create a friendship card.

This view shows my Copic-filled image.


Layers of Bazzill white and red cardstock with Basic Grey Eskimo Kisses Caroling double-sided patterned paper form my card.  The diamond patterned side covers most of my card front while a strip of the pattern from the other side grounds my card elements.  A QuicKutz nesting tag cookie cutter die cut set provided the removable tag with a star eyelet peeking out from behind my image.  Three Basic Grey colored buttons accented with My Minds Eye Miss Caroline Dolled Up "Cute" Twine act as a simple corner embellishment.  The "Friendship is a together thing" stamped sentiment is from a Crafty Secrets Large Wizard of Oz set.  The "Can't wait to see you!" stamped sentiment is from Inky Antics.  I used Adirondack Brights Watermelon dye ink on a rose stamp from an Impression Obsession clear Wreaths and Garlands - Floral Set to overlay my sentiments.

Here's a view of my completed card front showcasing Ladybug Crafts Ink The Teenagers Texting Jess . . .


The inside is layered similar to the front and is left open to include a handwritten note or stamped sentiment . . .


Looking for fabulous inspiration using Ladybug Crafts Ink images? You'll find more designs by the Lovely Ladybugs at the Ladybug Crafts Ink challenge blog (here).


I'm entering this card into the following challenges . . .
Paper Crafting Journey "Use a Sentiment" (here)
Southern Girls "Button Up or Show Flair" (here)
Totally Paper Crafts "Monochromatic" (here)
Stampin' for the Weekend "Friendship" (here)
Cupcake Craft "Monochromatic" (here)
Craft Your Passion "Diamonds" (here)
Fab 'n Funky "1 image, 2 patterned papers, 3 embellishments" (here) - buttons, eyelet, twine
Emerald Faerie "Recipe 1 image, 2 patterned papers, 3 embellishments" (here)
Crafty Sentiments "Monochromatic" (here)
Sweet Stamps "Use 3 of Any Item" (here) - 3 buttons


Copics used:
skin - E000, E01, E11, E93, BV00
hair - E31, E35, E47
velour hoodie outfit, cell phone - R32, R35, R37, R39
sofa - R81, R83, R85, R89
wall, floor - E42, E40, 0
atyou Spica Clear over belt, phone and lips

* * * * *

As always, I'm so glad that you stopped by to visit!

~ Rose

Monday, March 4, 2013

Card Art with Copics: Some Odd Girl's Guitar Kody

This sweet little guy smiles as he softly strums his acoustic guitar.  He is a digi image, named Guitar Kody, designed for Some Odd Girl.  You can get your own Guitar Kody at the Some Odd Girl online shop here.

This photo shows my Copic-filled image. . .


I've used Bazzill dark blue cardstock to form my side open card.  A Sizzix Tim Holtz Alterations Texture Fades sheet music embossing folder adds a musical background when I've embossed a piece of Core'dinations Color Core Whitewash Weather Vane cardstock and lightly sanded the raised surface to see the core.  A Sizzix red original Blazing Sun die cut forms my circular element.  A Lifestyle Crafts' Large Oval shapes my image.  An older Hero Arts' vertical Thank You Note stamp runs down a banner, accented with an Offray blue ribbon bow, at the side of my image.  A wooden button from a My Minds Eye Miss Caroline Dilly Dally "Best" pins and buttons set adorns one top corner.  A strip of blue rhinestones runs down the side of a lower corner.
 
This photo shows the front of my card, displaying Some Odd Girl's Guitar Kody . . .


A simple computer-generated part of a song by Dido called Thank You is included inside.  Each of us NEEDS SOMEONE who makes us feel like everything is gonna be alright.  When we're lucky enough to have that person, it'll be great to thank them too.


I'm entering this card into the following challenges:
Some Odd Girl "Sketch" (here)
Sweet Stampin' "Embossing" (here)
Sweet Stamps "Embossing Folder + Die + Stamp" (here)
Tuesday Throwdown "You're on My Mind" (here)
Simon Says Stamp! "Anything Goes" (here)
Creative Inspirations "Buttons and Bows" (here)
Divas by Design "Anything Goes" (here)
Cute Card Thursday "Something Old" (here)
PaperCrafting Journey "BINGO - die/punch, embossing, buttons" (here)
Craft Us Crazy "Anything Goes" (here)


Copics used:
skin - E000, E01, E11, E93, BV00
hair, guitar - E31, E35, E47
sneakers, guitar - T9, T6, T0
guitar front - E53, E55, E57
eyes, pants - B32, B34, B37, B39
sneakers - C1, C3, C5
ground shadow - C3, C2, C1, C0


As always, I'm so glad that you stopped by to visit!

~ Rose

Monday, February 11, 2013

Card Art with Crafts and Me Stamps Silhouette For You Fairy

Crafts and Me Stamps carries a fabulous selection of amazing digital silhouette fairy stamps. They're beautiful images that can easily provide a wonderful card or project that's perfect for gift giving! What a fantastic way to share stamped sentiments or handwritten notes with magically enchanted cards.  Silhouette images are becoming more popular for their ease of use.

I've used For You Fairy to whip up a simple yet lovely Valentine's card that would be perfect for sharing a bit of love with a friend, family member, special neighbor or anyone that you care about.  You can get your own digital For You Fairy here.

You'll note that all of the digital silhouette images are made to print in black ink.  In eight simple steps, I changed my digital image to print in red.  You can find the steps I used at the end of this post.

This photo shows my red-filled silhouette image printed on The Paper Company White cardstock.


I've layered Bazzill cardstock with The Robin's Nest Daisy Stripe Red glitter paper, American Crafts Love Can't Help Falling and My Mind's Eye State of the Heart "Full of Love" patterned papers.  A strip of Satin Sensations Cranberry 5/8" ribbon provides a border and bow.  A few heart brads are lined in one corner.  A See D's What a Feeling set sentiment is stamped near my image.
 
This photo shows the front of my side open card, displaying Crafts and Me Stamps Silhouette For You Fairy digital image . . .


The inside is decorated to match the front.  I've added a stamped sentiment from a Stampin' Up! Have a Heart set.  A cute set of lips brad stands out as my only embellishment.


I'm entering this loving card into the following challenges:
Cupcake Craft "Sketcharoony by Liza" (here)
Craft Your Passion "My Valentine" (here)
Totally Paper Crafts "Valentines or Love" (here)
Digital Tuesday "Hearts" (here)
Simon Says Stamp! "Have a Heart" (here)
Creative Inspirations "Sent with Love" (here)
Fab 'n Funky "Valentines or Hearts" (here)
Divas by Design "Winged Things" (here)
Cute Card Thursday "Love Struck" (here)
Paper Crafting Journey "Love" (here)
 

* * * * *

Eight simple steps to change color of digital Silhouette image:

1. Open Microsoft Windows Paint program.
2. Open .jpg of silhouette image.
3. Zoom out to see entire image.
4. Use cursor to select color.
5. Use cursor to select paint bucket.
6. Move cursor to place paint bucket icon over image and click. You'll see new color in most areas.
7. Zoom in to enlarge image and continue to click paint bucket over additional areas that need color change.
8. Zoom out to view entire image and save new colored image with different name for use.

* * * * *

As always, I'm so glad that you stopped by to visit!

~ Rose

Saturday, January 12, 2013

Card Art with Copics: Kenny K's Madison Attitude

This energetic young lady is hurrying to show off her favorite finds from her recent shopping adventure.  She is a rubberstamp image, named Madison Attitude, designed by Kenny Kiernan for Whimsy Stamps.  You can get your own Madison Attitude at the Whimsy Stamps online shop here.

This photo shows my Copic-filled image all ready for a birthday party.  Flower Soft Black covers the trim around the collar and sleeves of her jacket.  Bits of tissue paper peek from the openings of her shopping bags.


Bo Bunny's double dots embossed paper, layered with white Bazzill Bling and Reminisce Northern Exposure snowflake patterned paper, forms my side open card.   A strip of 1/8" Offray blue ribbon provides a border and triple bow.  A Spellbinders Fleur De Lis Rectangle frames my image.  A Creative Charms beaded flower clusters with a Prima Raja Sequin flower and a Me and My Big Ideas icons mini rhinestone flower.  The stamped sentiment is from Stamps by Judith.  Prima Say It In Crystals black rhinestone swirls add movement around my image.
 
This photo shows the front of my monochromatic birthday card, displaying Kenny K's Madison Attitude . . .


The inside is decorated to match the front.  I've added birthday party sentiments from a Close To My Heart Everyday Celebration set.


 If I enclose a gift card or cash, then I'll write something like " . . . but I couldn't find a thing for you!"
 

I'm entering this monochromatic birthday card into the following challenges:
Kenny K's Krafty Krew "Anything Goes" (here)
Winter Wonderland "Shopping" (here)
Totally Paper Crafts "Ribbon" (here)
A&T DigiDesigns/Emerald Faerie Garden "Celebration" (here)
PaperCrafting Journey "Anything Goes" (here)
Cute Card Thursday "Beat the Blues" (here) - go shopping!
Charisma Cardz "Happy Birthday!! + 4" (here)
Cupcake Craft "January Blues" (here)
Dream Valley "Anything Goes" (here)
Divas by Design "Anything Goes" (here)


Copics used:
skin - E000, E01, E11, E93, BV00
hair - E31, E35, E47
outfit using Fade with Lightest Color Technique, bags - BG01, BG05, BG09
boots, fur - T0, T6, T9
bags, shirt - B01, B04, B06
eyes, tissue paper - C1, C3, 0
ground shadow - W5, W3, W1, 0
airbrushed speckled background - BG09


As always, I'm so glad that you stopped by to visit!

~ Rose

Monday, August 6, 2012

Card Art with Copics: Crafts and Me Stamps Watching It Fly by Zindy S.D. Nielsen

Crafts and Me Stamps carries an exclusive line of fabulous life-like stamps designed by one of their newest artists Zindy S.D. Nielsen.  I've used Watching It Fly on a monochrome card to share loving thoughts.  You can find this image as a rubberstamp here.

This photo shows a closer view of my Copic-filled image.  Lifestyle Crafts (formerly QuicKutz) Nesting Circles dies include 21 different sized circles so you're sure to find just the right size for your image.


Below my image you'll find a cluster of paper flowers handmade with layers of a variety of Punch Bunch punches.  Here's a closer view of my handmade gerber daisies lightly painted with Diamond Stickles for amazing sparkle . . .


I've layered older DCWV Old World Stack patterned paper with Bazzill cardstock.  A sentiment from a Hero Arts Simple Messages set expresses loving thoughts.  A Martha Stewart Butterfly Border Punch adds a flighty faux stitching border behind my image with a bit of Target loving words ribbon that repeats in a bow.  A Creative Impressions White Glimmer Fastener adorns each corner of my card.

Here's a photo of my completed card front showing my use of Crafts and Me Stamps' Watching It Fly image as designed by Zindy S.D. Nielsen . . .


I'm entering this card into the following challenges:
Dream Valley "Die Cuts and Punches" (here)
Fashionable Stamping "Anything Goes" (here)
Craft Your Passion "Anything Goes" (here)
Divas by Design "Flowers" (here)
PaperCrafting Journey "Anything Goes" (here)
Totally Paper Crafts "Monochrome + White Ok" (here)
Little Miss Muffet "Neopolitan Ice Cream" (here)
A&T Digital Designs "BINGO" (here) - die cut/ribbon/sew


Copics used:
skin - E000, E01, E11, E93
hair - YR23, R14, E07
dress - R12, R24, R29
airbrushed background - RV63, RV66


I'm so glad that you stopped by to visit!

~ Rose

Sunday, July 29, 2012

Card Art with Copics: Crafts and Me Stamps Love Life by Zindy S.D. Nielsen

Crafts and Me Stamps carries an exclusive line of fabulous life-like stamps designed by one of their newest artists Zindy S.D. Nielsen.  I've used Love Life on a monochrome card that expresses loving thoughts.  You can find this image as a rubberstamp here.

This photo shows a closer view of my Copic-filled image.  I love the effect of using the "beyond the edge" diecutting technique with this image.  Lifestyle Crafts (formerly QuicKutz) Nesting Circles dies include 21 different sized circles so you're sure to find just the right size for your image.


Along the edge of my circular element you'll find a border of paper flowers handmade with layers of a variety of Punch Bunch punches.  Here's a closer view of my handmade flowers lightly painted with Diamond Stickles for amazing sparkle . . .


I've layered older DCWV Old World Stack patterned paper with Bazzill cardstock and Bo Bunny Double Dots textured paper.  A sentiment from a Hero Arts Thank You For Being My Friend set shares loving thoughts.

Here's a photo of my completed card front showing my use of Crafts and Me Stamps' Love Life image as designed by Zindy S.D. Nielsen . . .


I'm entering this card into the following challenges:
Fashionable Stamping "Anything Goes" (here)
Crafting When We Can "Monochrome" (here)
Papertake Weekly "Make Your Own" (here)
Simon Says Stamp "Anything Goes" (here)
Charisma Cardz "Monochrome" (here)


Copics used:
skin - E000, E01, E11, E93
hair - T0, T6, T9 + E31, E35, E47
clothing - BG01, BG05, BG09, T0, T6, T9
heart splat - W1, W3, W5
airbrushed background - BG01, BG09, T9, W5


I'm so glad that you stopped by to visit!

~ Rose

Monday, July 2, 2012

Card Art with Copics: Crafts and Me Stamps Sea Star by Jasmine Becket-Griffith

It seems to me that this lovely fairy is ready to reward a loving Christmas star as she shares warm words with someone special. Her name is Sea Star and she has been designed by Jasmine Becket-Griffith exclusively for Crafts and Me Stamps.  Sea Star is available as a rubberstamp (here).  Perhaps Sea Star wasn't intended to be used on a Christmas/Winter card but it's the first thing I thought of when seeing this sweet image.

I've used a Lifestyle Crafts/Quickutz circle die to shape my fairy.  Here's a closer view of my Copic-filled image . . . 


I've used daisy punches in various sizes in my attempts to create handmade paperwhites (Christmas flowers) to scatter around my image.  I've used yellow Stickles as the flower centers and lightly painted Diamond Stickles over the petals and leaves for pretty sparkle.


I've layered Bazzill cardstock with TPC Studio Winter Whites Let It Snow and Winter Wonderland patterned paper.   My Purple Cow Deckle Edge rotary trimmer blade makes it easy to add a torn paper look to my paper layers.  I'm thrilled with the addition of a Marianne Design Creatables Icicle die cut for a top a border.  Snowflake shaped brads accent each side of my image.  The loving sentiment is from a Close To My Heart Pair-a-Phrase set.  A May Arts 5/8" fuzzy ribbon bow provides a soft accent.

Here's a view of my completed card front showing Jasmine Becket-Griffith's Sea Star image used on a Christmas card for someone special . . .


I'm entering this card into the following challenges:
Dream Valley "Things With Wings" (here)
Ooh La La "Mystical Magic" (here)
Crafty Creations "Embellish It!" (here) - die cut, ribbon, brads, flowers
Creative Inspirations "Anything Goes" (here)
Charisma Cardz "Anything Goes" (here)
All Sorts "In Bloom" (here)
Sparkle Creations Christmas "Monochromatic" (here)
Hooked on Crafts "Christmas in July" (here)
Winter Wonderland "Monochromatic" (here)
Secret Crafter "Christmas" (here)


Copics used:
skin - E000, E01, E11, E93
hair - C1, C3, C5 then painted with Opaque White
dress, wings - B21, B23, B26
star - Y11, Y23, Y26
airbrushed background - C1, C5


"Top 3" July 8, 2012 Winter Wonderland


I'm so glad that you stopped by to visit!

~ Rose

Tuesday, March 15, 2011

Copic Creations Challenge: Blues

The team over at Copic Creations is challenging Copic lovers to use their Copic "blues." Sugar Nellie is sponsoring this challenge and offering four of their stamps to the random winner of this challenge. Take a look at the stunning images that Sugar Nellie produces and distributes. Their stamp artists do show some very beautiful work. Find out more about this challenge and the sponsor here.

Blue is associated with stability and is said to symbolize loyalty, wisdom and sincerity. It produces a calming effect and is good for the body and mind.

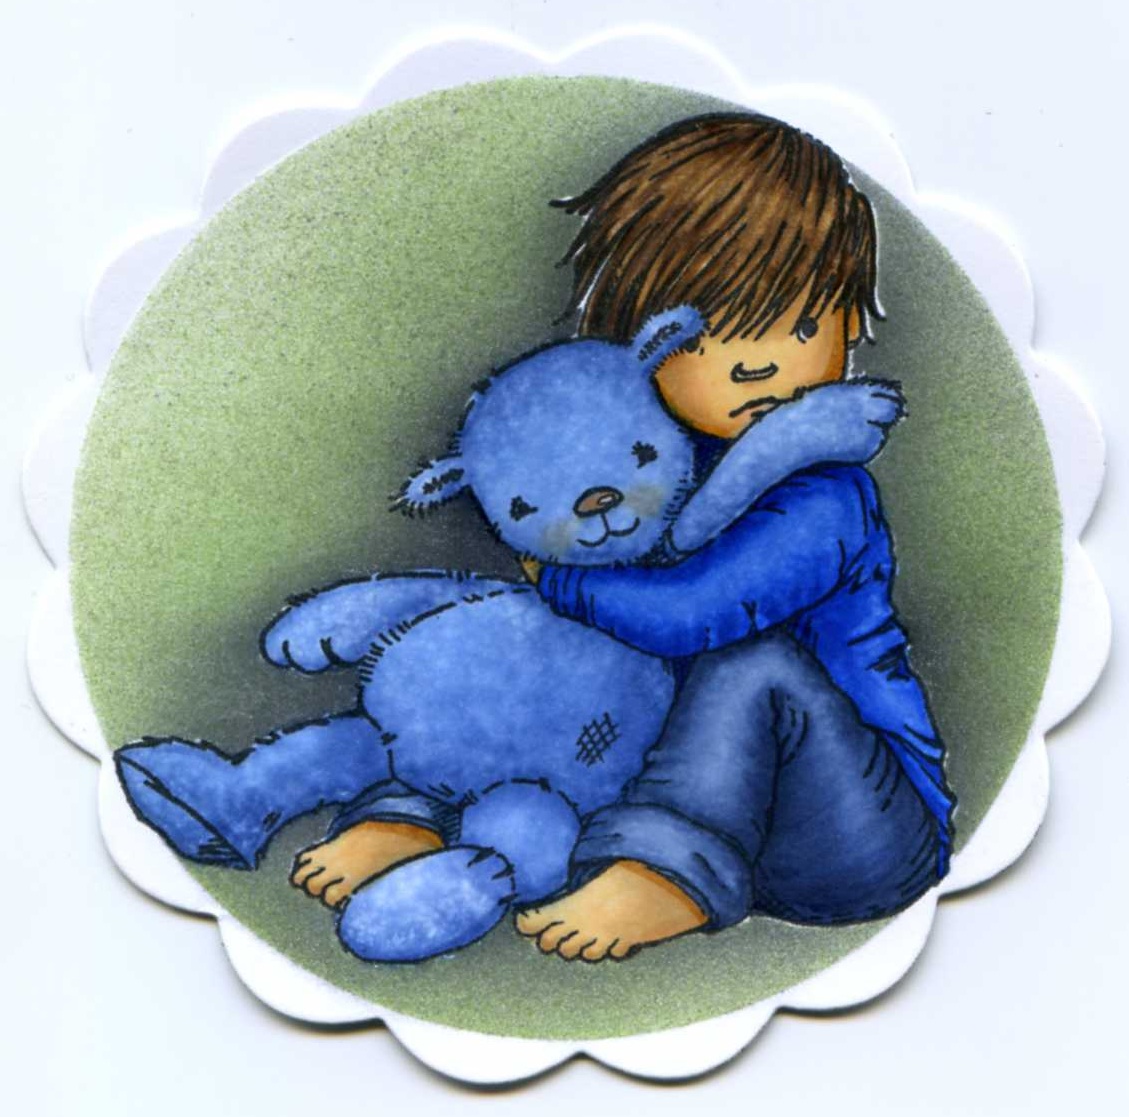
I was drawn to this 2010 Kathy Hare Sugar Nellie image named Worried. I found something touching about this little guy with his bear and this image seemed perfect for filling with "blues."


Once filled, this image still seemed a little flat to me . . . maybe more texture will help . . .

So, I covered my dried colored image with a negative mask and prepped it for a colorless blender technique. I crumbled a paper towel, spritzed the towel with a touch of colorless blender and touched it to the surface of my bear. Using colorless blender straight from the bottle can make it too wet so I like to spritz the solution from a mini spritzer.


Repeating that a few times really softened up the layers of color for my bear and gave him some wonderful texture . . .


Oops. I pounced a little too heavily with the colorless blender and wet the paper so much that my color seeped beyond the lines of my image. I plan to airbrush a background so I'm not worried about that right now. These bright blues can be tough to push back inside of the lines of the image so when I plan to keep the background white, I'm more careful and use more very light layers.

I used a QuicKutz scalloped circles die and die cut my image. Keeping that die in place, I masked my image and began airbrushing my background. I like the results best when I aim the spray directly over my mask and allow the overspray to add the color to my background. With the die and mask in place, I added a few spritzes from Ranger's Perfect Pearls Mists in perfect pearl to give some shimmer to the background. It sure doesn't look pretty at this stage . . .


Now for the big reveal . . . I love this part. It's like a wonderful surprise every time . . .


If my mask doesn't fit precisely over my image, resulting in a halo of white in places, sometimes I leave them alone and let them act as natural highlights. The only way to correct those areas is to very lightly (very, very lightly) stipple tiny dots of medium gray to cover that white.

This Top Line Creations genuine boy plaid paper seemed perfect for the outside of a fun Spinner Card. Magnolia's Doohickeys Bon Voyage Foliage and Shabby Chic White Garland added a simple border with some May Arts ribbon.

This sentiment is from a Hero Arts Woodland Creatures set . . .


Spin the wheel on the right to read this sentiment from another Hero Arts set . . .


Spin the wheel again to see one of my favorite Motivet sentiments . . .


Why not use your Copic "blues" to fill one of your favorite images? Enter this Copic Creations Challenge for a chance to win Sugar Nellie's fabulous prize.

Copics Used:
Skin - E50, E51, E53, R30
Hair - E31, E35, E47
Pants - B91, B95, B97
Shirt - B21, B24, B28
Bear - B41, B45, E95, 0
Airbrush - C5, G82
faux stitching - atyou Spica sky blue

Tuesday, March 8, 2011

Simple Card Art with Die Cuts

Sometimes I need a card for an unexpected occasion and I just don't have enough time to prepare something very detailed and elaborate.  Using die cuts to embellish a die cut card is a quick and easy method for resolving such a dilemma.  Choose neutral colored papers (less thinking is best!), run them through the die cutting machine and adhere.  Ink it up if there's time.  Add a sentiment and some shimmer.  Done.

I've used Bazzill cardstock in tan and brown and a piece of doodlebug design 1939 bon bon chenille cardstock to create this very simple card using mostly die cuts.

One of the last items that I purchased from QuicKutz (now operated by a company known as Lifestyle Crafts) was their Special Delivery limited edition gift set.  The set contains cookie cutter dies for cards, borders and mats, labels and tabs and some exclusive shapes;

like this little bird . . .

and these flowers to layer . . .


This lovely Helen Keller quote is from a 2010 Close To My Heart Spring stamp set . . .


In just a short time, I put together this simple card ready to tuck into a gift bag for someone special . . .


Next time you have a need for a quick and simple card, consider creating a card using die cuts.

Monday, May 24, 2010

Copic Creations Monochrome Challenge

I've been teaching monthly Colors of Copics classes that involve using three Copic markers, from the same color family, to apply color using various techniques.  There are so many different looks that you can get from just three Copic markers!  So as soon as I saw this month's Copic Creations challenge, I knew I had to participate!

Here's a picture of a card that I submitted for the Copic Creations challenge:  Monochrome Copic Coloring (find the challenge here).  I don't have any of the Paper Makeup Stamps by the challenge's current sponsor, Katie Cotton, so I used a fairy image that I'm sure could work well with any color scheme.


I stamped The Rubber Cafe images (Woodland Fairy and Anything is Possible) using Memento Grape Jelly ink.  Bazzill Smooth cardstock worked nicely with Bazzill Bling and Worldwin DoubleMates Lovely Lilac.  I used Copic markers V0000, V000 and V01 for the fairy's wings and skin; V04, V06 and V09 for her dress; V91, V93 and V95 for her hair.  I used V12 to airbrush lightly around the image.  Colorless Blender faded her skin and wings to white.  atyou Spica Clear added magnificent sparkle to her wings and the flowy part of her dress.  Prima crystals added a little more bling to the border and image.  After using the Martha Stewart border punch, I like to set aside the remaining punched shapes to include as confetti for the inside of the card.   A thin Offray ribbon tied it all together.

Creating monochromatic projects using Copic markers, all from the same color family, allows you to apply various Copic techniques for added texture and dimension.  Give it a try!  You'll like it!