Why Rosie's Book?

While growing up, I had a dear friend, Renee, that lived next door and with whom I spent much of my childhood. We grew, in different directions, and went on our merry way. Many years later, I ran into her parents and they kindly reminded me of the laughs they still have over my book. “What book?” I wondered with a puzzled look. "I don't remember a book." Hardy laughter accompanied their response. At some time during our childhood, I tried to convince Renee about something that her parents didn’t agree with. I told her that proof of its truth could be found “in my book.” Naturally she went home and tried to convince her parents of the same thing but they weren’t falling for it. She needed an edge and told them emphatically, “It’s in Rosie’s book!” After they caught their breaths from reborn laughter, they let me know how “Rosie’s book” has been cited for many other things throughout the years. They’ve also mentioned that they’d like to see “Rosie’s book” one day. I can’t remember all of the things that I said were in “my book” but I’m sure my dear friend’s parents can recall much more than I ever knew about – LOL!!! So, here it is . . . my version of things you might find In Rosie’s Book . . .

Wednesday, October 24, 2012

Paper Mache Pumpkin Treat Holder

Paper Mache is a fun (and wonderfully messy!) way to transform newspaper strips into a dimensional object by pasting them to a mold to take its form.  I've used a large leftover party balloon to shape my newspaper strips into a dimensional oval to create my pumpkin.


The recipe for my paste is 1 cup flour, 1 cup water and 1 tablespoon of salt.  I wet both sides of each paper strip with my paste before adhering it to my balloon's surface then used a sponge brush to flatten the strip well.  After applying four layers of pasted newspaper, I began to clump layered strips on the top to form my pumpkin's short stem.

I've let the newspaper dry over the inflated balloon for four days before using a knife to cut off my lid.

I added folded newspaper strips around the opening of my pumpkin and the rim of the lid to smooth the edges then let it sit to dry another two days.  I planned to add paint and certainly don't want any mold to form in my project because of moisture left in my paper mache.

I began to paint layers of Lumiere metallic bronze and Ranger's flat orange acrylic paint to the outside and allowed more drying time.  The inside is also painted.

I used black Stickles to add hand-drawn eyes, a nose and mouth.  This pic seems to capture some of the amazing sparkle and texture that the Stickles glitter glue adds.


Now this fun, handmade jack-o-lantern holds some of the Halloween goodies that we'll hand out to our trick-or-treaters.

The swirly paper ivy adhered to the base and lid is a digital image cut from my QuicKutz Silhouette electronic cutter.  I love that I can resize the ivy image to meet my needs.  I've spritzed the paper vine with glimmer mist for shimmer.


* * * * *

I'm entering this project into the following challenges:
Cute Card Thursday "Got Glitter!" (here)
All Sorts "Autumn Colors" (here)
Dream Valley "Halloween" (here)
Crafty Sentiments "Recycle It" (here)
Simon Says Stamp! "Autumn Leaves" (here)
Creative Inspirations "Happy Halloween!" (here)
Divas by Design "Use Some Orange" (here)


I'm so glad that you stopped by to visit!

~ Rose

Friday, October 19, 2012

Elisabeth Bell's BellaDonna and Hoot Digi Bells' Blog Hop

Please forgive my lateness in posting the pics as this continues to be a work in progress . . . one day I may get to decorate the inside too - LOL!!!

To celebrate the newest addition to Elisabeth Bell's Digital Gallery (here), the Digi Bells Design Team is hosting a blog hop.

How can you win your own BellaDonna and Hoot digi image?  You'll have to hop through and leave comments on EACH blog.  [You can find the full list of 11 other blogs at the Digi Bells Design Team blog (here).]  Lynda will pick 2 blogs at random and the winners will be picked from those comments. The hoppers will have until Friday, Oct. 26, 2012 at 9 AM to leave comments. The winners will be posted at the Digi Bells' blog on Saturday, Oct. 27, 2012.

Reminder:  Buying then sharing digital images is theft.  Sharing digital images takes income away from the artist.


* * * * *

Here's a closer view of my Copic-filled image shaped with Lifestyle Crafts Large Circles die cuts.  I think that this image is a great example of coloring through layers as Elisabeth has clearly indicated that the lantern glow flows over parts of BellaDonna and Hoot.  In portraying that glow, I've added color to the glow first then I colored those parts of the image lying behind the glow, using the same colors that are more faded and include a top layer of the glow color.


I've layered Bazzill blackbird and purple cardstock with Little Yellow Bicycle's Frightful patterns.  Faux stitched borders are drawn with Sakura's 3-D transparent black glossy ink.  JoAnn Essentials 1/4" black ric rac ribbon is tied around the top blocks while cotton lace is tied around the bottom.  A metal ghost brad adorns a sentiment from a Crafty Secrets Costume Cuties Large set that's been shaped with a Marvy Uchida postage stamp punch and Fiskars postage stamp decorative scissors.


Unembellished BellaDonna and Hoot on card front

I've surrounded my sentiment with handmade Plum Blossom flowers layered from Punch Bunch, EK Success and McGill pine branch punches.  Diamond Stickles painted over each adds magical sparkle.  You can find your own beaded star on a stick at Crafts and Me Stamps here.


I used the Sizzix Tim Holtz Alterations Bewitching Hour die for my cardstock covered chipboard bat.  This photo shows my completed card front where I've used Elisabeth Bell's newest digital image named BellaDonna and Hoot . . .


Remember to leave your comment below then move along to your next stop at the wonderfully-talented Wendy's blog (here). For reference, you can find the full list of the blogs to hop at the Digi Bells Design Team blog (here).


I'm entering this card into the following challenges:
Craft Your Passion "Which Witch is Which?" (here)
Hooked on Crafts "Halloween" (here)
Creative Card Crew "Birds" (here)
Simon Says Stamp "Joy's Eerie Inspiration" (here) - spooky sky with moonlight
Southern Girls "Tie a Ribbon Around It" (here)
Crafty Catz "Halloween" (here)
Stampin' for the Weekend "Something Spooky" (here)
A&T Digital Designs/Emerald Faerie Garden "Anything Goes" (here)
Flutterby Wednesdays "Any Winged Creature" (here) - owl
Rick St Dennis "Sweet or Spooky Hallowe'en" (here)


* * * * *


Copics used:
skin - E000, E01, E11, E93, BV00
hair, broomstick - E31, E35, E47
lantern glow - Y000, 0
peacock feather - BV11, BV13, BV17, YG06, G43, G46, B91, B99, BG01, BG07
lantern, clock - Y13, Y26, Y28
broom - E33, E35, E39, Y35
owl - E42, E44, E47
ghost - W3, W00, 0
owl hat, patches - G24, G29
netting, patches - T6, T0
gown, hat - BV11, BV13, BV17
airbrushed background - Y00, W1, W3, W5


I'm so glad that you stopped by to visit!

~ Rose

Thursday, October 18, 2012

Sizzix Big Shot Pro Carry All Box for Halloween Treats

This sweet little fairy is thrilled to show off her favorite pumpkin from the patch.  She is a digital image, named Pumpkin Fairy Ellora, designed by Elisabeth Bell.  You can get your own Pumpkin Fairy Ellora at Elisabeth Bell's Digital Gallery here.

This photo shows my Copic-filled image.


I used my Sizzix Big Shot Pro Carry All Box to die cut orange Bazzill paper to create my box.  A strip of deep brown cardstock layered beneath a strip of Moxxie Bump In The Night Dem Bones striped paper surrounds my box.  Black Fun Fir is tied around the handle for my only embellishment.

This photo shows a side view of my simple Halloween treat box, displaying Elisabeth Bell's Pumpkin Fairy Ellora digital image . . .


You can find Pumpkin Fairy Ellora and more of Elisabeth's amazing digital images by visiting the Elisabeth Bell Digital Collection at her gallery here.

Looking for fabulous inspiration using Elisabeth Bell images?  You'll find it at the Digi Bells Design Team Blog here.


I'm entering this treat box into the following challenges:
Charisma Cardz "Clean and Simple" (here)
Craft Us Crazy "Children and/or Fall" (here)
All Sorts "Too Cute to Spook!" (here)
Crazy 4 Challenges "Sweet Treat (Halloween)" (here)
Dream Valley "Halloween" (here)
Hooked on Crafts "Halloween" (here)
Creative Card Crew "Birds" (here)


Copics used:
skin - E000, E01, E11, E93, BV00
hair, shoes, dog, stem - E31, E35, E47
pumpkin, scarf, stars, bow - YR20, YR07, YR09
wings, petals, ribbon - BG90, BG93, BG99
wings, slip - B91, B95, B97
airbrushed background - W3, W00, Y21, B91, B95


I'm so glad that you stopped by to visit!

~ Rose

Wednesday, October 17, 2012

Crafts and Me Stamps Challenge: Lace and Pearls

The Dynamite Digi design team over at the Crafts and Me Stamps' challenge blog wants to see lace and pearls added to your projects.  Crafts and Me Stamps is sponsoring this challenge and offering THREE digital images to a randomly selected entry. You can find out more about this challenge here.

I've used the soon-to-be-released Strings of Worship digital image, designed by Sara Burrier.  You'll be able to find this lovely Strings of Worship digital image soon here.

Here's a closer view of my Copic-filled image, shaped with Lifestyle Crafts Large Ovals die cuts.


I've layered Punch Bunch daisies and birch leaves to add a single handmade Paper White flower, painted lightly with Diamond Stickles.


Layers of patterned paper from a Close To My Heart (CTMH) Serendipity Heart of Winter Project pack with CTMH white core cardstock form my square criss-cross card and plain, rounded corner insert.  A bit of 3/4" cotton lace adds a delicate border surrounding the belly band.  Zva Creative self-adhesive swirls of pearls accent each side of my image.

Here's a view of my completed card front showing how I've used Sara Burrier's Strings of Worship digital image on my card.


You've just got to hop over to the Crafts and Me Stamps Challenge blog to see how the amazingly talented Dynamite Digi girls have shown their use of lace and pearls while using Crafts and Me Stamps digital images on their fabulous projects!


I'm entering this card into the following challenges:
Totally Paper Crafts "Make Your Own Flowers" (here)
One Stitch at a Time "Music or a Song" (here)
Anything Goes "Make Your Own Embellishments" (here)
Creative Craft "Three" (here) - three embellishments = lace, pearls, flower
Flutterby Wednesdays "Any Winged Creature" (here)


Copics used:
skin - E000, E01, E11, E93, BV00
hair - E31, E35, E47
gown - B21, B24, B28, E70, E74, E77
violin, roses in hair, stars - Y13, Y26, Y28
wings - C3, BV00, B00, RV00, Y00
holly - YG67, YG61
berries - atyou Spica Lipstick
Copic Opaque White over snowflakes on gown
airbrushed background - Y13, B21


I'm so glad that you stopped by to visit!

~ Rose

Saturday, October 13, 2012

Card Art with Copics: Ladybug Crafts Ink Christmas Shopping with Jess

Ladybug Crafts Ink carries a fabulous line of The Teenagers digital images featuring Jess and Josh.  You can find Shopping Jess here.

Spellbinders Standard Circles in large and small shape and mat my image.  I love the crisp and clear embossed edges that Spellbinders dies provide to their shapes.  Here's a closer view of my Copic-filled Shopping Jess image . . .


Cotton lace lies below Punch Bunch holly leaves, a bow of My Mind's Eye Caroline Howdy Doody "like" twine, and a Tim Holtz idea-ology accoutrement button with a My Mind's Eye Lost & Found Union Square "Favorite" brad at its center.  Here's a closer view of this fun button element . . .


Layers of Stampin' Up! Holiday Treasures floral patterned paper and Bazzill cardstock form my side open card. Cotton lace is layered over a border formed from an EK Success 3/8" Ribbon Edger punch weaved with Michael's 1/4" metallic ribbon. McGill pine branch punches lie behind a QuicKutz die cut present and gift bag. CarlaCraft small kikyou flower punches with Yellow Stickles centers line my gift cluster. A few Basic Grey buttons adorn one corner. The first part of a Close To My Heart Card Chatter - Christmas sentiment is included on the front of the card.

Here's a view of my completed card front showing my use of Ladybug Crafts Ink Shopping Jess . . .


A Fiskars Trellis border punch decorates the bottom of the inside of my card that also contains the continuation of the Close To My Heart Card Chatter - Christmas sentiment.  This inside view shows a border made of QuicKutz die cuts of gift bags and presents made from scraps . . .


I'm entering this card into the following challenges:
Sir Stampalot "Punch Away" (here)
Craft Your Passion "Hip to be Square" (here)
Tuesday Throwdown "Recipe" (here) - 1 image, 2 die cuts (Spellbinders and QuicKutz), 3 buttons
Tuesday Alchemy "Anything Goes" (here)
Ladybug Crafts Ink "Flowers and Embossing" (here)
Simon Says Stamp! "Dies and/or Punches" (here)


Copics used:
skin - E000, E01, E11, E93, BV00
hair - E31, E35, E47
tank top, leggins, bags - YG91, YG95, YG97
pants, jacket, bags - E70, E74, E79
dress, bags - R81, R83, R85, R89
bags - R43, R46, R59
airbrushed background - R83, E71


"Top 3" Oct. 24, 2012 Tuesday Alchemy
 

"Top 3" Oct. 16, 2012 Tuesday Throwdown


I'm so glad that you stopped by to visit!

~ Rose

Tuesday, October 9, 2012

Card Art with Copics: Ladybug Crafts Ink Floral Delight Too Release

I'm so happy to participate in this fortnight's Ladybug Crafts Ink flower and embossing challenge as a guest designer.  It's such an honor to be invited by Head Ladybug Kerry to submit a creation to be displayed along with the Ladybugs' team projects.  Many thanks to Kerry and the rest of the lovely Ladybugs for allowing me to participate in this challenge as a guest dt!  (You can find out more about this challenge and the wonderfully talented Ladybugs here.)

This whimsical floral digital image, brilliantly named Jug and Vase Delight, is designed by artist Jan White for Ladybug Crafts Ink.

Here's a closer view of my Copic-filled image showing how I've also added its reflection.  I printed a duplicate image onto plain paper and fussy cut the larger pieces.  I lined up the base of the flipped cut out of the jug and vase to the base of the image and used a pencil to lightly trace the outline for a relatively accurate area as my guide.  As the Jug and Vase Delight is the most important part of my project, I carefully layered my Copic colors onto my main image first.  The reflection is less important but a fabulous addition to make my image seem more realistic so I used the same Copic colors to fill my reflection but in a more haphazard way.  The colors that are closest to my main image are darker and crisper and should fade and get softer as the reflection gets further away.


I considered how the jug and vase would look on a mottled glass tabletop and decided to try to emphasize the reflective quality of its surface.  I began to scribble horizontal strokes of C3 over my reflection then overlapped and extended those scribbles using C1.  I overlapped my reflection and scribbles with BG000 and carried the color toward the edges of my cardstock.  Some of my reflective colors smeared but it helped to soften the edges of the reflection nicely.  While still damp, I began to slowly pounce the tip of my colorless blender over all of my image's table surface area to create the mottled glass effect and further distort my reflection.


I've layered punched flowers and shapes from Punch Bunch punches to create my handmade chrysanthemums . . .


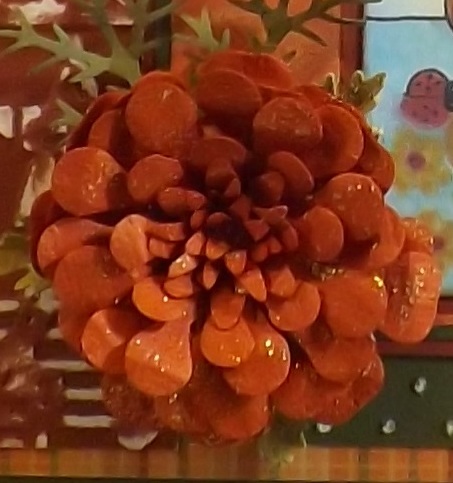
and my attempt at a larger handmade marigold . . . All flower petals are lightly painted with Star Dust Stickles for wonderful shimmer and shine.


I fussy cut the lovely ladybug from another printed image and added cotton thread for antennae before coating the ladybug with glossy accents for dimension.  She provides a lovely accent to my Close To My Heart Treasure Life sentiment stamped onto a Lifestyle Crafts Tag It Kit tag.


I've layered Close To My Heart Felicity Collection plaid and swirls patterned papers with Barn Red, Olive, and Terracotta white core cardstock.  A Sizzix Tim Holtz Alterations Patchwork Texture Fades and Cuttlebug Swiss Dots embossing folders brought wonderful raised texture to my cardstock that I sanded to show the white core.

This photo shows my completed card front where I've used Ladybug Crafts Ink newly released digital image called Jug and Vase Delight . . . and my attempts at including its reflection on a mottled surface.


You can find my post showing how I add reflections on wood here.


I'm entering this card into the following challenges:
Simon Says Stamp! "Glimmer and Sparkle" (here)
Crafty Creations "Colors of Fall" (here)
Divas by Design "Use Some Texture" (here)
Charisma Cardz "Badda Bing!" (here)
Paper Play "Shine On" (here)
Do You Stack Up "Warm Colors" (here)
A&T/Emerald Faerie "Flowers" (here)
Crafty Catz "Autumn" (here)
Delicious Doodles "Flowers" (here)
Cupcake Craft "Autumn" (here)


Copics used:
jug, silver - C1, C3, C5
jug, gold - Y13, Y26, Y28
vase, copper - E02, E33, E37, E39
flowers - YR21, YR24, YR27
leaves - G82, G85, G99
ladybug - R22, R29, R59
mottled glass surface - C3, C1, BG000, 0
airbrushed background - Y00, B21


I'm so glad that you stopped by to visit!

~ Rose