Why Rosie's Book?

While growing up, I had a dear friend, Renee, that lived next door and with whom I spent much of my childhood. We grew, in different directions, and went on our merry way. Many years later, I ran into her parents and they kindly reminded me of the laughs they still have over my book. “What book?” I wondered with a puzzled look. "I don't remember a book." Hardy laughter accompanied their response. At some time during our childhood, I tried to convince Renee about something that her parents didn’t agree with. I told her that proof of its truth could be found “in my book.” Naturally she went home and tried to convince her parents of the same thing but they weren’t falling for it. She needed an edge and told them emphatically, “It’s in Rosie’s book!” After they caught their breaths from reborn laughter, they let me know how “Rosie’s book” has been cited for many other things throughout the years. They’ve also mentioned that they’d like to see “Rosie’s book” one day. I can’t remember all of the things that I said were in “my book” but I’m sure my dear friend’s parents can recall much more than I ever knew about – LOL!!! So, here it is . . . my version of things you might find In Rosie’s Book . . .

Showing posts with label mini-album. Show all posts

Sunday, July 24, 2011

Card Calendar Organizer Book

I'm still searching for a card holder that makes me happy.  I need something that will help me to organize and protect my store-bought and special handmade cards that will also inspire me to actually mail them.

I came across this Card Calendar Organizer Book that I put together a while ago and thought I'd share it with you.  This was alot of fun to make.  I think I'll give it another try and see if I can make good use of it.

The tropical tones of Creative Imaginations Christine Adolph South Seas Island Bloom and Kimono Breeze and Bazzill cardstock tie together beautifully with May Arts 1" wide Navy ribbon.  This wonderful 9x9" book is held together using Bind-It-All 3/4" coils.


It houses monthly pocket calendar pages with extra pockets for get well, congratulations, thank you and sympathy cards. QuicKutz tabs and calendar phrases die cuts help to clearly mark the pages.


The monthly calendar pages include reminders for monthly birthstones and flowers.


I've also included an anniversary gift page with a list of traditional and modern gifts.


I don't recall why I stopped using this Card Calendar Organizer Book.  It seems to have very helpful elements to it.  I'll have to find out what blocks me from storing my cards inside these colorful pockets and make adjustments where needed.

How do you organize and store your cards?

Wednesday, January 19, 2011

Sizzix Big Shot Pro Album with Lace and My Little Shoebox

The Sizzix Album with Lace die for use with the Big Shot Pro makes finishing a mini album incredibly easy.  It cuts through chipboard like butter and allows matching papers to be lined up and adhered perfectly.  There is a lacy scalloped edge page that I used for my front and back covers.  For my inner pages, I used the slightly smaller rounded corner inserts.  Both pages are included on the same die.

Several months ago, I won a very generous prize package from a My Little Shoebox blog hop (here) and have finally used it to decorate this multi-page mini album.


The front cover shows my use of Scraps of Metal, Petals and Furry Friends . . . I cut out some robots from the back of the Reboot paper.


Scraps of Metal covers the inside of the cover . . . A pocket made from the Sizzix #4 envelope note card allows room for some additional notes, tags and/or photos.


The first page includes Reboot . . .


For page 2, I used Down the Street for the cool notebook paper design on the back . . .


Page 3 shows the robots side of Scraps of Metal . . .


Page 4 shows the stars side of Scraps of Metal . . .


Nice to See You covers page 5 . . .


Page 6 shows Follow the Cloud . . . My Little Shoebox die cut cardstock includes nice designs for further embellishing . . .


You-Hoo is included on page 7 . . .


Page 8 shows Love Birds . . .


while I used Tweet-Hearts on page 9 . . . The little circular owl tab on the right can be lifted to open a flap where more photos and journaling can be included . . .


Page 10 is surrounded by Furry Friends . . . The designs of the My Little Shoebox patterned papers are clear and easy to cut for use in coordinating embellishments.  Glossy Accents and Stickles added to the cut outs allows you to add your own homemade layered stickers.


Sierra coordinates well on page 11 . . .


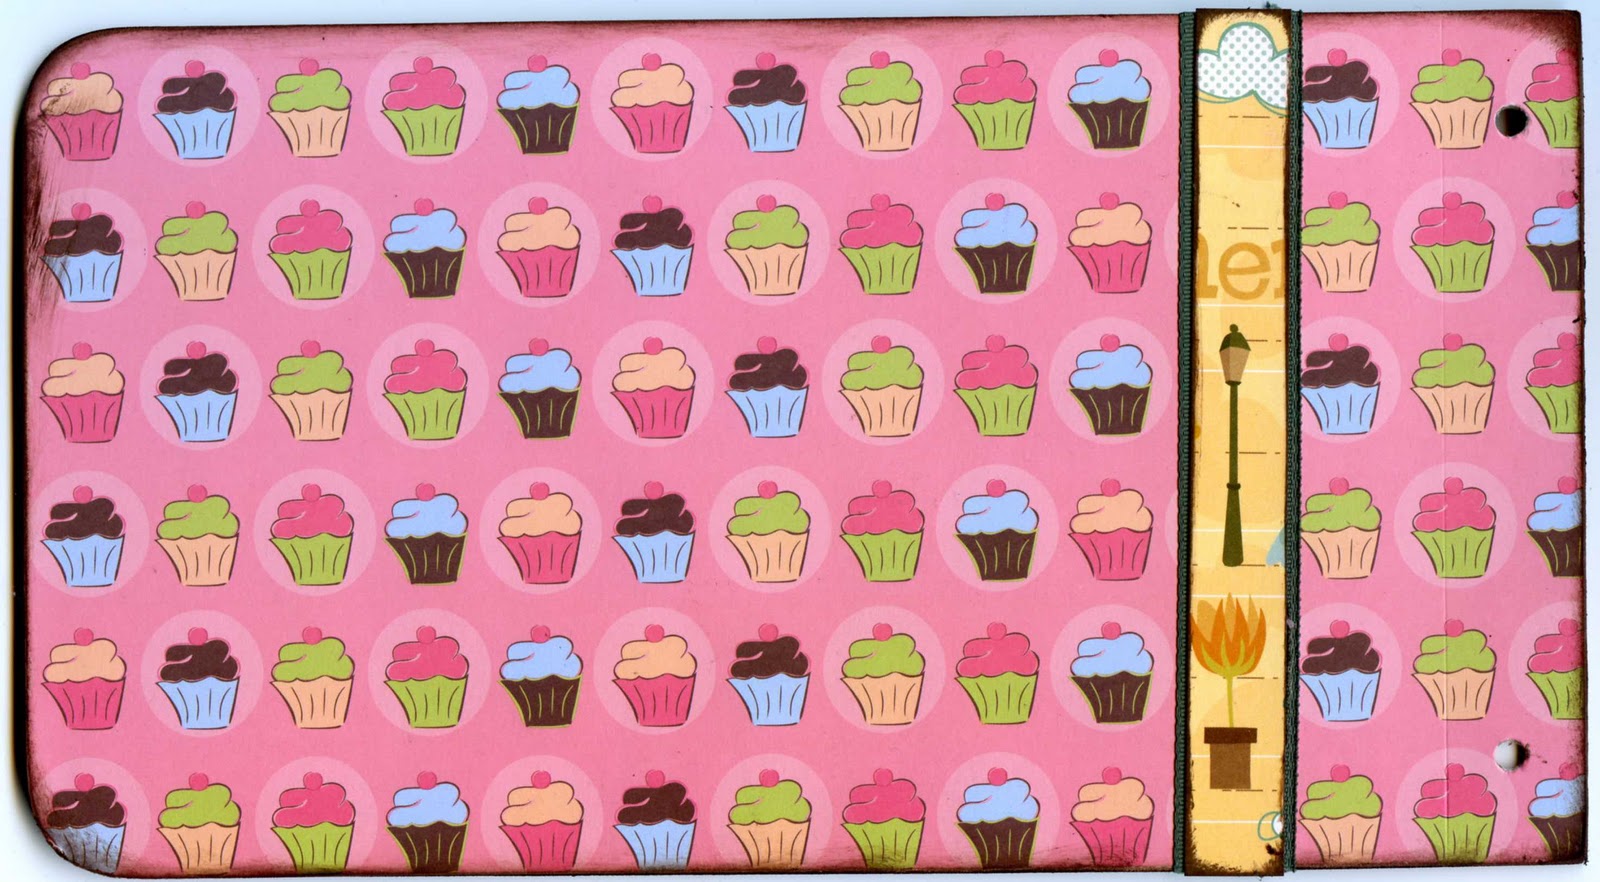
Page 12 shows Bite Size . . .


The inside of the back cover is lined with the dark blue plaid from the back of Botanical.  The corner pocket is made using the Fresh Air scalloped circle die cut . . .


The other side of the back cover is lined with Happy Trees . . .


The finished project is approximately 10 1/8" x 5 1/2".  This mini album has room for as many as 13 4x6" photos and 3 wallet-size with journaling.  Now to select some photos of my sons and daughter to place inside and remind them of some of their childhood days . . .

Yikes!!!  I still have enough product left from this prize to make at least another mini album or two . . .

Friday, January 7, 2011

Magnolia Stamps Sampler Mini Book, Continued (IV)

I find myself drawn to images of animals and Magnolia Stamps Wilma with Rose from the 2010 Raising the Ceiling Collection was no exception.  This little cutie deserves her own space in my Magnolia Stamps Sampler Mini Book.

I stamped Wilma onto a 3 1/4" square of Bazzill Smooth white paper and filled her in using Copic markers.  I masked Wilma and airbrushed her outline.  I used a Toner Gray No. 6 and decided that was too dark but I'm going to use this image anyway to serve as a reminder not to use such a dark outline next time.  A pierced and drawn border adds a homemade touch.

I also stamped Wilma twice onto Grafix shrink plastic using Staz-on.  I cut around the images and punched a hole in each to allow room to hang them as charms.  I used the same Copic colors to fill the reverse side of the stamped images and used my heat gun to shrink them.  Wilma on the left shows the colored side and Wilma on the right shows the stamped side.


I used a Tim Holtz Idea-ology Charm Clip with Jump Ring to attach a shrink plastic charm to my paper Wilma and adhered the paper to my book page.

I added some punched McGill Pine branches with some Punch Bunch small birch leaves and attempted to use a 12" length of Melody 3/8" Ruby Red Ribbon from Beaux Regards to create a folded rolled rose.  I used Fabri-tac adhesive to hold my rose together and add it to the page. 


The Tattered Angels Vintage Seasons Timeless Romance stamp had a fine sentiment for this Magnolia Wilma with Rose page.  This photo shows the completed page . . .


Here's how the completed page looks in my Magnolia Stamps Sampler Mini Book . . .


Find more pages from my Magnolia Stamps Sampler Mini Book at this post (click here).

Copics used:
Rose - R22, R29, R59
Leaves, Stem - G82, G85, G99
Ribbon - Y13, Y26, Y28
Dog Fur - E11, E13, E15, R20
Nose - atyou Spica pitch black
Airbrushed outline - T6

Monday, January 3, 2011

Magnolia Stamps Sampler Mini Book, Continued (III)

I thought it would be appropriate to add a new baby image to my Magnolia Stamps Sampler Mini Book to bring in the New Year.  Here I used Magnolia's Sleeping Baby Tilda and the New Baby text from the 2010 Cozy Autumn Collection.

As my background paper is American Crafts I Do Gerber Daisies, I filled my image using Copic markers in coordinating colors.  Here's Sleeping Baby Tilda with her golden angel wings . . .
Her wings just weren't golden enough for me so I added a thin layer of Ranger's Stickles in Gold.  Ahhh, now they're more angelic-looking.
I used QuicKutz Cookie Cutter Oval nesting dies to die cut the image then airbrushed around the die . . .
After adhering a light blue satin ribbon and bow with a dangling pacifier charm, I outlined the edges of my scalloped page using Ranger's Stickles Star Dust.

I spread some Diamond Stickles on the surface of some McGill pine branch punches, QuicKutz leaves, and some quilled leaves and yellow flowers.  The quilled flower strips were first fringed with angled and straight fringing tools.  Then the fringed paper strips were quilled as usual.  I love the swirly look of the angled flower.  A touch of Gold Stickles fills the centers of two of the flowers.


Here's the completed full page . . .


Here's how this New Baby Tilda page looks in my Magnolia Stamps Sampler Mini Book . . .


You can find the cover and page 1 of my Magnolia Stamps Sampler Mini Book here.  Page 2 is here.  Click here for page 3.
Copics Used:
Skin:  E000, E00, YR00, R20
PJs/Cap/Pillow:  BG13, BG15, BG18
Eyelet Lace:  BG000, 0
Wings:  :Y13, Y26, Y28
Grounding:  T6, T0, 0
Airbrushing:  R20

Thursday, December 2, 2010

Magnolia Stamps Sampler Mini Book, Continued (II)

I enjoyed paper-piecing on my Magnolia Secret Tilda from the 2010 Merry Little Christmas Collection for the latest Copic Creations Challenge so much that I thought I'd add one to my Magnolia Stamps Sampler Mini Book.

I stamped Tilda three times:  once onto Bazzill Smooth White and one on each side of the Basic Grey Eskimo Kisses Thin Ice patterned paper.


I used Copic markers to fill the skin, blonde hair and gift areas of the image stamped on white paper.  I cut pieces of clothing from the images stamped on patterned paper.


I used a wet glue pen to adhere my clothing pieces to the image on white paper so I could glide the pieces into place and make sure they were lined up properly before drying.  Here's how Tilda looks before I shaded her clothing pieces . . .
Here's how Tilda looks after I used coordinating Copic colors to add some shading to the paper-pieced areas . . .

I used a QuicKutz tag die to cut beyond the edge (find more examples of using the "cut beyond the edge" technique here and here).

I adhered the tag to a Sizzix die cut chipboard scalloped square covered with both sides of Basic Grey's Eskimo Kisses Thin Ice double-sided patterned paper.  I added an ornament sticker and a few coordinating handmade poinsettias.  Here's how the completed page looks . . .


Here's how this page looks in my Magnolia Stamps Sampler Mini Book . . .


See the cover and page one of my Magnolia Stamps Sampler Mini Book here.  Find page two here.  I think that this page will serve as a good reminder to use my Magnolia images to create some exciting gift tags.

You can find another example of this image paper pieced with My Minds Eye patterned papers here.


Copics used:
skin:  E000, E00, YR00, R20
blonde hair:  Y21, Y26, Y28
gift:  RV93, RV95, RV99
gift ribbon:  G82, G85, G99
shade shirt/slippers/headband:  RV93
shade pants:  B01

Wednesday, November 24, 2010

Magnolia Stamps Sampler Mini Book, Continued

Using Basic Grey Max & Whiskers mittens/max plaid paper, I die cut another page for my Magnolia Stamps Sampler Mini Book.

I've stamped and used Copic colors to fill the Longing Tilda image from the Fairy Tale Collection 2010.  Spellbinders Lacey Circle dies make a beautiful matting for Tilda.

Using purple tones for their contrast with the yellows of Tilda's dress, I've added a dotted background by stippling with Copics.


Do you think that this form of an outline shadow appears to make Tilda pop forward?  Find more examples of dotted backgrounds here.

I've added some Prima flowers and a simple Inkadinkado sentiment to complete this additional page for my Magnolia Stamps Sampler Mini Book.  Here's how the completed page looks . . .


Here's how this page appears in the book . . .


See this post to learn more about how this Magnolia Stamps Sampler Mini Book got started.

As a side note, I'm still trying to like X-Press It paper.  Here, rather than allowing for a smooth blend, I find that X-Press It paper made my image very splotchy, especially in the areas of the skin tones.


Copics used:
skin:  E0000, E00, E02, R20
dress/bow:  Y21, Y23, Y26
hair/tabletop:  E55, E57, E59
Dotted Background:  V04, V01, V000, V0000

Saturday, November 20, 2010

Magnolia Stamps Sampler Mini Book

I've grown to be a collector at heart.  I like to think that I collect practical and useful things.  My most valuable collection is in a binder that contains research materials and findings related to my family history.  I have a collection of some Belsnickels that I adore year round.  It makes me happy to use my colorful fiesta ware at every meal.  I've enjoyed the hunt for antique furniture and other treasures from the past.  Now I collect scrapbooking tools and other paper crafting products . . .

I've developed a fascination for collecting Magnolia stamps.  I've admired these images for years.  I find the idea that they're images of "angels that speak from their hearts" quite endearing. (That's why images from Magnolia stamps don't have mouths; they don't need them as they speak from their hearts.)

Filling these images with the wonderful colors of Copics makes them even more lovely to me.

I've thought of different ways that I might enjoy my Magnolia images more and serve as a reminder to use them in paper crafting projects.  I finally settled on creating a Magnolia Stamps Sampler Mini Book.

I've used the Sizzix Clear Scallop Square to die cut medium weight chipboard.  I think that each 4 1/2" square will allow ample room for displaying most Magnolia images.  I can easily die cut coordinating papers to adhere to the chipboard.

Here's the front cover:

I've filled the Spring Tilda from the Chasing Butterflies Collection 2009 using Copic colors that coordinate with the Junkitz Fanci-ful Be You double-sided patterned paper covers.  I've found that the X-Press It paper continues to be unfriendly with my attempts at 3-Tone Smooth Blending.

I cut around Tilda so I could display her seated on a ribbon.  Keeping the page design simple, I added a few jeweled Petaloo Flora Doodles over some QuicKutz leaves and a single Inkadinkado sentiment.  Here's the first page of my Magnolia Stamps Sampler Mini Book . . .


My mini book is held together using 1 1/2" rings so I should be able to add additional pages at my leisure.  Here's how it all looks so far . . .


Using the new Tim Holtz Vagabond die cutting machine makes die cutting the chipboard and coordinating papers a breeze.  I expect to add a page to this mini book regularly and spend some time enjoying my filled Magnolia images again and again.  This will also be a great way to share my collection with others.

Now doesn't that sound "practical and useful?"  LOL!!!

Copics used:
coveralls/hair ties:  B01, B02, B04
hair:  E21, E25, E29
coveralls:  G82, G85, G99
shirt/boots:  RV21, RV32, RV34
skin:  E000, E00, YR00, R20
atyou Spica Clear

Tuesday, June 29, 2010

Wedding Memory Binder

Layers, layers and more layers . . . of beautiful, shimmery patterned paper and cardstock . . . flowers and ribbons and pearls . . . oh my!

I've been having a wonderful time piecing together all of the black, grey and white papers and embellishments with this Heidi Swapp 9x6-ish memory binder (with 3-ring binding).  Angela Moen designed this kit for The Button Farm and it was my pleasure to work with these items.  I think that most of the products were from the Making Memories Wedding collection.  There were glitter die-cuts, dimensional stickers, rub-ons, foil, netting and printed flowers.  As if that wasn't enough, some other items were Queen & Co pearls, ribbon slides, various ribbons and lace.  I added a couple of charms and beaded links from my own stash.

My daughter served as one of the bridesmaids for my niece and I selected some of my favorite pictures (boy, that was difficult!) to represent her participation in my niece's special day.  As the bridesmaids wore plum-colored dresses, I added some as-close-to-plum-as-I-could-get paper.

This binder holds 14 double-sided pages and I still have enough product left that I could create another mini-album!  I may give one of them to my daughter one day - LOL!!!


There are pockets . . . both of paper and page protector material for holding special documents . . .

There are journaling spots to personalize it and make it your very own . . .

Some of the chipboard pages have tabs . . .

Some of the papers are die-cut . . .

Oh how wonderful it is to relive this special day through this Wedding Memory Binder . . .

Have you enjoyed working with pre-coordinated, already designed kits?