Why Rosie's Book?

While growing up, I had a dear friend, Renee, that lived next door and with whom I spent much of my childhood. We grew, in different directions, and went on our merry way. Many years later, I ran into her parents and they kindly reminded me of the laughs they still have over my book. “What book?” I wondered with a puzzled look. "I don't remember a book." Hardy laughter accompanied their response. At some time during our childhood, I tried to convince Renee about something that her parents didn’t agree with. I told her that proof of its truth could be found “in my book.” Naturally she went home and tried to convince her parents of the same thing but they weren’t falling for it. She needed an edge and told them emphatically, “It’s in Rosie’s book!” After they caught their breaths from reborn laughter, they let me know how “Rosie’s book” has been cited for many other things throughout the years. They’ve also mentioned that they’d like to see “Rosie’s book” one day. I can’t remember all of the things that I said were in “my book” but I’m sure my dear friend’s parents can recall much more than I ever knew about – LOL!!! So, here it is . . . my version of things you might find In Rosie’s Book . . .

Friday, April 15, 2011

Copic Creations Challenge: Your Favorite Paper for Copics

At the Copic Creations Challenge blog, the design team is currently showcasing their use of Copic markers on Cryogen white paper. The sponsor of this challenge, the lovely Patricia of Paper Temptress, is offering a very generous $25 gift certificate to the Paper Temptress store as a prize to a randomly selected entry. Find out more about this challenge and sponsor here.

Paper Temptress provides a fabulous range of gorgeous high quality papers in various colors, metallic to iridescent, smooth to textured, light to heavy gauge. I’m especially interested in seeing how Copic markers work on Cryogen White paper. With an 89 lb. cover weight, Cryogen White has a subtle sparkling surface and its mica coating shows an elegant luminescent sheen on both sides of the sheet. It is acid-free and compatible with laser and ink jet printers.

Here are the results of my first attempt at using Copic markers on Cryogen paper . . .

I've printed this digital image of a Gothic Fairy from the 2010 book Fairies Art Studio by David Riche’ onto Cryogen paper using my Epson Stylus Photo R1800 printer.  The printing is crisp and clean and shows no sign of smearing.  Great start.


If you're able to click on the photo above and enlarge it, you can see how the shimmer of the Cryogen paper shows even through the layers of Copic color.  Well, you can't see the amazing shimmer exactly, but all of those teensy-tiny white dots throughout the wings and upper area is the mica shimmering.

While I love the remarkable shimmer and silky smoothness of this paper, it behaves much like the X-Press It! blending card and glossy cardstock for me when I apply my Copic marker ink.  If you like X-Press It! blending card then you'll like Cryogen white paper.  There is little to no ink bleeding through to the other side.  I didn't have any problem with the color feathering beyond the lines of my image.  As the marker color remained on the surface of the paper, I was able to easily remove any misplaced color with just a swipe of the Colorless Blender.

The humidity levels in my area of New Jersey effect paper differently than the environment in other parts of the world. I have found that Cryogen paper does not allow me to use my normal application of light layers with Copic markers. The ink dries so quickly on this paper’s surface that my layered strokes remove the previously applied ink from the newly formed ink-puddles. Colorless Blender techniques are ineffective because the ink removed from the surface stays on the marker tip of the Colorless Blender rather than allowing the Colorless Blender to push, fade or erase the applied color. For the most part, one stroke is all I get on this paper. When I remove my marker tip from the surface, streaks form.


To embellish my card, I've added a border of pleated black lace, a couple of Sizzix 3d Flowers and Punch Bunch blossoms.  Silver nailheads adorn a computer generated quote die cut with Spellbinders Floral Doily Motifs.


I used a QuicKutz pirate flag die for the skull and cross bones to create airbrushing masks.  Spellbinders Labels 8 shapes the Cryogen white and Black Crepe matting.  I attempted to use a few dabs of Diamond Stickles for sprinkled fairy dust.

Here’s the completed card that shows my use of layers of superior quality paper from the Paper Temptress as well as my use of Copics on Cryogen Paper to fill this cool Gothic Fairy image.


You have until April 30th to show us your best work using your favorite paper for Copics. Why not give Cryogen white paper a try?

Copics used:
skin - E000, E01, E11, E93, BV01
hair - Y21, Y23, Y26, Y28
leather dress/boots - T0, T6, T9, 0
silver straps - C1, C3, C5
rose - R22, R59, G82, G99
wings/rose ribbon - V91, V93, V95, V99
airbrush - C3, R22, V93, Y23

Wednesday, April 13, 2011

Card Art with Copic Fluorescents: Sweet Pea Stamps Dance of Butterfly

The current Crafts and Me challenge is to show use of ribbon.  Whiff of Joy is sponsoring this challenge and offering a Miss Ladybugs stamp to a randomly selected entry.  Find out more about this challenge and sponsor here.

The In A Sweet Pea Dream challenge is offering a $7 gift card for Sweet Pea Stamps to a randomly selected entry showing your favorite color.  Find their challenge here.

Sweet Pea Stampers challenge is offering a $10 gift card for Sweet Pea Stamps to a randomly selected entry showing a card for Mother or Hero.  Find their challenge here.

I've inked up my Sweet Pea Stamps Dance of Butterfly by Ching-Chou Kuik and stamped her onto Neenah Classic Crest Solar White 80lb cardstock then filled this beautiful image using my Copic Fluorescent colors.

Are you ready?

You're not going to believe this . . .

It's awesome . . .

I can't believe I made it myself . . .

Here she is, glowing under a black light . . .


I know!  It makes you want to run out and get some of those Fluorescent colors, doesn't it?  There are only 8 of them, thankfully.  You can find out more about how much I love the Copic Fluorescent shades here, here and here.

This photo shows the full card front with the image framed in Offray 1/8" salmon ribbon.  A few Creative Impressions small tropical iridescent blossoms and leaves with gold mini brads are at two corners.  The sentiment is from Outlines Rubber Stamp Co.

Lights ON . . .


Lights OFF . . .


Gotta love it!!!

Copics used:
skin - E000, E01, E11, E93, BV00
hair - FV2, FB2, FBG2, FYG2, T6
tail - N1, FYR1, FRV1, 0
gold accents - Y13, Y26, Y28
butterflies - FY1, FYG1, FYG2
eyes - C3, C00, FBG2, FB2
bubble - G20, G21, G24
airbrush - BG11, BG13, BG15, V04
highlights - Opaque White

Saturday, April 9, 2011

Continuing A Love for Zentangle

There is something so incredible to me about meeting groups of people, guiding them through this simple and meditative art form called Zentangle, then admiring their final work.

This photo shows some Zentangle tiles created at a March workshop . . .


The tiles in this photo were completed more recently.  On a fine Saturday in April, Sam invited some dear friends to her lovely home to introduce them to the Art of Zentangle.  How fortunate I was to be there too!


Many of the magnificent Zentangle tiles shown in these photos have been completed by wonderful people who have never heard of Zentangle.  Before their first tiles were completed, they wanted to learn more . . . in a much calmer way - LOL!!!  Gotta love it!!!

Thursday, April 7, 2011

Card Art with Copics: Close To My Heart Bunny

I found this sweet image of a lady bunny happily delivering an Easter gift at a recent local ScrapStampArtTour show.  She's part of a Close To My Heart Sensational Season March 2011 Stamp of the Month set.

I filled her using Copic Spring colors.


I used a Fiskars read between the vines Border and Corner Punch at the card's open edge.  A Copic atyou Spica in Lilac makes some glimmering faux stitching for an image border.  A few Bazzill Basics walnut self-adhesive jewels adorn three corners while a simple thin ribbon bow adorns the other.

Here's a view of the completed card . . .


Copics used:
fur - E31, E35, E47, E93
dress - Y13, Y15, Y19
apron - V0000, V01, V04
gift bow - V04, V06, V09
gift box, grass - YG11, YG13, YG17
outline shadow - B00, B000, B0000

Sunday, April 3, 2011

Card Art with Copics: Sweet Pea Stamps Fly Butterfly

The design team over at Crafts and Me is currently challenging paper crafters to use the color yellow.  Kraftin Kimmie is sponsoring this challenge and offering two Kraftin Kimmie stamps to a randomly selected entry.  Find out more about this challenge and sponsor here.

Crafts and Me is also having their first Blog Hop with great stamping prizes sprinkled throughout their design team blogs.  Hop along for lots of chances at winning.  Their Blog Hop runs through April 15th.  Find out more about how to start here.

Yellow is psychologically the happiest color in the color spectrum and radiates spiritual warmth.

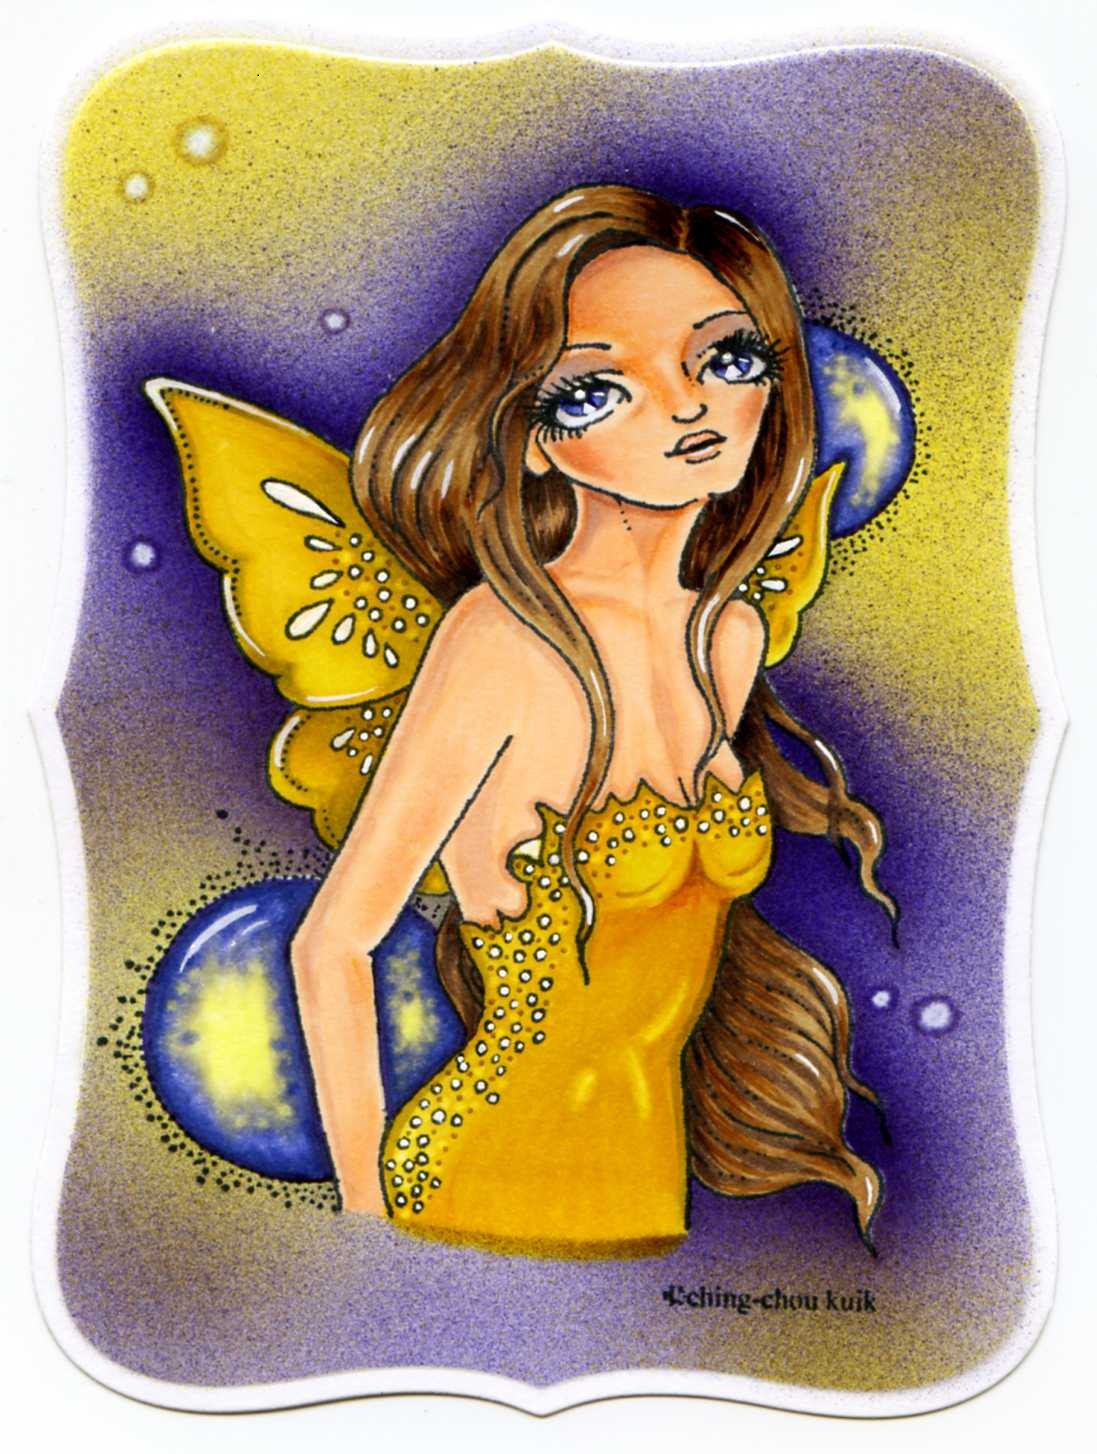
I've used Copic colors to fill this amazing Fly Butterfly image by Ching-Chou Kuik.  Sweet Pea Stamps holds a license to Ching-Chou's images and they're also available through Crafts and Me.
Here's a view of the image after I die cut using Spellbinders Labels Eight and added a complementary background using purples.  Use of complementary purple provides a strong contrast that makes the yellow appear to pop.
This view shows my next step of adding Copic's Opaque White acrylic paint to return some of the highlights and gleam to the image . . .

Here's the completed card front showing my entry to the Crafts and Me "yellow" challenge.  I've added an Outlines Rubber Stamps Swarovski clear crystal SS5 to her ear and a thin ribbon border near the base.  These simple, plain embellishments allow my Copic technique-filled image to remain the focal point.


I'm also submitting this card as an entry into the "Hello Spring" challenge at In a Sweet Pea Dream.  A randomly selected entry will receive a $7 gift card for Sweet Pea Stamps.  Find out more about their challenge here.

Copics used:
skin - E000, E01, E11, E93, BV00
hair - E31, E35, E47
dress, wings - Y13, Y15, Y19, Y28, atyou Spica Gold
eyes - BV02, BV04, BV08, W1, W00, 0.03 black multiliner
outline shadow - W3, W1, W00
moons - BV08, BV04, BV02, Y00
airbrush - Y00, Y18, BV08

Friday, April 1, 2011

Copic Creations Challenge: Favorite Technique

The team over at Copic Creations is currently challenging you to use your favorite Copic technique. Why not find your favorite Copic Creations challenge from the past year and show us your take on it? With so many techniques and challenges to choose from, you’re bound to overlap some and include more than two on your entry.  Crafty Secrets is sponsoring this challenge and will be providing some of their lovely stamps to a randomly selected winner.  Find out more about the challenge and sponsor here.

I've combined a few of the Copic Creations challenges from the past year to create a birthday card . . .


Crafty Secrets Clear Art Stamps generously provided me with their fun, medium, Mouse Party set to demonstrate use of Copics on their images. It is possible to use Copic markers on images that are small with tight space; you just have to remember that one stroke is all you get – LOL!!! Use thin layers of color. If you find that your color feathers beyond the lines of your image, try scribbling darker color onto a plastic palette, pick it up with a lighter color then add that marker stroke to your image for shading. Tip-to-Tip Blending comes in handy here too (just use a lighter color marker tip to pick up some color from the tip of a darker marker color then add that stroke to your image).

I used a QuicKutz Revolution present die to form the base for this little clowning-around mouse to burst through. I like the warm and complementary tones of the Bazzill brick red present and the Copic yellow-green mouse’s outfit for demonstrating this little clown’s surprise entrance to the party.


The Cat’s Pajamas CutUps Inside Pinking Border die makes a fun hanging banner for the Mouse Party birthday celebration.


Heidi Swapp Bling rhinestones add a bit of sparkle to the clown’s pointed hat as well as at the center of the EK Success Paper Shapers punched flowers cluster. A bit of Diamond Stickles on the flower surfaces adds more glimmer.


My intention was to create the appearance of a mouse hole by cutting a half-oval shape from a piece of Creative Imaginations Real Wood Thin Cherry. I used Echo Park’s Life is Good Seeing Spots as a background to continue the bubbly, happy feeling of the birthday party theme.

My warm little Mouse Party Make-A-Scene includes Copic coloring of animals, pleats around the surprise mouse’s clown collar, and shading on “other” surfaces (a bit on the wood, patterned paper and cardstock).


What’s your favorite Copic technique/challenge from the past year? We can’t wait to see it!

You have until April 14th to submit your entry for this “your favorite technique” challenge (here).

Copics used:
mice fur – W00, W1, W3, R81
balloon – BG0000, BG72, BG75, BG78
left mouse shirt/gift ribbon – R32, R35, R39
gift box – BG70, BG72, BG75
right mouse – YG11, YG13, YG17
shading on present die cut – W5
W1 around wood, patterned paper, cardstock