The latest Copic Creations Challenge involves using Copics to add shaded areas to paper-pieced stamped images. Tickled Pink Stamps is offering a $15 gift certificate to one randomly selected entry. Find out more about the challenge here.
[I've found that this card also seems to meet the 7 Kids College Fund Challenge to create a Christmas card using non-traditional colors. Find their challenge here. A Basic Grey Jovial Card Kit is their prize for this challenge.]
I've stamped Secret Tilda from the 2010 Magnolia Merry Little Christmas Collection three times: once on Bazzill Smooth White, then on each side of My Minds Eye Penny Lane Tiny Dancer Pirouette.
I used Copic marker colors to fill the skin, blonde hair and gift areas of my Magnolia Secret Tilda image. Then I hand cut clothing pieces from the patterned papers to adhere to the image stamped on white paper.
I used a wet glue pen to adhere my paper pieces so I could glide them into place and ensure they line up properly. Here's how Tilda looks before shading . . .
Then I used medium shades of coordinating colors to provide some shaded areas to the paper pieces. Here's how Tilda looks after the shading . . .
I used a Spellbinders scalloped rectangle die to frame my paper-pieced Tilda image. I added a background and strip of the My Minds Eye paper to clearly show that it was used for the paper-piecing. Icicle Stickles coats a QuicKutz flourish and the scalloped edge of the frame. A Stampin' Up! sentiment was punched using a Marvy 2" Oval punch that was matted with a scalloped oval punched from a Marvy 2 1/2" Scalloped Oval punch. I embellished with just a few coordinated handmade poinsettias (find out more about how to make these poinsettias here).
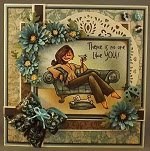
Here's the completed card that shows how I've used Copic marker colors to provide shaded areas to a paper-pieced stamped image and created a Christmas card using non-traditional colors . . .
It's been a long time since I've used this technique of paper-piecing on stamped images. While cutting these clothing pieces, I found myself having flashbacks of my early childhood when I used to trace paper doll clothes onto other papers so I could cut them out and have a larger assortment of tabbed paper clothing pieces to dress my paper dolls. If my older brothers could have seen me, intently and purposefully cutting out these little clothing pieces, they would surely have continued their debate on whether or not I ever really grew up - LOL!!!
Copics used:
skin: E000, E00, YR00, R20
blonde hair: Y21, Y26, Y28
gift: E42, E44, E47
gift ribbon: RV91, RV93, RV95
shade shirt: RV93
shade slippers: RV95
shade pants/headband: E44
Sunday, November 28, 2010
Wednesday, November 24, 2010
Magnolia Stamps Sampler Mini Book, Continued
Using Basic Grey Max & Whiskers mittens/max plaid paper, I die cut another page for my Magnolia Stamps Sampler Mini Book.
I've stamped and used Copic colors to fill the Longing Tilda image from the Fairy Tale Collection 2010. Spellbinders Lacey Circle dies make a beautiful matting for Tilda.
Using purple tones for their contrast with the yellows of Tilda's dress, I've added a dotted background by stippling with Copics.
Do you think that this form of an outline shadow appears to make Tilda pop forward? Find more examples of dotted backgrounds here.
I've added some Prima flowers and a simple Inkadinkado sentiment to complete this additional page for my Magnolia Stamps Sampler Mini Book. Here's how the completed page looks . . .
Here's how this page appears in the book . . .
See this post to learn more about how this Magnolia Stamps Sampler Mini Book got started.
As a side note, I'm still trying to like X-Press It paper. Here, rather than allowing for a smooth blend, I find that X-Press It paper made my image very splotchy, especially in the areas of the skin tones.
Copics used:
skin: E0000, E00, E02, R20
dress/bow: Y21, Y23, Y26
hair/tabletop: E55, E57, E59
Dotted Background: V04, V01, V000, V0000
Labels:
Copics,
Magnolia,
mini-album,
Pattern,
Sizzix,
Spellbinders,
Technique,
X-Press It
Saturday, November 20, 2010
Magnolia Stamps Sampler Mini Book
I've grown to be a collector at heart. I like to think that I collect practical and useful things. My most valuable collection is in a binder that contains research materials and findings related to my family history. I have a collection of some Belsnickels that I adore year round. It makes me happy to use my colorful fiesta ware at every meal. I've enjoyed the hunt for antique furniture and other treasures from the past. Now I collect scrapbooking tools and other paper crafting products . . .
I've developed a fascination for collecting Magnolia stamps. I've admired these images for years. I find the idea that they're images of "angels that speak from their hearts" quite endearing. (That's why images from Magnolia stamps don't have mouths; they don't need them as they speak from their hearts.)
Filling these images with the wonderful colors of Copics makes them even more lovely to me.
I've thought of different ways that I might enjoy my Magnolia images more and serve as a reminder to use them in paper crafting projects. I finally settled on creating a Magnolia Stamps Sampler Mini Book.
I've used the Sizzix Clear Scallop Square to die cut medium weight chipboard. I think that each 4 1/2" square will allow ample room for displaying most Magnolia images. I can easily die cut coordinating papers to adhere to the chipboard.
Here's the front cover:
I've filled the Spring Tilda from the Chasing Butterflies Collection 2009 using Copic colors that coordinate with the Junkitz Fanci-ful Be You double-sided patterned paper covers. I've found that the X-Press It paper continues to be unfriendly with my attempts at 3-Tone Smooth Blending.
I cut around Tilda so I could display her seated on a ribbon. Keeping the page design simple, I added a few jeweled Petaloo Flora Doodles over some QuicKutz leaves and a single Inkadinkado sentiment. Here's the first page of my Magnolia Stamps Sampler Mini Book . . .
My mini book is held together using 1 1/2" rings so I should be able to add additional pages at my leisure. Here's how it all looks so far . . .
Using the new Tim Holtz Vagabond die cutting machine makes die cutting the chipboard and coordinating papers a breeze. I expect to add a page to this mini book regularly and spend some time enjoying my filled Magnolia images again and again. This will also be a great way to share my collection with others.
Now doesn't that sound "practical and useful?" LOL!!!
Copics used:
coveralls/hair ties: B01, B02, B04
hair: E21, E25, E29
coveralls: G82, G85, G99
shirt/boots: RV21, RV32, RV34
skin: E000, E00, YR00, R20
atyou Spica Clear
Labels:
Copics,
Magnolia,
mini-album,
QuicKutz,
Sizzix,
X-Press It
Tuesday, November 16, 2010
Card Swap: Assemblyline Production with the Paper Cut
Participating in card swaps can be fun. There's something very satisfying about seeing the progression and final results of completing a dozen or so of the same cards.
The Paper Cut products of pre-cut layers and pieces with coordinating envelopes make assemblyline production easy. I've used cranberry scalloped cards, insert liners, Hopsack Land large scallop circles, and fossil circles, with green and Hopsack Land rectangles.
Adirondack Currant dye ink is the perfect coordinating color for stamping this Impression Obsession Peaceful Season sentiment. A couple of gold mini brads adorn these popped up words.
Adirondack pitch black dye ink provides a clear image of this Impression Obsession Poinsettia and Holly stamp.
Copic markers in R22, R29, R59 and G82, G85 and G99 fill this image beautifully.
Here's a closer look at the 3-tone smooth blending with some Stickles Xmas Red added for the holly berries.
A strip of May Arts ribbon, wrapped around the card and tied in the front, adds a special homemade touch.
Here's a closer look at a single card.
The inside of the card includes a lighter, thinner insert for additional stamping or handwriting.
This is my submission for the upcoming card swap hosted by the Scrappers Cove. I look forward to receiving the cards submitted by the other swap participants. It's always interesting to see which techniques, colors, symbols, images, etc., that they choose to share. It's really cool to have a sampling of their art work too!
* * * * * * *
Edited 12/5/10 to add:
Here are a few photos to show the beautiful cards that I received for participating in this swap. You have to imagine the magnificent sparkle added as the photos just don't reflect the true beauty of sugar paper, stickles and glitter.
Velour, scallops, embossing, bling, and paper-piecing . . .
Vintage, matchbook, and diecuts . . .
Layers, tags, and pop-ups . . .
Wax, gloss, and pretty lacy inserts . . .
Oh, what fun it is to swap . . .
Friday, November 12, 2010
Layout Challenge: Suspended Frame in a Wreath of Bo-Bunny Olivia
I love the results of suspending a frame in a wreath of die cut chipboard pieces. The latest Scrappers Cove layout challenge kit provided the perfect supplies for such dimension.
Here's the products included in the kit: Bo-Bunny's Olivia Stripe and Ambrosia double-sided heavy weight paper, green and rust Bazzill cardstock, a weaved/braided shapable ribbon, a pack of BazzillBasicsPaper walnut self adhesive jewels, a large sugar coated brad and two die cut curling roses.
I used the Sizzix Flower Layers #5 to die cut nine small and nine large flowers out of medium weight chipboard. I also used the Sizzix Rectangle Frame to die cut one chipboard frame.
Using the same Sizzix flower die, I cut a variety of flower shapes from both sides of the patterned paper and some of the cardstock. I adhered the paper to the chipboard then sanded and inked the edges.
Temporarily placing the frame in the center of the background page allowed me to align these flowers into a wreath surrounding the frame. A 3/4" striped border on each side of the layout helps to anchor the wreath. I adhered all of the flowers using glossy accents then set the frame aside.
Using an xacto knife, I cut out the center of the background page, leaving a small border around the inside edges. I saved the center piece to use for diecutting the frame's cover. That was sanded and inked too.
It's easy to adhere a piece of transparency to the back of the layout, creating a clear inside layer. Glossy Accents secured the chipboard frame to the front of the transparency. Any 3" x 4" photo can be placed on the back of the transparency. I used a portrait photo here but a turn of the layout easily allows for a landscape shot.
I applied a jewel to the center of each flower and aligned five jewels to the upper left corner of the frame. I used the weaved/braided shapable ribbon to create a bow and adhered it to the frame bottom using glossy accents. I used my slotted quilling tool to curl the roses, secured them to the base (included at the center of the die cut), and airbrushed each with Copic E19.
Here's the completed layout that shows a frame suspended in the wreath.
This layout will be placed in an album so I'm not paying attention to the back of the page. When a similar layout with a suspended frame in a wreath will be displayed on an easel, I have traced the opening from the front onto another cardstock to use as a back page to hide the adhered transparency. Another chipboard frame for the back will allow room for another photo or a place for extra journaling.
Monday, November 8, 2010
Copic Creations Challenge: Scenery and Browns
The latest Copic Creations challenge involves use of Copic brown tones and/or making a scene. Zoe McGrath of Make "it" Crafty is sponsoring this challenge and offering three Copic Ciao markers and three of her digi images to the random winner. Find out more about this challenge and Make "it" Crafty here.
I happen to have a jungle scene image by StarvingArtistamps that I've used for this challenge. This Set the Scene backdrop "jungle" stamp is framed and fits perfectly on an A2 4 1/4 x 5 1/2" card front, allowing a slight border of the card to show. The use of FYG2 (Fluorescent Dull Yellow Green), mixed with shades of Yellow-Green, helped to keep these jungle leaves nice and bright. Some of the Copic shades of "E"arthtone have reddish tones and orange tones that allow nice brown variations in different areas of the same image.
I've included stamped images of a monkey and a vine too. They're also made by StarvingArtistamps. Malbec and vine are found in the DoodleFactory Valentine Remix set.
Here's the completed card that shows how I made a scene and used many of the Copic shades of brown. The sentiment is from a Close to my Heart Spring Treasures set.
Copics used:
Leaves - YG11, YG13, YG17, FYG2
Snake - E41, E43, E47, T6, T0
Vines - E21, Y26, E27
Tree Trunks - E31, E35, E47, W3, W5
Tree Ground - E04, E07, E09, E02 (spots)
Dirt Bank - E95, E97, E99
Dirt Ground - E31, E35, E47
Sky - B28, B24, B21
Monkey - E95, E97, E99, E41
Thursday, November 4, 2010
The Magic of Zentangle
Zentangles aren't supposed to look like anything.
Zentangle is an abstract art form. You do not intentionally plan the outcome. There is no goal or expectation of what it's supposed to look like.
Sometimes, though, a Zentangle unfolds into a wonderful, magical surprise.
Check out this little guy! The more I look at it, I see a little running star, with a backpack full of great things, waving his arm as he shouts, "C'mon! Let's do something cool!"
I don't have a "D" in my name but would love to share this with someone who does. It does make a very cool "D"esigner Zentangle. Or "D"iscover.
If a Zentangle can be related to symbolic journaling, then I really have to wonder about this one. LOL!!! Was it the result of my subconscious wandering toward the approaching ghoulish festivities of Halloween? Or something more sinister? I'd be worried about a professional analysis of this one. LOL!!! It kind of gives me the creeps.
If someone showed me any of these completed Zentangles, I would have thought I couldn't do it. In fact, I probably can't do it the same way again. LOL!!! If anyone tries to recreate them, they may look similar, but each one will be as unique as the individual creating it.
Zentangle is a very cool art form that inspires very unique, unlimited, individual creativity. No special "artistic" talent is needed. The outcome is always uplifting and magical!
Find a Zentangle workshop in your area, taught by a certified Zentangle teacher (cZt), and "do something cool!" You can find a current list of cZts here.
Subscribe to:
Posts (Atom)


