Why Rosie's Book?

While growing up, I had a dear friend, Renee, that lived next door and with whom I spent much of my childhood. We grew, in different directions, and went on our merry way. Many years later, I ran into her parents and they kindly reminded me of the laughs they still have over my book. “What book?” I wondered with a puzzled look. "I don't remember a book." Hardy laughter accompanied their response. At some time during our childhood, I tried to convince Renee about something that her parents didn’t agree with. I told her that proof of its truth could be found “in my book.” Naturally she went home and tried to convince her parents of the same thing but they weren’t falling for it. She needed an edge and told them emphatically, “It’s in Rosie’s book!” After they caught their breaths from reborn laughter, they let me know how “Rosie’s book” has been cited for many other things throughout the years. They’ve also mentioned that they’d like to see “Rosie’s book” one day. I can’t remember all of the things that I said were in “my book” but I’m sure my dear friend’s parents can recall much more than I ever knew about – LOL!!! So, here it is . . . my version of things you might find In Rosie’s Book . . .

Saturday, March 26, 2011

Card Art with Copics: Whiff of Joy Willow with Hot Chicken Soup

The Whiff of Joy challenge blog is celebrating their 100th challenge by giving away prizes for randomly selected "anything goes" entries and comment love left along their design team's inspiration blog hop.  A random entry of this challenge will be chosen for a $25 credit voucher for the Simon Says Stamp store.  There's an extra very generous prize package from Katharina of Whiff of Joy.  More prizes are sprinkled throughout the design team's blogs.  Find out more about this challenge celebration here.

I've inked my newly acquired Whiff of Joy Elisabeth Bell's Willow with Hot Chicken Soup from the Get Well Collection.  Here she is filled using Copic markers . . .


I've chosen Copic colors to coordinate with the Bazzill olive, dark and light browns as well as the Basic Grey max & whiskers mittens/max patterned paper.

I've used a Fiskars read between the vine Border and Corner punch, some Prima leaves and flowers using Creative Impressions White Mini Brads for flower centers.  A little Marvy Uchida Opaque Paint Marker in Gold surrounds my image.  I've added an appropriate sentiment from a 2008 Stampin' Up! Best Yet set.

Here's the completed card front showing my entry for this Whiff of Joy "anything goes" celebration challenge:


Chicken soup always makes me feel better.  I'm sure it would be an extra comfort to have this lovely Willow card accompany a caring portion of get well wishes.

Copics used:
skin - E0000, E00, E02, R20
hair/shoes - E55, E57, E59
blouse - Y21, Y23, Y26
pants - YG91, YG95, YG99
apron - E40, E41, 0
steam - W1, W3
pot - C1, C3, C5

Thursday, March 24, 2011

Sizzix Big Shot Pro Pillow Purse and Magnolia Stamps

Sometimes improvising is the key to unlock doors that seem to block creativity.  I wanted to use Magnolia stamps for an Easter scene but I didn't have any Magnolia Easter stamps.  Hmmm.  Improvise.

I filled my Magnolia Tilda Hanging Ornaments image from the 2010 Merry Little Christmas collection with the intention of cutting off the ornaments.


I wanted a fence to hide some eggs but didn't want a full background so I filled the fence from the Magnolia Fence and Summer Background image from the 2008 Summer and Sea Collection and cut it out too.


I die cut a couple of baskets and several eggs using the QuicKutz Easter Basket die . . .


. . . added some shading using Copic markers and adhered them to my stamped Magnolia images.


I used some older Top Line Creations Easter/Spring Varsity Plaid single-sided patterned paper to die cut my Sizzix Big Shot Pro Pillow Purse.  A little lace pleated under the front flap, a Bazzill Basics Button Vintage Elizabeth for a flap closure, some Diamond Stickles for added sparkle, Martha Stewart fringe scissors for long Spring grass and an Easter Joy sentiment from Outlines Rubber Stamp Co. supplements my Easter scene.


Here's my completed Easter scene decorated Sizzix pillow purse . . .


Since only the bottom half of Tilda is adhered to the base of the pillow purse, the purse flap can still open and close behind her.

My Magnolia stamps Easter Scene is complete without using any Magnolia Easter images.  How's that for improvising?

I've entered this Sizzix Big Shot Pro Pillow Purse using Magnolia Stamps in the current Magnolia-Licious Inspiration Challenge (find more about the challenge here).

I've also entered this project for a #3 Anything but a Card at the Magnolia-licious Easter-Spring Extravaganza Contest (here).  Click here to enter the Magnolia-licious store.

* * * * *
Edited 5/14/11 to add:

I've just reviewed the March 2011 issue of Magnolia Ink Magazine and found my Magnolia Easter Purse published on page 59 of the Spring issue.  Woo-Hoo!!! ~ Rose


Published in March 2011 Magnolia INK Magazine


Copics Used:
Skin - E0000, E00, E02, R20
Hair/Fence - E47, E35, E31
Shirt/Socks - V12, V15, V17
Pants - YG11, YG13, YG17
Eyelet Lace - YG21, 0
Basket - E31, E0000, E47
Bow - BV11, BV0000, BV17
Eggs - YG11, BV11, YR20

Monday, March 21, 2011

Card Art with Copics: Sweet Pea Stamps Fantasy Art

Fantasy images are so much fun to work with when creating card art.  Limitations and preconceived outcomes are lifted.  You can use any color combinations, to any degree, and your fantasy image will be perfectly acceptable.  Want to use blue hair?  Cool.  Want green lips?  That works.  Want to see a moon in the daylight?  That's awesome.  Want to play with your Copic Fluorescent shades?  Fantasy art images are perfect for that too.

Having this much fun is probably illegal somewhere.  I've been playing with this Red Hearts image by Ching-Chou Kuik.  Her fantasy art images are amazing, have been licensed by Sweet Pea Stamps and are also available through Crafts and Me.

Here's a view of the Red Hearts image that I've filled using Copic markers . . .


The Crafts and Me Challenge blog is currently running a photo inspiration challenge and asks for texture to be included.  (Find more about the challenge here.)  Sweet Pea Stamps is offering a $20 gift card to a random entry of this challenge.  In celebration of the challenge's one year anniversary, a separate random entry will win eight Crafts and Me digital images!

Using Copic's Opaque White paint for highlights in an image adds texture.  If you were to gently rub the surface of my image, you'd feel the slightly raised areas where the Opaque White has been added.  I'm really happy with the way her hair appears white and still shows shaded areas.  I love the way the white dots and highlighted streaks appear so super white, even though that white is covering very dark Copic colors in some places.  (You can find more about how I use Copic's Opaque White on one of my earlier posts here.)

I really don't want anything to take away from this image being the focal point of the card.  A few Bazzill Basics Bachelor flowers with McGill branch punches make a simple embellishment.  A little glimmer is in place using Creative Impressions White Glimmer Round Fasteners and some painted Diamond Stickles.


This quote is included with Ching-Chou Kuik's stamp set . . .


Here's a view of the completed card front showing my use of Copic brights to coordinate with the photo inspiration of the Crafts and Me Challenge with extra texture added using Copic Opaque White.


Escape your day-to-day pressures and enter the realm of color through fantasy art.

Sweet Pea Stamps has a challenge blog called "In A Sweet Pea Dream." They're offering a $7 gift card to a random entry for their current "use pink" challenge.  Find that challenge here.


Crafts & Me


"Top 3" Designer March 29, 2011 Crafts and Me


Copics used:
hair - C0, C1, C3, C4, W5, Opaque White
skin - E000, E01, E11, E93
eyes - B06, B02, B0000, C0, C1
dress bottom/gloves - B21, B26, B29
dress top/wings - RV14, RV19, RV23
circle background - B21, B0000, RV23, RV0000, C2, C00, 0
airbrushed background - C3, YR02, G02, Y02

Sunday, March 20, 2011

Card Art with Copics: Sugar Nellie's Satchel Nellie

Sugar Nellie is a small Scottish Stamp Company that sells an assortment of wonderful images by a few select stamp artists.  Operating since 2007, Sugar Nellie may have become best known to the stamping community for the Eveline Wikberg signature designs of Nellie and Luca.

While looking through the multitude of images available through Sugar Nellie, I found this lovely yet very humbling image of Satchel Nellie.  Satchel Nellie is a limited edition re-issue of an old favorite image by Eveline.

Those of you who know me may instantly recognize my association to this Satchel Nellie image.  I wear the long strap of my handbag over one shoulder too.  LOL!!!  So, you see, I just had to have this image . . .  On occasion, I find it very amusing to make an association between an image and the person who uses the image.  The association I imagine may not always be correct but it can still be very funny.  Sometimes it's just outright hysterical.

I spent some time with Satchel Nellie and dressed her using some of the newest Copic colors.  Satchel Nellie was die cut using QuicKutz oval dies then matted on a Spellbinders Scalloped oval.  This photo shows the completed Satchel Nellie image . . .


A simple Sizzix 3-D flower with a few QuicKutz leaves provides a quick embellishment.


An Inkadinkado one word sentiment adhered with foam tape adds a nice greeting.


Bo Bunny's Shabby Princess Collection Spring Jewels Boho single-sided patterned paper adds some pretty Spring shades that are a bit brighter than the pastels more commonly used for Spring.  This photo shows the full card front of my Sugar Nellie Satchel Nellie Spring greeting card.


The Sugar Nellie Challenge Blog is called The Sugar Bowl.  The current sketch challenge is about Spring.  A random entry will be selected to win a goody box full of surprises.  You can find out more about the challenge here.

Copics used:
skin - E000, E01, E11, E93
hair - E11, E15, E19
coat - new RV63, new RV66, RV69
skirt/socks - YG91, YG95, YG99
satchel/shoes - B91, B95, B97
outline shadow - E41, 0

Wednesday, March 16, 2011

Just Magnolia Challenge - Heartbreaker Edwin

The current sketch challenge over at the Just Magnolia and  hÄnglar & stÄnglar Challenge Blog involves using circles.  There are two prizes offered for this challenge:  a £10 voucher for Dies to Die For and a Stamping Set of Promarkers from Letraset.  Find out more about this challenge here.

I challenged myself a bit for making Magnolia Stamps Heartbreaker Edwin from the 2010 Raising the Ceiling Collection look like a heavenly angel dressed in white.


A set of tropical white flowers from Bazzill Basics and a 2.5" Imaginisce Flower Shower Now and Forever Collection with netting further support my heavenly theme.  Accent Depot Music Note brads align nicely with my background paper.


I used QuicKutz circles to die cut white and gold Bazzill cardstock.  This Maya Road Signed. Sealed. Delivered. sentiment flows beautifully here.


A bit of Creative Imaginations Marah Johnson cream music paper and a couple of punched corners continues my heavenly theme.  Here's the completed card that I'm entering for the Just Magnolia and  hÄnglar & stÄnglar Challenge using Bev's sketch.


So, what do you think?  Now that you see the card, in full context, when you look at the image of Edwin, do you think he's wearing the clothing of a heavenly angel or does he just look really dirty?  I can remember putting some of my children's socks through the laundry that looked like that.  LOL.

Copics used:
skin - E000, E01, E11, E93, W3
hair - E31, E34, E39
clothes - E41, W3, W5, 0

Tuesday, March 15, 2011

Copic Creations Challenge: Blues

The team over at Copic Creations is challenging Copic lovers to use their Copic "blues." Sugar Nellie is sponsoring this challenge and offering four of their stamps to the random winner of this challenge. Take a look at the stunning images that Sugar Nellie produces and distributes. Their stamp artists do show some very beautiful work. Find out more about this challenge and the sponsor here.

Blue is associated with stability and is said to symbolize loyalty, wisdom and sincerity. It produces a calming effect and is good for the body and mind.

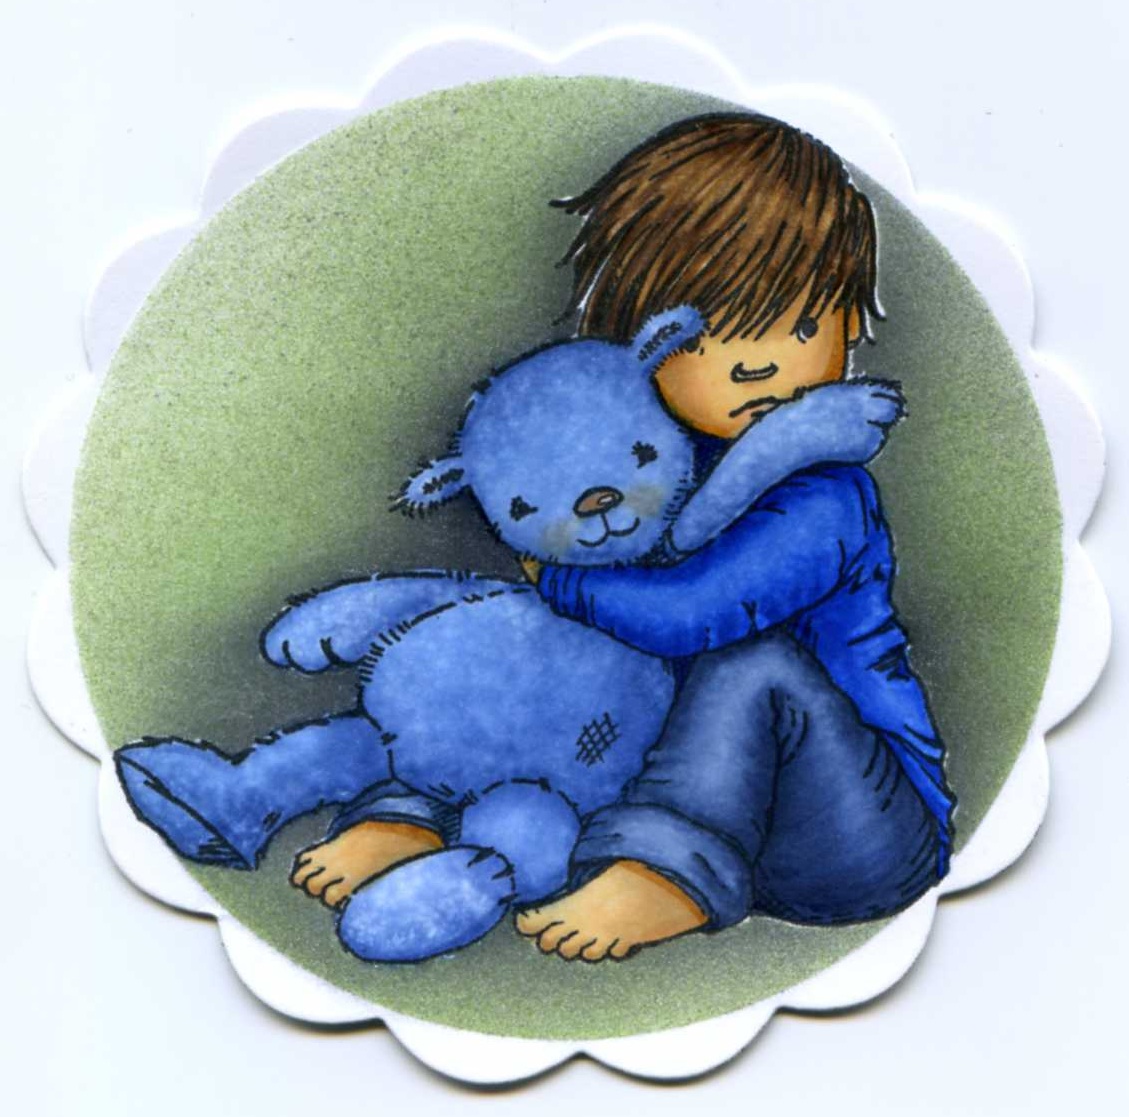
I was drawn to this 2010 Kathy Hare Sugar Nellie image named Worried. I found something touching about this little guy with his bear and this image seemed perfect for filling with "blues."


Once filled, this image still seemed a little flat to me . . . maybe more texture will help . . .

So, I covered my dried colored image with a negative mask and prepped it for a colorless blender technique. I crumbled a paper towel, spritzed the towel with a touch of colorless blender and touched it to the surface of my bear. Using colorless blender straight from the bottle can make it too wet so I like to spritz the solution from a mini spritzer.


Repeating that a few times really softened up the layers of color for my bear and gave him some wonderful texture . . .


Oops. I pounced a little too heavily with the colorless blender and wet the paper so much that my color seeped beyond the lines of my image. I plan to airbrush a background so I'm not worried about that right now. These bright blues can be tough to push back inside of the lines of the image so when I plan to keep the background white, I'm more careful and use more very light layers.

I used a QuicKutz scalloped circles die and die cut my image. Keeping that die in place, I masked my image and began airbrushing my background. I like the results best when I aim the spray directly over my mask and allow the overspray to add the color to my background. With the die and mask in place, I added a few spritzes from Ranger's Perfect Pearls Mists in perfect pearl to give some shimmer to the background. It sure doesn't look pretty at this stage . . .


Now for the big reveal . . . I love this part. It's like a wonderful surprise every time . . .


If my mask doesn't fit precisely over my image, resulting in a halo of white in places, sometimes I leave them alone and let them act as natural highlights. The only way to correct those areas is to very lightly (very, very lightly) stipple tiny dots of medium gray to cover that white.

This Top Line Creations genuine boy plaid paper seemed perfect for the outside of a fun Spinner Card. Magnolia's Doohickeys Bon Voyage Foliage and Shabby Chic White Garland added a simple border with some May Arts ribbon.

This sentiment is from a Hero Arts Woodland Creatures set . . .


Spin the wheel on the right to read this sentiment from another Hero Arts set . . .


Spin the wheel again to see one of my favorite Motivet sentiments . . .


Why not use your Copic "blues" to fill one of your favorite images? Enter this Copic Creations Challenge for a chance to win Sugar Nellie's fabulous prize.

Copics Used:
Skin - E50, E51, E53, R30
Hair - E31, E35, E47
Pants - B91, B95, B97
Shirt - B21, B24, B28
Bear - B41, B45, E95, 0
Airbrush - C5, G82
faux stitching - atyou Spica sky blue

Saturday, March 12, 2011

Card Art with Copics: Crafts and Me Creekside Magic

While perusing the Crafts and Me playground of stamped images, I came across this magnificent image by Molly Harrison.  Molly is a northern California artist that aspires to the world of fantasy.  I'm thrilled that she shares this Creekside Magic image in a rubberstamp and I just had to buy it.


I've stamped this image using Memento Tuxedo Black ink onto Bazzill Smooth White cardstock. This photo shows how the image looks filled with Copic colors . . .


Ahhh . . . but there's more.


I've used my Copics to add some deliberate streaking throughout the base and provided more ground depth.


Ooo . . . and there are so many things to do with backgrounds. It was tough to decide if I should airbrush using masks, add some simple outline shadows or leave the background white. I decided to play and used my lightest Copic colors to scribble and stipple. The color and texture of the background is oh so subtle.  Here's how it looks now . . .

I really do love working with my Copics!!!


I pulled together some Bazzill purple and teal and some Bo Bunny a gift of love Winter Joy Bundled to form a layered easel card.  I used Copic atyou Spica in Lavender for faux stitching.  Tropical purple mini brads by Creative Impressions adorn the corners.  A bit of 5/8" teal satin ribbon provides a slight border.


I adhered my Creekside Magic image slightly to the right side so I could add a border of fun embellishments.  Some Prima Sugar Plum Roses in eggplant, a berry vine, McGill fern punches, Martha Stewart's butterfly punches and a QuicKutz revolution flourish are playing to her left.  Diamond Stickles are thinly painted over border accents.


This photo shows the card front . . .


I've added a "Believe" sentiment from Prickley Pear and an "anything is possible" sentiment from The Rubber Cafe.


Here's a view of my completed easel card using Molly Harrison's Creekside Magic rubberstamped image by Crafts and Me.


You can find an Under the Sea challenge at the Crafts and Me Challenge Blog here.


Crafts & Me  


"Top 3" Designer March 22, 2011 Crafts and Me


Copics used:
skin - E000, E01, E11, E93
hair - E53, E57, E59
rocks - W00, W1, W3, W5, W7
water - B95, B91, BG0000
reeds - G82, G85, G99, YG11, YG13, YG17
flowers - BV000, BV00, BV11
open flower - Y000, Y00, Y11, YR12, R37
breast cover, fin - Y11, Y13, Y17, Y38
mermaid tail - BG70, BG72, BG78
grasshopper - BV02, Y02
butterflies - B02, BG02, Y02, YR02, R02, BV02
background - scribbling with all 0000's and stippling with colorless blender

Tuesday, March 8, 2011

Simple Card Art with Die Cuts

Sometimes I need a card for an unexpected occasion and I just don't have enough time to prepare something very detailed and elaborate.  Using die cuts to embellish a die cut card is a quick and easy method for resolving such a dilemma.  Choose neutral colored papers (less thinking is best!), run them through the die cutting machine and adhere.  Ink it up if there's time.  Add a sentiment and some shimmer.  Done.

I've used Bazzill cardstock in tan and brown and a piece of doodlebug design 1939 bon bon chenille cardstock to create this very simple card using mostly die cuts.

One of the last items that I purchased from QuicKutz (now operated by a company known as Lifestyle Crafts) was their Special Delivery limited edition gift set.  The set contains cookie cutter dies for cards, borders and mats, labels and tabs and some exclusive shapes;

like this little bird . . .

and these flowers to layer . . .


This lovely Helen Keller quote is from a 2010 Close To My Heart Spring stamp set . . .


In just a short time, I put together this simple card ready to tuck into a gift bag for someone special . . .


Next time you have a need for a quick and simple card, consider creating a card using die cuts.

Friday, March 4, 2011

Zentangle-inspired Sizzix Big Shot Pro Square Box with Lid

I liked my Zentangle-inspired Sizzix Big Shot Pro Pillow Purse (here) so much that I thought I'd try something similar using the Sizzix Big Shot Pro Square Box with Lid die.

For this project, I printed my previously scanned Zentangle-inspired art on both sides of plain white cardstock.  (Now that I've refreshed my ink cartridges, my printer is happy again and this time it did what I asked it to do - LOL!!!)

Here's the outside of my little box . . .


. . . and here's the inside!


Having all of those tangles on the inside of the lid and box bottom makes me happy . . . it looks just like I thought it would.

This tangle-patterned box needs few embellishments so I just wrapped some sparkly Beaux Regards Melody 3/8" Black Jack ribbon around the lid, including the inside.  A few McGill branches punched out of Bazzill Bling in white and black added a light filler for my rolled ribbon rose.  Studio112 self-adhesive pearls helped to dress up this box top:


It'll make a beautiful party favor for any occasion.

This Sizzix Big Shot Pro Square Box with Lid is just 2 1/4" x 2 1/4" x 2 1/4" so I can't fit anything very large inside.  It may hold some type of jewelry . . . Hmmm.

Tuesday, March 1, 2011

Copic Creations Challenge: Complementary Colors (and a Give Away)

The team over at Copic Creations is currently challenging Copic lovers to use their Copic “complementary colors.” Crafts and Me is sponsoring this challenge and offering 4 digi images as a prize to the random winner of this challenge. Find out more about this challenge and sponsor here.

Complementary colors provide great contrast to each other, making their opposite colors appear brighter and bringing out the best in each other. Purples vs. Yellows; Blues vs. Oranges; Reds vs. Greens. Complementary colors look good together and make the people that are looking at them feel good.

. . . I must interrupt this blog post for a very exciting message . . .

I’ve been invited to join the “crafting goddesses” of the Copic Creations Challenges Design Team! I’m so excited, I could just pee my pants!!! I have been admiring the magnificent work of these fabulous and very talented Copic artists for quite some time and I feel so privileged to join them in their Copic adventures.

To celebrate this momentous occasion, I feel the need to share my happiness by giving something away. How’s a set of 4 Copic Sketch markers sound? In medium Skin Tones? With duplicate practice images on Neenah Classic Crest Solar White cardstock.  And a few sheets of blank X-Press It paper with a Memento Dew Drop ink pad thrown in for good measure. Ooo, I’ll include a set of Layers of Color Flowering Gems clear stamps too. A Magnolia Dancing Party Tilda makes a cool celebration prize.  Ooo! and some Prima Flowers in Fairytale Roses Baby Pink!  That sounds like a fun prize package to me . . .


Ahhh, to whom shall I send my blog Give Away? Hmmm. How about a few ways for chances to win?

     1. Leave a comment on this post telling me why you love Copics.
     2. Help spread the word about Copic Creations by adding the Give Away photo with a link to this
         post to your blog roll (include a link to your blog in a separate comment on this post so I can check
         it out!)
     3. Followers of my blog get another chance to win my Give Away.

I’ll draw a random winner for my blog Give Away on March 15th and post the results here shortly afterward.

* * * * *
edited on 3/15/11 5:16pm to add:

And the Winner of my blog Give Away is . . .

ChickieChirps said...
Congratulations Rose!
Love your wee fairy tea party card! She's so sweet and the colours look great!
I LOVE my copics... they're just the best marker in the world... they have such a fantastic colour range and they blend so beautifully and they just add that extra something to stamping.
Arabella

Please send me a note to let me know the address of where I should send your prize package.

Thanks everyone for dropping by and participating in my blog Give Away.  Come back soon! ~ Rose

* * * * *

. . . Now back to the regular blog post . . .

Crafts and Me graciously provided this “Tea for Two” Digital Stamp by Sara Burrier for me to demonstrate using Copic’s “complementary colors” on one of their wonderful images. Since this pretty little fairy is having a tea party in the great outdoors with her well-loved little bear, I used tones of Red to complement the tones of Green.

This photo shows the image mostly filled with Copic reds and greens . . .


Here’s how the image looks after I airbrushed soft grass and sky (Gotta love that Copic airbrush system!) . . .

After adding a border made from punches, a sentiment from StampingScrapping and a little glitter, here’s the completed card front showing my use of Copic’s “complementary colors” . . .


You have until March 14th to submit your entry for this Copic Creations “complementary colors” Challenge. Hop over to the challenge blog (click here) for more “complementary colors” inspiration from the fantastic design team and enter your “complementary colors” card art for a chance to win the cool prize from Crafts and Me . . .


Copics used:
skin - E000, E00, YR00, R20
bear/mushroom dots - RV23, RV25, RV29
bear blanket - E47, E31
dress/socks/hair flowers - R22, R29, R59
wings - RV23, RV14, RV19; YG11, YG13, YG17
teapot/cups - Y13, Y26, Y28
tablecloth - E40, E41
hair/mushrooms - E31, E35, E47
mushroom, middle - G82, G85, G99
mushroom, left - G21, G24, G29
mushroom, right - G12, G14, G17
left mushroom dots - YG11, YG13, YG17
airbrush - G82, G85; B41, B91