Why Rosie's Book?

While growing up, I had a dear friend, Renee, that lived next door and with whom I spent much of my childhood. We grew, in different directions, and went on our merry way. Many years later, I ran into her parents and they kindly reminded me of the laughs they still have over my book. “What book?” I wondered with a puzzled look. "I don't remember a book." Hardy laughter accompanied their response. At some time during our childhood, I tried to convince Renee about something that her parents didn’t agree with. I told her that proof of its truth could be found “in my book.” Naturally she went home and tried to convince her parents of the same thing but they weren’t falling for it. She needed an edge and told them emphatically, “It’s in Rosie’s book!” After they caught their breaths from reborn laughter, they let me know how “Rosie’s book” has been cited for many other things throughout the years. They’ve also mentioned that they’d like to see “Rosie’s book” one day. I can’t remember all of the things that I said were in “my book” but I’m sure my dear friend’s parents can recall much more than I ever knew about – LOL!!! So, here it is . . . my version of things you might find In Rosie’s Book . . .

Showing posts with label The Tube by SRM Press. Show all posts

Tuesday, November 20, 2012

Display Stand for The Tube with KennyK's Troublemaker

I came across one of the 7" clear plastic tubes made by SRM Press that I've had stashed away.  I also had the makings of a naked chipboard display stand that I made quite a while ago just for this tube.  (You can find more details about how I made this display stand here.)


I quickly added Copic colors to a fun KennyK image named Troublemaker.  I adhered her to a layer of gray cardstock then fussy cut around the image.  I covered her with a layer of Glossy Accents for fabulous shine.


While the Glossy Accents layer over the Troublemaker was drying, I began to add layers of TPC Studio Winter Whites Winter Wonderland, Let It Snow and Snowflake Stripe papers to my naked chipboard display stand.

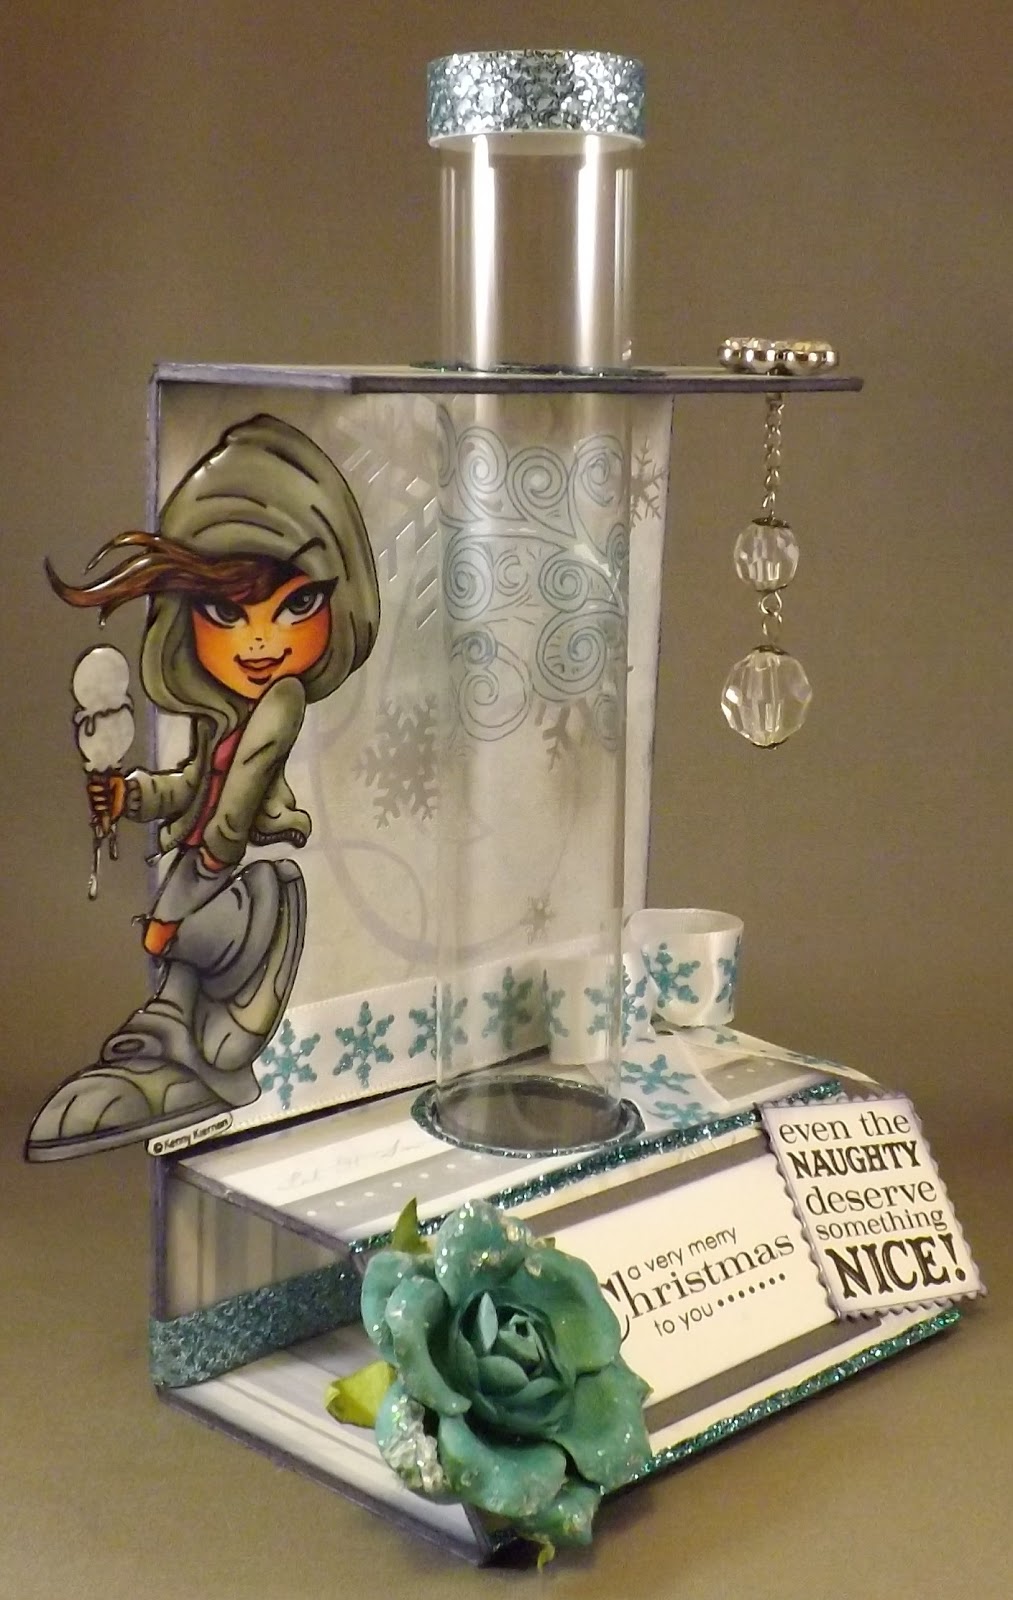
The top ledge has plenty of room to hang things from.  I've used Tim Holtz' idea-ology Baubles with some chain attached to a Bazzill Buttons Vintage Elizabeth button.  I added Art Warehouse Vibe Designs Impress-ons swirls to the Tube itself.  Gorgeous 3/8" glittered blue ribbon accents the pull top of the tube.


The folded base of the display stand has plenty of room for embellishments.  I used Fiskars Postage Stamp scissors to cut a Stampin' Up! sentiment from their Tags Til Christmas set then layered it over a sentiment from their More Merry Messages set.  A beautiful Prima Sweet Teal Tea Rose that's already covered with dew drops adorns one side of my base.  Some Aqua Stickles fills the space between the chipboard folds.  Wonderful 5/8" glittered snowflake ribbon accents the background.


This photo shows the completed Display Stand for The Tube as decorated for someone naughty . . .


I'm tempted to fill the inside of The Tube with mini marshmallows and identify it with an added tag marked "snowman poop" . . .

This view of the back of the stand shows why I adhered my colored image to gray cardstock before fussy cutting.  The bit that hangs over the edge shows a silhouette rather than the back of the colored image.


I'm entering this Display Stand for the Tube into the following challenges:
Kenny K's Krafty Krew "Sassy Christmas" (here)
Hooked on Crafts "Christmas - No Red/Green" (here)
Bunny Zoe's Crafts "Winter" (here)
Tuesday Alchemy "Anything but a Card" (here)
Ladybug Crafts Ink "Snowflakes" (here)
Creative Card Crew "Anything Goes" (here)
Charisma Cardz "Keep Your Cool - Cool Colors" (here)
Winter Wonderland "Oh Baubles" (here)
One Stop Craft "Monochrome Tones" (here)
All Sorts "It's A Gift" (here)


* * * * *


Copics used:
skin - E000, E01, E11, E93, BV00
hair - E31, E35, E47
jacket - BG90, BG93, BG96, BG99
shirt - R81, R83, R85, R89
pants, snowcone - C1, C3, C5

"Top 5" Nov. 23, 2012 Allsorts of Challenges


I'm so glad that you stopped by to visit!

~ Rose

Tuesday, May 31, 2011

Display Stand for The Tube

The Scrappers Cove in Milltown, NJ, sells wonderful clear plastic tubes made by SRM Press.  I brought a 7" tall tube home and thought about making a pretty display stand for the tube to use as a favor for a baby shower or any other event for that matter.

I found a cool display put together last October by Ellen Hutson at the CLASSroom here.  Ellen's Hocus Pocus Test Tube Treat Holder makes a nice Halloween display for a smaller tube.  Inspired by her spooky tube holder, I began putting together a more dainty version.

I used Grafix Medium Weight Chipboard and had to add 1 1/2" to the top.  I held the chipboard pieces together using basic masking tape on both sides.  Masking Tape is strong and flexible and can withstand regular handling.  I thought it best to make three the first time, you know, just in case I messed up so badly then I'd have another ready to try again - LOL!!!

I used my Zutter Kutter to score through one side of the chipboard piece in several places.

I needed a 1 1/4" circle cut out of the chipboard for the tube to slide through.  I don't have any punches that will cut nicely through chipboard.  I don't have any single circle die cuts that I could easily fit through my die cut machines.  Hmmm.  I might have to break a sweat for this project - LOL!!!  I had to use the smallest of my Creative Memories circle cutters with the green blade to score through the top layer of the chipboard and finish the circles with an xacto knife.  That part was not so much fun but definitely worth it!  Here's how my naked chipboard looks now . . .


So far, so good - LOL!!!

I used Ranger's Distress Ink in Worn Lipstick to ink the fold areas and edges on both sides.


That ink coordinates well with My Mind's Eye Market Street "Princess" Princess Crowns and Lovely Lady Paper that I plan to decorate my Display Stand with.  I tried to adhere one full sheet then create the folds and found that the paper shifted so I adjusted and used smaller paper pieces to fit just the panels between the folds.  Here's how the inside of the Display Stand looks now . . .


I used a pencil to mark the placement of my circle on the wrong side of the patterned paper and cut the circles before adhering those papers.  Here's how the outside of the Display Stand is covered . . .


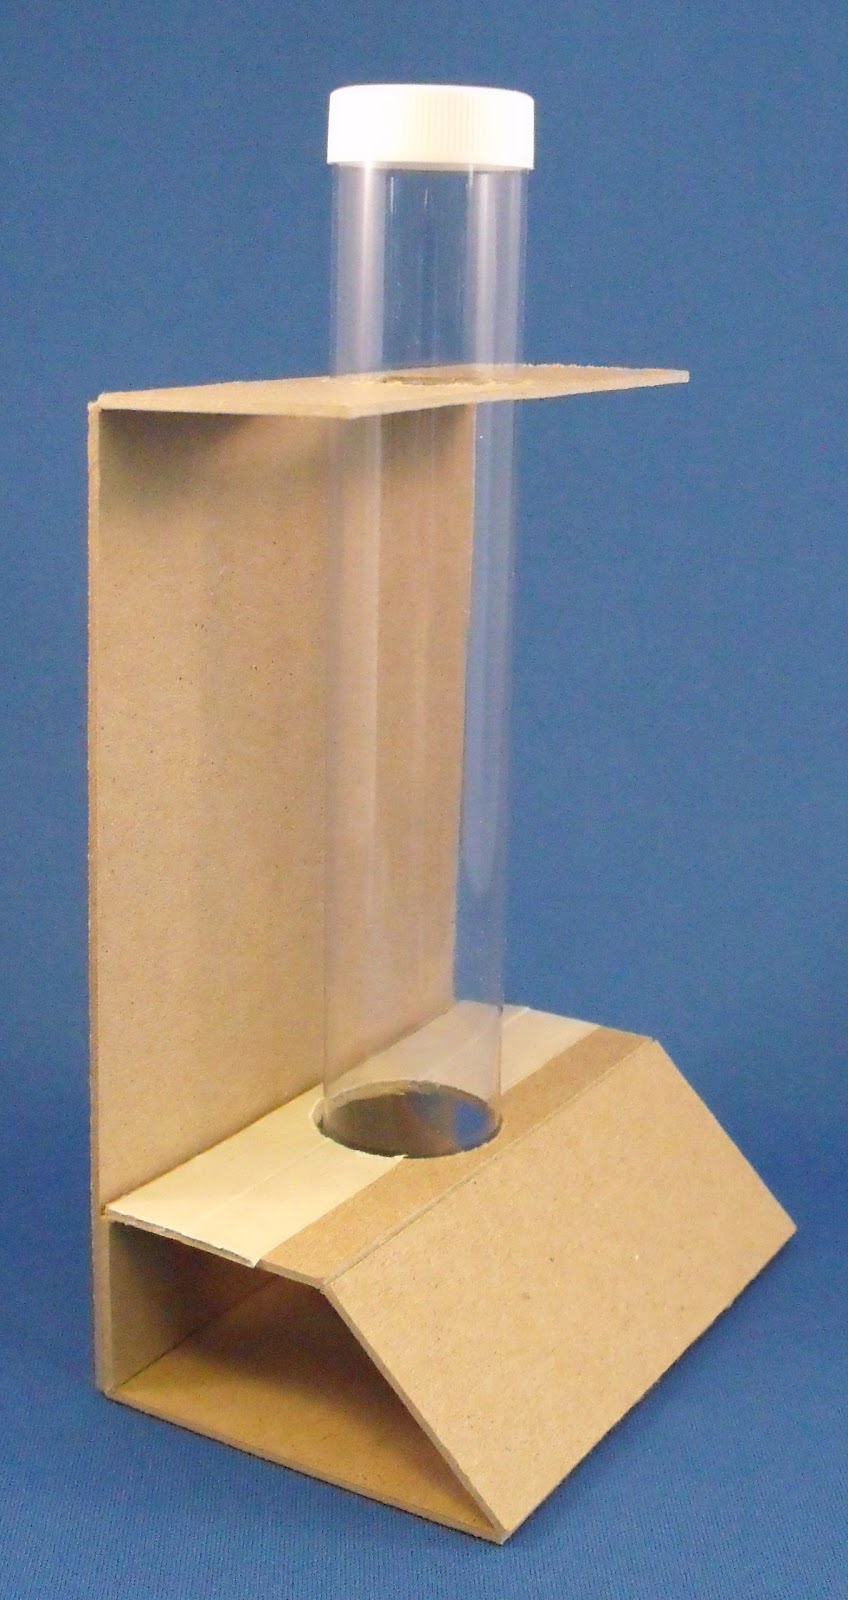
Three small pieces of 1" wonder tape secures the folded bottom to the back for the base.  Now my Display Stand for the Tube is ready for embellishing - Woo Hoo!!!  This shot of a naked chipboard display stand may help you to see how it's folded and adhered.


The top ledge has plenty of room to hang things from.  I've used Tim Holtz' Baubles with some wire attached to a My Mind's Eye Lost and Found Madison Avenue "Sisters" button.  I added a patch of K&Company Smitten Ornaments rub-on lace to the Tube itself.


The folded base of the display stand has plenty of room for embellishments.  I used an Autumn Leaves Greetings Rub-on, and white paper blooms that I airbrushed with Copic markers R12, R20, R32 and R37, then painted with Diamond Stickles.  Some Fruit Punch Stickles fills the space between the chipboard folds.


This photo shows the completed Display Stand for The Tube as decorated for a Baby Princess . . .


I'm off to find something wonderful to put inside The Tube . . .

Ooo!  Cool!  I have two more Display Stands for The Tube ready to be dressed!!!