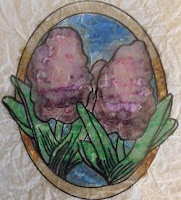
Here’s a fun and very cool way to create the look of stained glass using your Copic markers. The mottled texture combined with the shiny surface and vibrant colors of Copics, creates a nice depth and dimension for any project. It’s really very simple and so pretty.
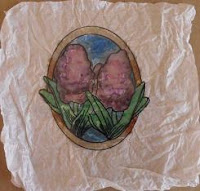
1. Stamp an open image onto the front of a transparency using Staz-On ink. (I used Make an Impression, Inc.’s Hyacinth stamp.)
2. Scribble directly onto the back of transparency using markers. Don’t worry about streaks here. They actually add to the beauty of the final piece. (I used B28, B37, G05, G09, V05, V17, V99, E55 and E57.) When I use this image again, I will be sure to add more splotches and streaks to the flowers and sky!
3. Cover the back colored area of the transparency with glossy accents. Squiggle the glossy accents over the whole image. Don’t touch the tip of the bottle to the transparency as it may move color and create white spots. It’s ok if some small areas are not covered. You’ll see why. When I use this image again, I will be sure to add more swirls with my glossy accents rather than just squiggles.
4. Cut a piece of white gift wrap tissue paper to a size that’s a little larger than your image. Crumble the tissue paper into a ball. The more creases and folds, the better the results. Open and reshape your tissue paper without flattening it or removing wrinkles.
5. On a non-stick craft sheet, cover the glossy accents with reshaped tissue paper. Just let the tissue paper rest on top of the glossy accents to ensure the whole image area is covered with tissue paper. Press tissue paper, gently but firmly, into glossy accents. Do NOT drag or push paper as that will remove color and possibly tear tissue paper. Don’t overwork it. It’s ok if some white tissue paper doesn’t absorb the glossy accents. We can fix that later.
6. Now, go away. For an hour. LOL!!! No peeking. No touching. Keep tissue side up on non-stick mat to dry.
7. When dry, cut around the line of your image or just trim excess tissue paper from around edges using scissors.
8. Adhere to your project area using glossy accents. If you have any areas where the white tissue paper hasn’t absorbed the glossy accents, make sure you add some to the back of those areas when adhering the piece to your project. If possible, I like to place a heavy object, like a book or glass mat, over the transparency to help it to dry flat without warping my cardstock base.
Here’s a picture of my finished project with this piece. I just added a simple stamped sentiment and a thin strip of ribbon for a simple, quick and easy card.
Here’s another example of this technique shown during my recent canvas tag art class. The transparency was first die cut using one of T!m’s labels. The twin tulip stamp is from Stacy’s Stamps. The whole background was filled using Copic marker B06.
This is one way of achieving the look of stained glass on a clear, smooth surface. Try this technique using colors from many color families for an even more beautiful effect.
Subscribe to:
Post Comments (Atom)













2 comments:
Great Tutorial Rose, very well explained, and I have done this technique quite a few times and I love how it comes out. Think I will go make a card now using this, with one of my new Hero Arts stamps!!
Have a great weekend!!!
Donna
When I post my card I will link back to your tutorial so everyone can see how it is done!! If and when I blog, I will link this to it also.
I've got all the stuff to try this. Love your site.
Post a Comment