The Scrappers Cove in Milltown, NJ, has done it again! The owners of my favorite local scrapbook store have started a monthly card kit to help satisfy the papercrafting needs of their card making customers. Participants pay just $5 for a package containing products selected by the store then submit their completed card(s) for a chance to win a $25 gift certificate to be used at the Scrappers Cove. Completed cards are due by the 15th and a winner is randomly selected each month.
Participating in challenges this way is a fun and inexpensive way to try products and combinations that you might not normally choose on your own.
My kit contained Ruby Rock-It The Summerhouse Glow double-sided patterned paper, Bazzill cardstock in tan and dark teal, 4 buttons, Inkadinkado pelican clear stamp set, Memento Dew Drop Potters Clay, and a satin/sheer ribbon.
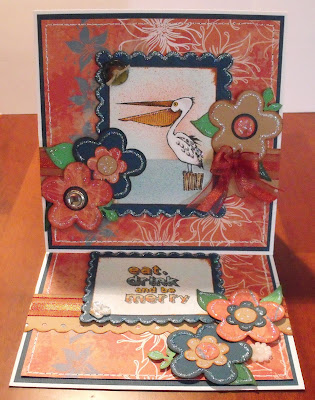
As soon as I saw these products, I thought I’d give my best shot at creating one of those lovely European-styled 6x6”ish cards that I admire so much. Here’s the easel card that I completed using the products from this card kit:
Easel cards are relatively easy to make considering how difficult they first appear to be and the magnificent impact of displaying them. While this is a 6x6”ish size, the same process applies to any sized easel card. (See my trashcan bear easel card here.)
Using a 12”x6” paper, score it at 6” and again at 3”. The 6” area becomes the inside base of your card. Fold the 3” score mark toward the inside base and it becomes the easel. Here’s a pic of how it’ll look:
Adhere a 6” square to the bottom inside half of the folded easel for your card front. Here’s a pic of how it’ll look:
Now that your 6” easel card is formed, you have a massive area to cover with all of the layers, images, embellishments and bling that your little heart desires. Your card front and inside base will both show when using the easel to display your card art. This card also folds flat for ease in giving.
One very important thing to remember for proper placement is that something near the top third of your inside base has to be “popped up.” That’s the crucial element that keeps your card front from sliding forward and sort of locks it in place for display. You can use foam or 3d glue dots to pop-up sentiments. A button or other embellishment with height will also work.
If you haven’t tried this card making style yet, what are you waiting for? Go for it! You’ll be so glad that you did.
Subscribe to:
Post Comments (Atom)














2 comments:
This is one of the most beautiful cards I've seen in a long time!
I've never made an easel card but you've made me want to try it.
Thanks so much for sharing your talent with us.
Debbie
Beautiful work again! These colors are gorgeous together and I love easel cards!
Hugs
Jodi =)
Post a Comment