Why Rosie's Book?

While growing up, I had a dear friend, Renee, that lived next door and with whom I spent much of my childhood. We grew, in different directions, and went on our merry way. Many years later, I ran into her parents and they kindly reminded me of the laughs they still have over my book. “What book?” I wondered with a puzzled look. "I don't remember a book." Hardy laughter accompanied their response. At some time during our childhood, I tried to convince Renee about something that her parents didn’t agree with. I told her that proof of its truth could be found “in my book.” Naturally she went home and tried to convince her parents of the same thing but they weren’t falling for it. She needed an edge and told them emphatically, “It’s in Rosie’s book!” After they caught their breaths from reborn laughter, they let me know how “Rosie’s book” has been cited for many other things throughout the years. They’ve also mentioned that they’d like to see “Rosie’s book” one day. I can’t remember all of the things that I said were in “my book” but I’m sure my dear friend’s parents can recall much more than I ever knew about – LOL!!! So, here it is . . . my version of things you might find In Rosie’s Book . . .

Friday, December 30, 2011

My 2011 Blog Year in Review

Karin over at With an "i" For Paper is hosting a Year in Review Blog Hop and offering a $25 gift certificate and another for $15 to randomly selected entries.  What a fun way to highlight some favorite projects or events from the past year.

Click Above Photo to enter


2011 has been an important growing year for me with my blog.  I began the year as a newbie blogger and in the past 12 months, I think I've progressed to at least a slightly-experienced blogger. I've been inspired and encouraged by so many amazingly talented artists.  As I look back through the year, I see how my blog posts show that my papercrafting interests have changed a bit as I'm more likely to skip scrapbooking layouts in favor of card making or other gift giving projects.  I've included some of my major blogging/crafting events below.  These are some things that changed the way I post blog entries or create my projects.

In January of 2011, I invested in a Sizzix Big Shot Pro die cutting machine and with just a few dies I developed an interest in enhancing die cut projects with embellishments.  Here's an example of one of my first Pillow Purses:


In February, I entered my first sketch challenge using Lady Tilda on a card.  I learned how following a good card sketch can help to unblock creativity and get the juices flowing again.


I was thrilled to accept an invitation to join the Copic Goddesses design team at the Copic Creations Challenge blog in March and held my first blog give away.  I was introduced to the fabulous fantasy images at Crafts and Me Stamps (Yay!!!). I also had a project published in Magnolia Ink's magazine!


April brought more experimenting with card shapes and styles.  I also posted a photo that was successfully taken under a black light, showing my Copic Fluorescent-filled image on a card:


In May, I had to find a way to add Copic clouds to my images and so began experimenting.  I've used this technique on many of my cards since.


In June I added my first real guy card and held my second blog give away . . .


I was overjoyed to accept an invitation to join the Dynamite Digi design team at Crafts and Me Stamps and began entering my projects into multiple challenges in July.  I also added my first 2011 Christmas card.


I spent quite a bit of time with Spellbinders Labels One dies and in August I posted ten examples.  I also gained my 100th follower!


I dabbled in the Steampunk trend in September . . .


In October, I found Elisabeth Bell's World Challenge blog (Yay!!!).  I also posted various ways to use Spellbinders Labels Two.


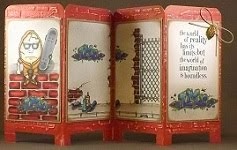
I was thrilled to accept my first guest design team assignment at Elisabeth Bell's World Challenge in November.


Adding multi-textures to this multi-layered Christmas card was a fun way to spend some time in December . . .


Oh, it's been a fabulous year in papercrafting, alright.  After looking through all the photos and my posts, I understand better why my dear non-blogging husband, when seeing me with my camera or at the laptop after 7pm, is compelled to ask, "Whaddaya have a blogger tonite?"

Thank you all for your kind words, encouragement, and inspiration.  I am ever grateful.

Here's wishing you a happy and healthy New Year that's overflowing with all good things!

Monday, December 26, 2011

Card Art with Copics: Elisabeth Bell's Sitty with Teddy (Front)

This sweet little lady is named Sitty with Teddy (Front) and she was designed by Elisabeth Bell for Sweet Pea Stamps.

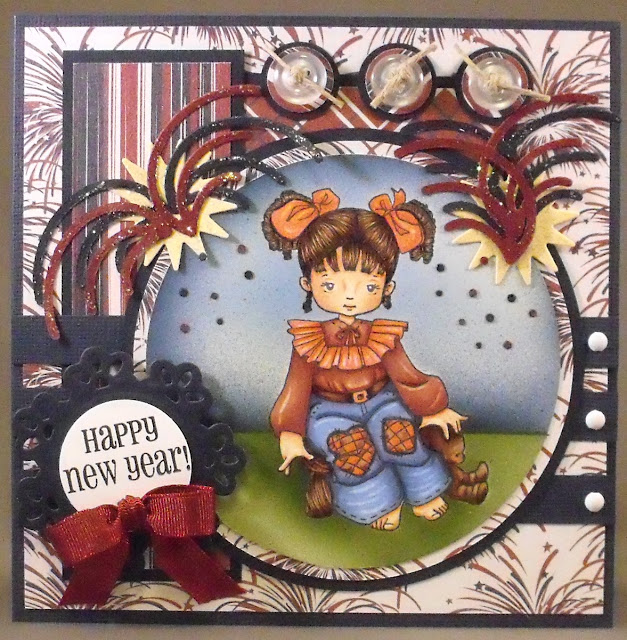
I attempted to select my Copic colors to fill Sitty with Teddy so that she'd coordinate with some older Reminisce Firework Collection patterned paper.  This photo shows a closer view of my version of Sitty with Teddy beginning her New Year celebrations with a firework display . . .


I've layered blue cardstock with Fireworks Extravaganza, Stars and Stripes and Picnic Plaid from Reminisce's Freedom Collection.  A few circle punches hold buttons tied with twine.


A Spellbinders Floral Doily Motif nicely displays my Close To My Heart Say It In Style "happy new year!" sentiment lightly adorned with a simple ribbon bow.


A couple of die cut QuicKutz Cannon Blasts, painted with Diamond Stickles, add more layers to the fireworks display.  Here's my completed card front showcasing Sitty with Teddy wishing everyone a very "Happy New Year!"


I'm entering this card into the following challenges:
Sketch Saturday "Sketch by Jo" (here)
One Sweet Challenge Just for Fun "New Year" (here)
ElisBell's World Challenge "Tic Tac To" (here) [buttons, brads, ribbon]
Charisma Cardz "Anything Goes" (here)
Totally Paper Crafts "Time to Party" (here)
Stampin' for the Weekend "Anything Goes" (here)
Delicious Doodles "Anything Goes" (here)
Crafty Emma's "Party, Party, Party" (here)
Paper Sundaes "Celebrate" (here)
Southern Girls "Let's Celebrate" (here)


Copics used:
skin - E000, E01, E11, E93
hair,belt, seat, bear - E31, E35, E47
jeans - B32, B34, B39
top - E13, E17, E19
bows, collar - Y04, Y07, Y09, final sweep with R22
airbrushed background - G99, B21, Y13, B99


"Top 3" Jan. 7, 2012 Crafty Emma's Store

Thursday, December 22, 2011

Card Art with Copics: Elisabeth Bell's Standing Pretty

Elisabeth Bell designed this lovely little lady for Sweet Pea Stamps and they've named her Standing Pretty.

Here's my Copic-filled version:


I've attempted to dress her in Christmas colors to match the Little Yellow Bicycle Christmas Magic Collection patterned paper.  A bit of Copic's atyou Spica in Garnet helps to frame my card with faux stitching.

I've used Copic E47 and E35 to lightly airbrush a few white Prima paper flowers.  I've added a brown ribbon flower and a couple of yarn pompom flowers to their centers.


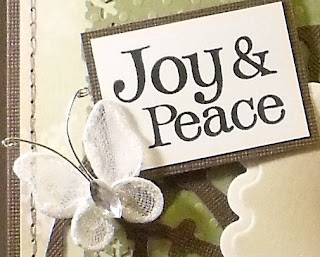
A sweet wire-formed butterfly adorns the sentiment from a Hero Arts Clear Design December set.


One side of my Bo Bonny Double Dots layer is bordered with an EK Success Dimension Punch Carnation and the other side shows a border made with EK Success' Snowflake punch. Tim Holtz' Alterations Sizzix Weathered Clock die cut provides my circular element.

Here's the completed card front showing my version of Sweet Pea Stamps' Standing Pretty image by Elisabeth Bell:


I'm entering this card into the following challenges:
Elisabeth Bell's World Challenge "Sketch by Lynda" (here)
Belles 'n Whistles "Warm Earth Colors" (here)
One Sweet Challenge Dec Week 1 "Christmas with Non-Christmas Themed Image" (here)
One Stitch at a Time "Anything Goes" (here)
Papertake Weekly "Christmas" (here)
Creative Inspirations "Anything Goes" (here)
Flutterby Wednesdays "Open" (here)
Charisma Cardz "Anything Goes" (here)
Crafty Purple Frog "Christmas" (here)

Copics used:
skin - E000, E01, E11, E93
hair - E31, E35, E47
dress - YG91, YG95, YG99
dress trim, hair bow - R43, R46, R59
airbrushed background - Y00, YG91, W1, W3, W5


Dec. 25, 2011 Elisabeth Bell's World


"Top 3" Jan. 16, 2012 Belles 'n Whistles

Sunday, December 18, 2011

Gift Project with Sizzix Big Shot Pro Match Box

I've enjoyed using my Copic colors to fill one of the recently released Elisabeth Bell rubberstamp images for Sweet Pea Stamps named Music Box.  Here's a close up view of my image.


I used a Spellbinders scalloped rectangle to frame her then adhered her to the top of my die cut match box.  Sizzix makes several great project dies for use with their Big Shot Pro machine.  Their Match Box die cuts two parts:  the outside wrap and the inside slider.  I quickly ran a piece of Quick Quotes Oh Lovely double-sided paper through the die cut system and within minutes my match box base was ready for embellishing.  I've attached a Tim Holtz idea-ology Hitch Fastener to each side of the slider piece to act as drawer openers.  I included some jewelry box fluff inside to create a nice bed for my gift to lie in.  Here's a view of how my match box slides open:


This finished Sizzix Big Shot Pro Match Box is 3 5/8" x 5 1/4" x 1 1/8". The insert slides out easily making it a nice container for including small gift items.

A bit of Prima lace and rose ribbon with some die cut Tim Holtz Alterations Sizzlits Festive Greenery flourishes borders my image.  A touch of Want2Scrap's Finesse Swirls in BrownR adds a sparkly edge.  A few Bo Bunny jewels in Timepiece act as berries to the three holly leaves also cut from the Festive Greenery die.

Here's a view of my completed gift project using the Sizzix Big Shot Pro Match Box die to showcase my Elisabeth Bell Sweet Pea Stamps Music Box image:


I have a small card holding Swarovski-like multi-colored crystals on a bracelet with matching earrings that will fit beautifully inside of this gift box.

I'm entering this gift project into the following challenges:
One Sweet Challenge "Christmas Ornament or Gift" (here)
Sweet Pea Stampers "Make a Gift" (here)
Stamp with Fun "Gift Wrapping" (here)
Ooh La La Creations "Anything but a Card" (here)
Hooked on Crafts "Christmas" (here)
Anything Goes "Anything but a Card" (here)
Divas by Design "Merry Christmas!" (here)
Paper Play "Christmas" (here)
One Stop Craft "Christmas Sparkle" (here)
Dream Valley "Christmas" (here)

The Elisabeth Bell Digi Bells design team is hosting a blog hop through Dec. 30th.  I'm also entering this Christmas project there for a chance to win Elisabeth's new Littlest Angel digi image.

Copics used:
skin - E000, E01, E11, E93
hair - E31, E35, E47
dress - R43, R46, R59
pillow - YG91, YG95, YG99
music box - Y13, Y26, Y28
airbrushed background - Y00, YG91, W1, W3, W5

Wednesday, December 14, 2011

Crafts and Me Challenge: Christmas

The Digi Design Team over at the Crafts and Me Stamps challenge blog wants to see your Christmas creations.  Crafts and Me Stamps is sponsoring this challenge and offering THREE digi images as a prize to a randomly selected entry.  You can find out more about this challenge here.

I've enjoyed working with this lovely Angel Rays digi image by Sara Burrier.  This photo shows a closer view of my Copic-filled image. I used Copic Opaque White acrylic paint to add the falling snowflakes.


This image is loaded with texture!  Check out the white Liquid Applique' that I applied over the furry parts of her coat and hat.  After it dried, I applied heat to make it puffy.


Adding Martha Stewart's chunky snow glitter provided a fabulous, realistic snowy ground . . .


My card base is layered with Bo Bunny's Snowfall "Blizzard" glitter paper and Bazzill cardstock, some pieces punched with EK Success' large snowflake edger and snowflake border.  K&Company's Smitten adhesive paper ribbon adds a stunning border.

I adhered some sugar paper to chipboard then die cut a Sizzix Snowflake #2, a snowflake from Tim Holtz' Bigz Winter Wonderland die and Mini Snowflakes from Tim Holtz movers and shapers (to my great disappointment, I had alot of trouble releasing those from the die!).  A Recollections mulberry paper mini rose is centered in one of the large snowflakes.  The sentiment is from an older Stampin' Up! Best Yet set.  I've added faux stitching with a Copic atyou Spica in Chocolate.

Here's a photo of my card front that showcases Sara Burrier's Angel Rays image, available exclusively through Crafts and Me.


Hop over to the Crafts and Me Digi Challenge and enter your Christmas Creation!

I'm entering this card into the following challenges:
Sketch Saturday "Sketch by Jo" (here)
PaperCrafting Journey "Christmas" (here)
Emerald Faerie Garden "Christmas Non-Traditional" (here)
Crafty Purple Frog "It's Cold Outside" (here)
Winter Wonderland "Let it Snow" (here)
Stampin' for the Weekend "Christmas" (here)
Delicious Doodles "X-travagent Xmas" (here)
Totally Gorjuss "Let it Snow" (here)
Creative Craft "Real or Faux Stitching" (here)
Sweet Stamps "Chipboard" (here)


Copics used:
skin - E000, E01, E11, E93
hair, trees - E31, E35, E47
coat, boots - E55, E57, E59
hat, scarf, gloves - BG70, BG72, BG75, BG78
dress - N1, N4, N6
wings - E50, E53, E55
houses - E50, E53, E55, N1, N4, N6, BG70, BG72, BG75, BG78
outline shadow, windows - Y00
background - B99

Monday, December 12, 2011

Card Art with Copics: Elisabeth Bell's Little Curls

I had more fun playing with this Little Curls image, designed by Elisabeth Bell for Sweet Pea Stamps.  She's dressed well for Spring and Autumn and could possibly be used for indoor Summer and Winter scenes too.  I thought it would be fun to try to show her indoors in a Christmas scene.

With that in mind, the first thing I had to figure out was how to have her appear indoors.  I decided to use my QuicKutz Santa's Workshop 3-panel die to create a picture window in the center of my card front.

Then I used Copic colors to fill my Little Curls image.  This scanned image shows how she looks alone  . . .


I adhered this Copic-filled image behind my window.  To cover the normal Copic bleed through, I covered the inside of my card with colored cardstock, leaving a little border of the original card color.

While she was sitting alone, inside of the window, I let my eye wander to her little outstretched toe and thought of what it would be like if she were sitting near a Christmas present and how she wouldn't be able to stand not touching it.  I can almost hear a parent hollaring from the other room, "Don't touch that present!"  Then, as any little girl might do, she yells back, "I'm not touching it!"  Because, after all, her toe isn't touching it, at the moment - LOL!!!

So, I die cut a present using a QuicKutz gift die and added Diamond Stickles for lots of giftie sparkle.

That gift needs to be under a tree!  I cut a piece of the Tim Holtz Sizzix Bigz Pine Tree and placed it in the corner of the window making sure it appeared inside of the window only.

I had the perfect sentiment for my Don't Touch That! scene.  The QuicKutz 2008 Jolly Set contains a "do not open..." clear stamp and a small ornament tag die cut.

I considered decorating the outside of the window but everything that came to my mind would cover too much of my Little Curls image and I really wanted her to be the focus.  The "merry christmas" die cut was also part of the QuicKutz Jolly set and fit nicely across the bottom of the card front.

This photo gives a clear view of my latest Little Curls image, through a window . . .


I'm entering this card into the following challenges:
Sweet Pea Stampers "Non-Traditional Christmas Colors" (here)
One Sweet Challenge Just For Fun "Tag! You're It" (here)
Belles 'n Whistles "Let's Sparkle" (here)
Crafty Creations "Card with a Sentiment" (here)
Monthly Copic Oz Challenge "Christmas" (here)
Craft Your Passion "Tag You're It!" (here)
Do You Stack Up? "Something Old" (here)
Divas by Design "Anything Goes" (here)


Copics used:
skin - E000, E01, E11, E93
hair - E31, E35, E47
clothes - B91, B95, B97, YR21, YR04, YR07
airbrushed background - E35, E37, W3, Y00

Thursday, December 8, 2011

Zentangle-Diecut Fusion

I've had a sudden need for small gift packages to hold smallish items that are easy for gift giving.  I wanted these packages to be attractive too.  I think that a handmade item is always wonderful to share, especially when I know that the recipient will appreciate the love and care put into creating it.

I have spent a great deal of time creating tangles that resulted in a piece of Zentangle-inspired wall art.  This framed artwork has become invaluable to me in so many ways.  I immediately felt the wonder of relaxation while tangling.  Seeing the progression of my artwork, by my own hands, was amazing to me.  Having completed a framable piece of artwork was incredibly satisfying.  This particular work continues to make me feel such accomplishment.

Again my wall art has come to the rescue.  I've scanned my Zentangle-inspired art work then printed it to both sides of a sheet of Bazzill Smooth cardstock.  Yes, this is my own pen and pencil to paper handwork and with the help of technology, as well as the Sizzix Big Shot Pro die cutting system, I've been able to create these small gift packages to meet my needs.

This photo shows my Zentangle-inspired matchbox.  I've added a strip of Bazzill Black bling to the match striking area.  A Tim Holtz alterations sizzlits rosette and Spellbinders flourish adorn the top.


Here's a view of my Zentangle-inspired carry all box.  The only embellishment needed was a bit of fun fur for the handle.


This photo shows my Zentangle-inspired candy-shaped box looking lovely with simple bows tied to each side . . .


Now I'm ready to add my little gifties!  Sweet and simple is good.

I encourage you to find a Certified Zentangle Teacher in your area and experience the wonder of Zentangle for yourself.

I'm entering one of these projects into the following challenges:
Cupcake Craft's "DIY Background Paper" (here)
Papertake Weekly "Anything Goes" (here)
Charisma Cardz "No Cards" (here)
Cute Card Thursday "Anything Goes" (here)
Moving Along With The Times "Last Minute Christmas" (here)
Creative Card Crew "Tis the Season" (here)

Sunday, December 4, 2011

Card Art with Copics: Kathleen and Summer by Hannah Lynn

I'm thrilled to introduce this beautiful and newly released Crafts and Me Stamps' digi image by Hannah Lynn named Kathleen and Summer.

This lovely mermaid is tenderly holding her dear little mermaid who is carrying her own little mermaid doll.  It seemed appropriate to make good use of some of the Copic Fluorescent colors for this under the sea image in objects like the seahorses, fish and coral.  I couldn't capture the cool effect of these fluorescent colors using a black light but in person it's really magnificent.  This photo shows a closer view of my Copic-filled image . . .


While working with this image, I couldn't help but think of the Highlights magazine and their Hidden Picture page where you had to search through the picture to find items hidden throughout.  At first glance, I only saw one dolphin then while coloring it, I found another.  I love the face included in the front of the wrecked ship.  There may be some items that I've missed as there is so much within this picture to enjoy.

I've layered Bo Bunny's Winter Joy Bundled and Dot with teal, purple and green Bazzill cardstock to create my card.  A Fiskars border punch mats my image.  A couple of Memory Box Madera Corners and an EK Success corner punch decorate my corners.  Several Close To My Heart Bitty Sparkles add some bling to my fancy corners.  Recollections Mulberry Paper Flowers with a satin ribbon create a nice corner cluster.

This is a photo of my completed card front where I've showcased the beautiful Kathleen and Summer image by Hannah Lynn . . .


I'm entering this card into the following challenges:
Anything Goes "Decorative or Altered Corners" (here)
Fab-n-Funky "Anything Goes" (here)
Divas by Design "Anything Goes" (here)
Creative Craft "Free for All" (here)
Crissy Armstrong's Monthly Challenge "Anything Goes" (here)
Charisma Cardz "Seeing Spots" (here)
One Stitch At A Time "Be Square" (here)


Copics used:
skin - E000, E01, E11, BV00, E93
hair - adult E31, E35, E47 child E51, E55, E57, Y13 doll Y13, Y26, Y28
sunken ship - E70, E74, E79
treasure chest - E31, E35, E47, W1, W3, Y13, Y26, Y28
message in a bottle - E35, E30, G00, 0
crab - R22, R24, R29, B29
starfish - E02, E04, E08
seahorses - FYG1, FYG2
dolphins - B91, B95, B97
shark - C1, C3, C5
tiger fish - FY1, FYR1
coral - FBG2, FB2, FV2, FY1, FYR1, FRV1
seasponges - E40, E42, E44
seaworms - RV23, RV14, RV19
seaweed - BG93, BG96, BG99
leaves - YG11, YG13, YG17
grass - BG70, BG72, BG75
plants, adult eyes - BG11, BG15, BG18
sand - E40, E41, E42
tail - adult BG70, BG72, BG75, BG78 child V04, V06, V09 doll YG11, YG13, YG17
water - BG000, BG01, 0
Opaque White


"Artist's Choice" Jan. 1, 2012 Sundays With Crissy
 
 
"Top 6" Dec. 14, 2011 Divas by Design


Wednesday, November 30, 2011

Crafts and Me Challenge: Pearls and Swirls

The Digi Design Team over at the Crafts and Me Stamps challenge blog wants to see your Pearls and Swirls.  Crafts and Me Stamps is sponsoring this challenge and offering THREE digi images as a prize to a randomly selected entry.  You can find out more about this challenge here.

I've used the soon-to-be-released digital image by Hannah Lynn called Christmas Miracle.  This lovely little angel floats among the clouds with a gentle little lamb while dreaming of a peaceful, white Christmas.  A touch of Flower Soft Vintage Christmas softens her headpiece and the bed that the lamb is lying over.  Here's a closer view of my Copic-filled image . . .


I've included an older Stampin' Up! Ski Slope designer paper when diecutting using my Sizzix Big Shot Pro Carry All Box Pro die.  This lovely gift container stands a little taller than 4 1/2", is about 3 1/4" wide and about 2 3/8" deep.  It'll make a sweet candy container too!

Before sealing the side and base of my Carry All Box, I used a QuicKutz Cookie Cutter set of circles to add a window to my box front.  A Memory Box Elegant Scrollwork, altered to fit, and a Prima Say It In Studs pearl-petalled flower adorn a corner of my box and image.  A few strands of EK Success Adornments Winter fibers decorate my box handle.

This photo shows my completed Sizzix Big Shot Pro Carry All Box showing Hannah Lynn's Christmas Miracle . . .


I'm entering this snowy white Christmas project into the following challenges:
Charisma Cardz "Snowflakes" (here)
Wags 'n Whiskers "Snow Angels" (here)
Delicious Doodles "Hairy Legs" (here)
One Stop Craft "Christmas Fairies" (here)
Crazy 4 Challenges "Snow" (here)
Daisy Doodles "Christmas" (here)
Creative Craft "Free For All" (here)
Craft Your Passion "Tis the Season" (here)
Hooked on Crafts "Winter Wonderland" (here)
Simon Says Stamp! "Anything Goes" (here)


Copics used:
skin - E000, E01, E11, E93
hair - E31, E35, E47
gown, bows - BG70, BG72, BG75
head band - YG13, R37
wings, sun - Y13, Y26, Y28
lamb - W3, W1, W00, E02, 0
clouds, halo - BG000, Y00, 0


"Top 3" Dec. 9, 2011 One Stop Craft

Sunday, November 27, 2011

Card Art with Copics: Fall Masquerade Fairy by Caron Vinson

Caron Vinson is an amazing artist who creates wonderful fantasy art and Sweet Pea Stamps carries a line of Caron Vinson's fairies and mermaids in rubberstamps.  I've used one of Caron's masquerade fairies for an autumn-colored thank you card.

This photo shows a closer view of my Fall Masquerade Fairy.  I've painted Diamond Stickles over her wings for added sparkle.


I've adhered a faux stitched matting of Best Creations sparkling patterned paper to my card made from Bazzill brown cardstock.  Creative Memories oval cutters helped to form my image shape.  A couple of Sizzix circle die cuts shape the background.  The sentiment is from Hero Arts.

A few holographic leaf stickers by American Greetings help to add some autumn sparkle to my card.


Here's a view of my full card front showing my use of Caron Vinson's Fall Masquerade Fairy by Sweet Pea Stamps.


I'm entering this card into the following challenges:
Sketch Saturday "Sketch by Jo" (here)
Sweet Pea Stampers "Sticker Shock" (here)
In A Sweet Pea Dream "Thankful using Fall Colors" (here)
Crafty Creations "Thanks/Gratitude" (here)
Flutterby Wednesdays "Open" (here)
PaperPlay "Being Thankful" (here)
Totally Gorjuss "Sparkle" (here)
Dream Valley "Sparkle" (here)


Copics used:
skin - E000, E01, E11, BV00, E93
hair - E31, E35, E47
wings - Y13, Y26, Y28
top - YG61, YG63, YG67
skirt - YR20, YR23, YR24
dotted background - YR20, YG61, Y26, 0